
Integrating Byteful with DICloak Antidetect Browser

No matter how perfect your browser is at protecting your data, it usually isn’t always enough. With the way technology keeps improving, hackers will surely find new ways to target unsuspecting victims. Therefore, it’s best to go the extra mile to secure your online presence.
We recommend using the state-of-the-art DICloak anti-detect browser with our very own reliable proxies. Regardless of your needs, Byteful has the right proxy solutions, including static residential ISP, rotating residential, and datacenter. In this article, we’ll provide a guide for integrating a Byteful’ proxy with DICloak.
What is DICloak?
DiCloak is a must-have anti-detect browser that offers a lot to its users. Not only can users mask their IP address, they can also avoid geo-restrictions. DICloak works on Chrome's core, modifying your online fingerprints and ensuring anonymity.
Aside from its features, this browser comes with a user-friendly interface for both its website and applications. While DICloak does work well on its own, when linked with Byteful’ rotating residential, it offers a more reliable connection.
Key Features of DICloak
Multiple Account Management
With DICloak, users can create actual browser profiles for several accounts. Each of these is separated from each other, making it easier to operate several different accounts on a single PC.
Flexible Proxy Configuration
DICloak works well with different proxy products like Byteful’ static residential ISP, rotating residential, and datacenter. There is also the option to share the proxy credentials with other team members.
Create Real Fingerprint
Users can use DICloak to import multiple browser profiles in batches and also auto-generate browser fingerprints. This helps reduce the risk of bans on some websites.
Improved RPA Assisted Automation
DICloak offers several RPA templates, and also allows users to make customizations to the RPA scripts. With this automation, users get to improve productivity and save time and money.
Popular DICloak Use Cases
When combined with DICloak, Byteful has a lot to offer, especially in different industries. Here are some popular use cases:
Network Monitoring: IT professionals use Byteful’ static residential ISP with DICloak to monitor network performance and troubleshoot connectivity issues. They do this to identify bottlenecks and make sure the network is running fine.
Gaming: Every gamer wants the best possible experience; therefore, they use Byteful’ datacenter proxy to reduce latency and improve connection stability, even in regions with poor servers.
SEO and Web Scraping: Digital marketers and SEO experts use DICloak to gather data from search engines and websites without triggering anti-scraping mechanisms. Byteful’ rotating residential helps them avoid detection and bans.
Cybersecurity Testing: Many security analysts use Byteful’ datacenter proxy to simulate attacks and test the strength of firewalls.
E-Commerce: Online retailers are usually very worried when it comes to monitoring their competitors’ pricing and inventory levels. DICloak combined with Byteful allows them to access region-specific data without any restrictions.
How to Link DICloak With Byteful
There are two stages to linking DICloak with Byteful, with each of them having several steps to follow. In this section, we’ll provide, in detail, how to go about it.
Stage One
This stage shows a step-by-step guide on how to download and install the DICloak software on your PC. Here is what to do:
Step 1: Sign Up for an Account With DiCloak

Head to the official DICloak website and click on the “Sign In” button. This opens a new page with the “Sign Up” button. After clicking it, the platform will require the user to provide an email and password.
There is also the option to use a Google account to create an account with DiCloak. Then, before ticking the box, make sure to read the terms and conditions.
Step 2: Download the DICloak Software on Your PC

Go back to the DICloak homepage and click on the green “Download” button. On the next page, select the right software for the PC (either Windows or macOS). Wait for the download process to complete, then install the software.
Stage Two
For the other part of this process, we’ll provide a guide to get the proxy from Byteful and link it with the DiCloak browser. Follow the instructions below.
Step 1: Register or Login to Byteful

Load up the Byteful platform and register or log into your account. To sign up, the platform requires an email, full name, and password.
Step 2: Head to Residential Proxy Generator

After logging in, the dashboard page will be shown on the screen with a side menu bar. Click on the “Residential” button under the “My Proxies” section.
Step 3: Generate Proxies
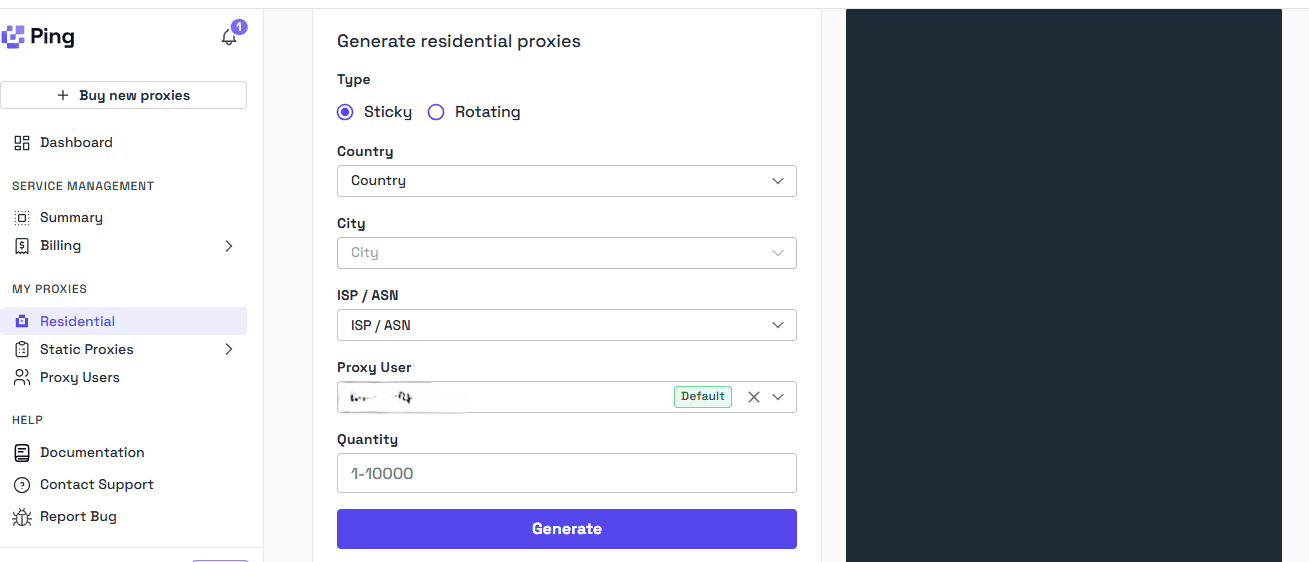
Select the preferred country and the city, and enter the number of proxies. Next, click the “Generate” button, then the platform will list them in the dark section. Each proxy will have a username, port, address, and password.
For example:
- Address/Host Name: residential.byteful.com
- Port: 1087
- Username/Account: dWDCX0kjHTEB2A0_c_IE_s_VSCOAYLIGV
- Password: Js6fgFJ1XQ
Step 4: Add and Set Them Up in the DiCloak Browser

After copying the proxy from Byteful, go to the DiCloak browser and log into your account. Next, click on the green “Create profile” button.

This takes you to a new page to set up the proxy. However, the first thing to do is to enter the preferred profile name.

Then, click on the “Proxy” option on the side menu. This moves the page to the proxy section, where the next thing to do is select the custom button and change the proxy type to “HTTPS”. Enter the proxy information from Byteful in their right boxes.
Step 5: Test Them

After entering the proxy details, click on the “Checking proxy” button to verify if the connection was successful. It will also show the information of the proxy as seen in the image above. Click on the confirm button to complete the profile and proxy setup.


To start browsing with the proxy, click on the “Open” button. This opens up a browser window with the confirmed proxy details. Just open a new tab and start browsing with better online protection.
Conclusion
DICloak combined with Byteful offers a comprehensive solution for enhanced online privacy and security. By following this simple integration guide, you can enjoy the benefits of anonymous browsing, multiple account management, and reliable connections across various use cases. Whether you're a marketer, gamer, security professional, or e-commerce business owner, this powerful combination provides the tools you need to navigate the internet safely and efficiently. Take control of your digital footprint today with DICloak and Byteful.