

Selenium is a powerful tool for dynamic web scraping or automation workflows. However, Selenium-based scrapers struggle with strict anti-bot measures, which can lead to IP blocking. This is where proxies with Selenium help.
In this scenario, proxies can help bypass rate limits and geo-restrictions by routing requests through multiple IPs in specified geo-locations.
In this guide, we will cover how you can integrate proxies into a Selenium script using different methods, where you can encounter different errors, and how to resolve them.
5 Working Methods To Add Proxies With Selenium
Selenium's native support for proxies is limited, especially for credential-authenticated proxies. However, several workarounds are available. The best approach to integrate proxies in Selenium depends on different factors like the proxy in use, authentication requirements, and the browser choice.
This section lists different ways to integrate proxies in Selenium and details the trade-offs to help you choose the best approach for your use case.
Method 1: Add a Proxy Without Authentication
Integrating a proxy in Selenium that doesn't require authentication is the easiest method.
Depending on your browser choice, the integration method can differ slightly. The following Python script demonstrates integration of unauthenticated proxies in Selenium for Chrome:
from selenium import webdriver
from selenium.webdriver.chrome.options import Options

# PROXY = "PROXYHOST:PORT"
PROXY = "98.159.44.0:61234"

options = Options()
options.add_argument(f"--proxy-server=http://{PROXY}")

# Selenium Manager handles the driver binary automatically out-of-the-box

driver = webdriver.Chrome(options=options)

try:
driver.get("https://api.ipify.org")
print(driver.find_element("tag name", "body").text)
finally:
driver.quit()
If you are using Selenium 4.6 or any later version, it comes with a built-in Selenium manager, which provides automated driver and browser management for Selenium. It is used by default and does not require any additional installation or configuration.
You can use pip show selenium to check the installed Selenium version and use pip install -U selenium to upgrade to the latest available version.
Once done, run the script. It will visit api.ipify.org through the integrated proxy and print the output on the command line. If the output matches the proxy’s IP, the proxy is integrated successfully.

If you need to use SOCKS5 proxies instead, you can use the same script above by changing the protocol mentioned in the –proxy-server flag:
options = Options()
options.add_argument(f"--proxy-server=socks5://{PROXY}")
Method 2: Use IP Whitelisting
When using a proxy that requires authentication, the script above won't work with the credentials. The Chrome browser blocks the “http://user:pass@host:port” URL form. In a headed session, Chrome responds to the proxy's 407 challenge with a login popup that Selenium can't interact with, and in headless mode, there's no dialog to show, so the request fails.
This has nothing to do with your script, but it's a common issue with an easy fix: whitelisting your IP address on the proxy provider’s dashboard. Many leading proxy providers like Byteful allow whitelisting IP addresses for their proxy services.
By doing so, the proxy server can authenticate your connection based on the whitelisted IP addresses, hence does not require credential authentication. This approach saves you the frustration of dealing with credentials.
After whitelisting your IP address, you can use the script provided earlier with no modifications, and it will work perfectly.
Method 3: Using Chrome DevTools Protocol (CDP)
Other than IP whitelisting, another reliable way of integrating credential-authenticated proxies in Selenium is via Chrome DevTools Protocol. The commonly found technique on the internet to handle credential authentication is building an in-memory Chrome extension. But that is not reliable anymore, as the latest Chrome versions do not support the “–load-extension” flag for workflows other than software testing environments.
The following script uses a Selenium Chrome driver, handling authentication via CDP:
import json
import threading

import requests # pip install requests
import websocket # pip install websocket-client
from selenium import webdriver
from selenium.webdriver.chrome.options import Options

class ChromeWithAuthProxy:
#Selenium Chrome driver that handles authenticated HTTP proxies via CDP.

def __init__(self, proxy_host, proxy_port, proxy_user, proxy_pass):
self.proxy_host = proxy_host
self.proxy_port = proxy_port
self.proxy_user = proxy_user
self.proxy_pass = proxy_pass
self._ws = None
self._cmd_id = 0
self._lock = threading.Lock()

def _cdp_send(self, method, params=None):
with self._lock:
self._cmd_id += 1
msg = {"id": self._cmd_id, "method": method}
if params is not None:
msg["params"] = params
self._ws.send(json.dumps(msg))

def _cdp_loop(self):
while True:
try:
msg = json.loads(self._ws.recv())
except Exception:
return
if msg.get("method") == "Fetch.authRequired":
self._cdp_send("Fetch.continueWithAuth", {
"requestId": msg["params"]["requestId"],
"authChallengeResponse": {
"response": "ProvideCredentials",
"username": self.proxy_user,
"password": self.proxy_pass,
},
})
elif msg.get("method") == "Fetch.requestPaused":
self._cdp_send("Fetch.continueRequest", {
"requestId": msg["params"]["requestId"],
})

def new_driver(self):
options = Options()
options.add_argument(f"--proxy-server=http://{self.proxy_host}:{self.proxy_port}")
options.add_argument("--remote-allow-origins=*") # allow our CDP websocket
driver = webdriver.Chrome(options=options)

# Open a CDP websocket to the page target and enable Fetch with auth handling.
debugger_address = driver.capabilities["goog:chromeOptions"]["debuggerAddress"]
targets = requests.get(f"http://{debugger_address}/json", timeout=10).json()
page_target = next(t for t in targets if t["type"] == "page")
self._ws = websocket.create_connection(page_target["webSocketDebuggerUrl"])
threading.Thread(target=self._cdp_loop, daemon=True).start()
self._cdp_send("Fetch.enable", {
"handleAuthRequests": True,
"patterns": [{"urlPattern": "*"}],
})
return driver

# Usage:
proxy = ChromeWithAuthProxy(
proxy_host="residential.byteful.com",
proxy_port=8848,
proxy_user="YOUR_PROXY_USERNAME",
proxy_pass="YOUR_PROXY_PASSWORD",
)
driver = proxy.new_driver()
driver.get("https://api.ipify.org")
print(driver.find_element("tag name", "body").text)
driver.quit()
This script works for both headless and non-headless Chrome, and the credentials are embedded within the script, so there is no need for any file on the disk to run this script. The --remote-allow-origins=* flag is required for Selenium to allow the local CDP WebSocket connection to be made successfully.
The script opens a CDP WebSocket, answers the proxy's authentication challenge, and loads “https://api.ipify.org”, printing the exit IP the site sees. If the script shows an IP that differs from yours, then that is a sign of successful proxy integration.
When using static proxies, the script output should match the proxy's IP exactly, while rotating residential gateways will show a different exit IP per session.

Method 4: Using SeleniumBase
To integrate proxies using SeleniumBase, you first need to install SeleniumBase:
pip install seleniumbaseSeleniumBase supports proxy integration through two primary methods: Via the Driver class, where proxy details are passed directly into the script, and via the BaseCase class, where proxy details are passed through your command in the command prompt.
The following script demonstrates the process of proxy integration in SeleniumBase via the Driver class:
from seleniumbase import Driver
from selenium.webdriver.common.by import By
import json

#specify your proxy details here along with the specific browser you want this script to use
driver = Driver(proxy="PROXY_USERNAME:[email protected]:61234", browser="edge")
driver.get("https://ipinfo.io/json")

body_text = driver.find_element(By.TAG_NAME, "body").text
location_info = json.loads(body_text)

for k, v in location_info.items():
print(f"{k}: {v}")

print(json.dumps(location_info, indent=2))
driver.quit()
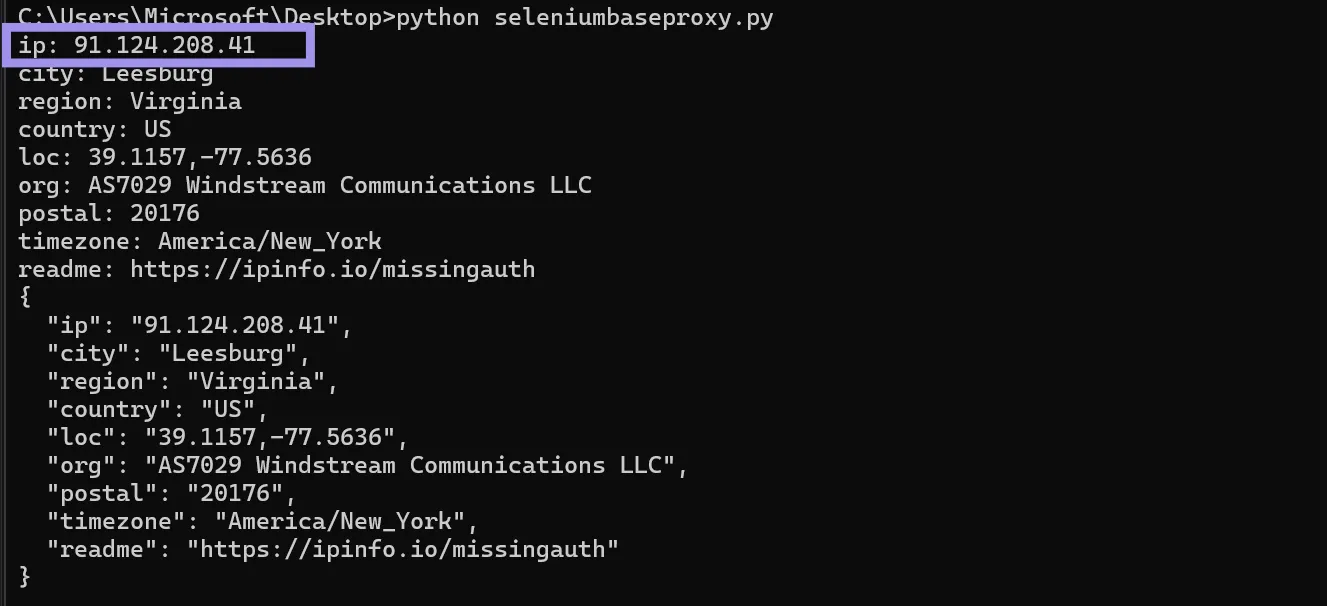
Running the script will print the output received from the endpoint mentioned in the code (https://ipinfo.io/json):
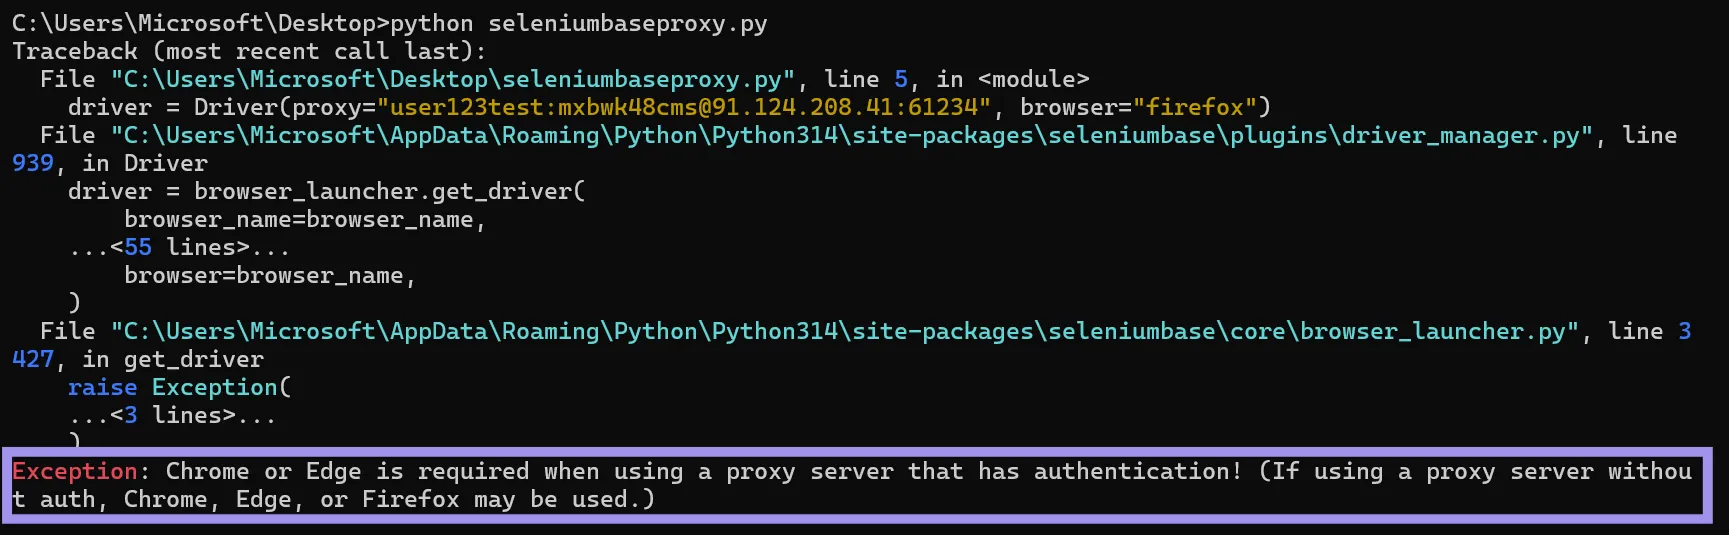
If you use credential-authenticated proxies, you will need to use either Chrome or Edge. Using Firefox in this case will throw an exception.
While Chrome and Edge both work with credential-authenticated proxies, Chrome 137 changed how extensions load, which temporarily broke SeleniumBase's proxy authentication as it relies on a generated browser extension. But this has been patched, so keep the library updated to prevent any issues.
To integrate proxies via the BaseCase class, the following script does the job:
from seleniumbase import BaseCase
from selenium.webdriver.common.by import By
import json

class ProxyTest(BaseCase):
def test_proxy(self):
#go to the site
self.driver.get("https://ipinfo.io/json")

#load the json response
location_info = json.loads(self.driver.find_element(By.TAG_NAME, "body").text)

#iterate through the dict and print its contents
for k,v in location_info.items():
print(f"{k}: {v}")
You can run this script using pytest while passing the proxy details and specific browser to use (via the --browser flag) in the command. If you don't pass the --browser flag, SeleniumBase defaults to Chrome:
pytest -s seleniumbaseproxy.py --proxy=91.124.208.41:61234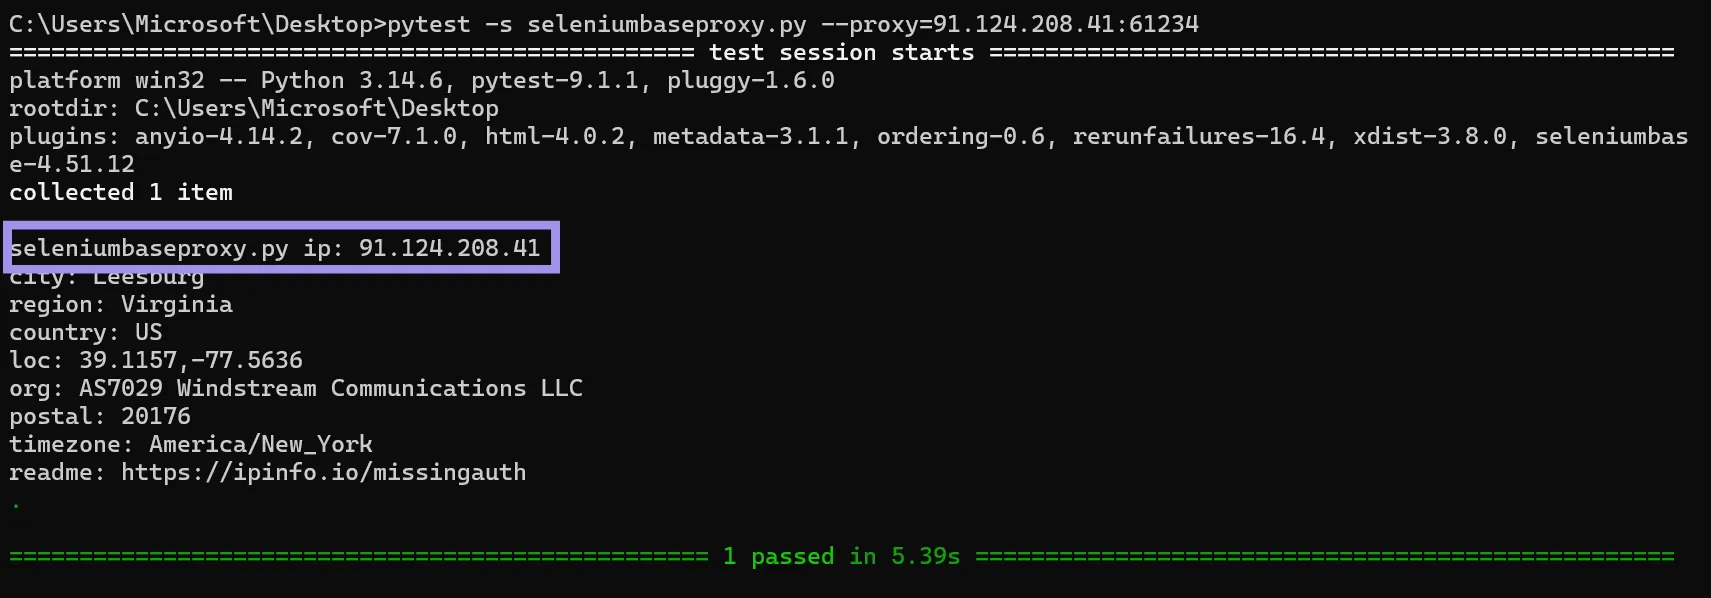
Using the -s flag displays output on the screen. Otherwise, the script will run, but the command line will not show any output.
Many older guides online also mention Selenium Wire for credential-authenticated proxies, but it no longer works as the project was archived in January 2024, and fresh installs now fail because its unpinned dependencies have moved on.
Method 5: The Selenium Proxy object
Integrating proxies in Selenium via the Proxy object is a portable approach and especially useful when you are using a browser other than Chrome.
To get started, create a Proxy object and set it to ProxyType.MANUAL. This lets you specify exactly which proxy handles which type of traffic.
from selenium import webdriver
from selenium.webdriver.edge.options import Options #change this line according to your browser choice
from selenium.webdriver.common.proxy import Proxy, ProxyType
from selenium.webdriver.common.by import By

proxy = Proxy()
proxy.proxy_type = ProxyType.MANUAL
proxy.http_proxy = "98.159.44.0:61234" #proxyhost:port
proxy.ssl_proxy = "98.159.44.0:61234"

options = Options()
options.proxy = proxy

driver = webdriver.Edge(options=options) #change this line according to your browser choice
driver.get("https://api.ipify.org")

# Print the page content
print(driver.find_element(By.TAG_NAME, "body").text)

driver.quit()
Here, you will need to set both HTTP and SSL proxies. If you only set the HTTP proxy, HTTPS traffic will bypass the proxy and leak your real IP address. Normally, you would configure the same proxy for both HTTP and SSL.
While using the Selenium Proxy object, you can also define a proxy bypass list via no_proxy. Any domains listed in no_proxy will bypass the proxy and route traffic through your real IP address.
proxy.no_proxy = ["domain1.com", "domain2.com"]When using Proxy Auto-Configuration (PAC), you will create a separate .pac file and host it somewhere (it can also be hosted on your local server with python -m http.server 8000) so it can be referenced in the script. In that .pac file, you will specify the logic of which proxy to use based on the URL being visited.
For test purposes, the following proxy.pac file specifies two different proxies for two different IP fetching endpoints:
function FindProxyForURL(url, host) {
if (shExpMatch(host, "ipinfo.io")) {
return "PROXY 98.159.44.0:61234"; //proxy1
}
if (shExpMatch(host, "api.ipify.org")) {
return "PROXY 91.124.208.41:61234"; //proxy2
}
return "DIRECT";
}
Here is the Python script that uses the locally hosted proxy.pac file as reference, visits the mentioned URLs, and prints back the results.
from selenium import webdriver
from selenium.webdriver.edge.options import Options
from selenium.webdriver.common.proxy import Proxy, ProxyType
from selenium.webdriver.common.by import By

proxy = Proxy()
proxy.proxy_type = ProxyType.PAC
proxy.proxy_autoconfig_url = "http://localhost:8000/proxy.pac"

options = Options()
options.proxy = proxy

driver = webdriver.Edge(options=options)

# Test URLs from the PAC file
driver.get("https://ipinfo.io/json") # Should use proxy1
print("Output from ipinfo.io:")
print(driver.find_element(By.TAG_NAME, "body").text)

driver.get("https://api.ipify.org") # Should use proxy2
print("Output from api.ipify.org")
print(driver.find_element(By.TAG_NAME, "body").text)

driver.quit()
When using a locally hosted server, make sure the proxy.pac is stored in the directory where you started the HTTP server, as that’s the directory being served. The script itself can live anywhere.
Running the script will print the results back to the command line after visiting both URLs using different proxies.
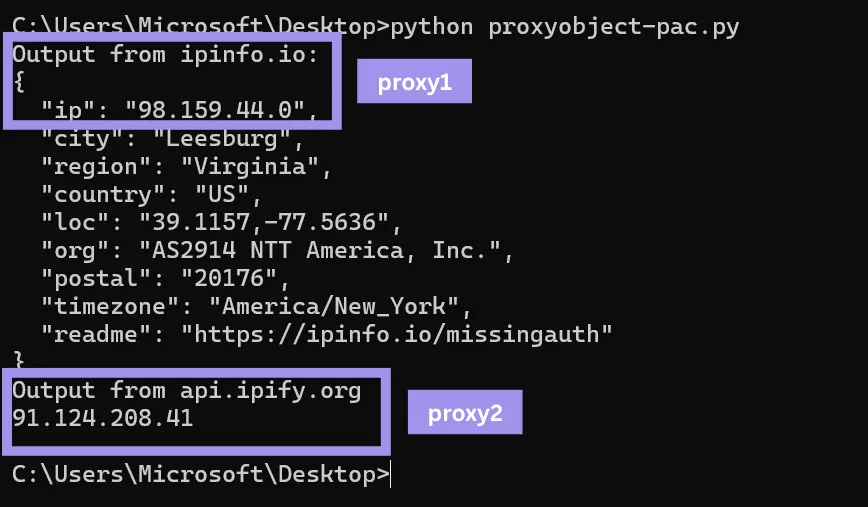
This approach is usually more helpful when multiple scripts use the same proxies. In that case, you do not have to specify the proxy details in each script separately. You can just create a .pac file with the proxy usage logic and use a reference to this file in all scripts.
Using Proxies in Other Browsers (Firefox)
When you need to use proxies with a browser other than Chrome, like Firefox, there are two approaches. One is using the Proxy object, as explained earlier, and the other is setting Firefox preferences directly.
When using the Proxy object, the previous script works perfectly fine when modified for Firefox:
from selenium import webdriver
from selenium.webdriver.firefox.options import Options
from selenium.webdriver.common.proxy import Proxy, ProxyType
from selenium.webdriver.common.by import By

proxy = Proxy()
proxy.proxy_type = ProxyType.MANUAL
proxy.http_proxy = "98.159.44.0:61234" #proxyhost:port
proxy.ssl_proxy = "98.159.44.0:61234"

options = Options()
options.proxy = proxy

driver = webdriver.Firefox(options=options)
driver.get("https://api.ipify.org")

# Print the page content
print(driver.find_element(By.TAG_NAME, "body").text)

driver.quit()
The Proxy object is cleaner and more portable across browsers, but set_preference() gives you access to Firefox-specific proxy settings if needed.
from selenium import webdriver
from selenium.webdriver.firefox.options import Options
from selenium.webdriver.common.by import By

options = Options()
options.set_preference("network.proxy.type", 1) # 1 = manual
options.set_preference("network.proxy.http", "PROXY_IP")
options.set_preference("network.proxy.http_port", PROXY_PORT)
options.set_preference("network.proxy.ssl", "PROXY_IP")
options.set_preference("network.proxy.ssl_port", PROXY_PORT)

driver = webdriver.Firefox(options=options)
driver.get("https://api.ipify.org")
print(driver.find_element(By.TAG_NAME, "body").text)
driver.quit()
But Firefox's proxy preferences have no username or password fields, so a credential-authenticated proxy will still trigger a login pop-up. When using a credential-authenticated proxy, use one of the methods discussed earlier or use IP whitelisting if your provider supports it.
Why Rotate Proxies for Selenium?
When you use Selenium with a single IP address, it can make your script look like automated activity to the target website and get you blocked. A significant number of requests from the same IP in a short interval can also trigger rate limits.
Rotating proxies in your Selenium script helps you avoid this problem by spreading the requests across multiple IP addresses and reduces your chances of getting blocked on the target.
How To Rotate Proxies?
When you create a driver with proxy details, that proxy is used for the whole session and can not be swapped mid-session. To encounter this problem, you could create a new driver per proxy, which will be inefficient. Or you can use an endpoint that rotates the proxy IP automatically without requiring anything from you.
Many leading proxy providers offer an endpoint that rotates the proxy IP address per request or after a set interval. This makes proxy rotation in the script efficient and requires no additional configuration.
Some proxy providers also let you specify the Time To Live (TTL) for the sticky proxies, which will keep your proxy IP consistent for the time duration you specify. But there can be a minimum and maximum limit of time you can specify for a sticky session.
Note: Since rotating endpoints are typically credential-authenticated, pair them with one of the previously discussed integration methods that support authentication.
Choosing the Right Proxy Type for Selenium
Each proxy type differs in the way it is sourced, routes traffic, and the cost. To use different proxy types effectively while staying on budget, you need to know what each type is for.
- Datacenter Proxies are usually the cheapest of all types and are sourced from datacenters. This sourcing makes them fast but easy to detect. These are best to use when speed is the priority, and the target has little to no restriction for datacenter IPs.
- Static residential ISP proxies are registered under the ASNs of real ISPs and are hosted in datacenters. That fusion of the way these are sourced and where they are hosted gives them datacenter speed with residential reputation. Use these proxies when speed and reputation are both concerns. These proxies can be effective against targets with moderate anti-bot detection, but struggle against stricter detection systems.
- Residential proxies route traffic through real home networks, making them hard to block, but they can be expensive. These proxies are more reliable to use when the target has a strict bot detection system, and the success rate takes priority over speed.
- Mobile Proxies are the hardest of all to get blocked, as mobile carriers use Carrier-Grade NAT (CGNAT) to place thousands of real users behind shared IP addresses, and blocking one IP means blocking legitimate customers along with it. These proxies can be a great choice for extremely protected targets or for testing mobile web experiences through carrier IPs.
Free proxies can also work for short, one-time use, but they're shared with many users, overused, and often already flagged by strict targets.
On the other hand, using a reputable proxy provider offers clean, fast proxies with a high success rate. Byteful’s ethically sourced proxies have the fastest mobile response time globally (0.48s), the fastest residential proxy response time (0.41s), and the best residential success rate (81.23%) against real-world targets. These numbers come from Proxyway's Proxy Market Research 2026, where they tested our proxies alongside 12 other well-known proxy providers.
You can also test our proxies with our no-credit-card 1 GB of free, non-expiring residential data. You can get the trial data after signing up on the dashboard and completing a short KYC. We KYC every user to keep malicious actors off our infrastructure and ensure everyone sharing the pool is a legitimate user, which translates to cleaner, less-abused IPs for every user.
Troubleshooting Common Proxy Setup Problems With Selenium
Integrating proxies with Selenium is not always a straightforward process, and you might face some errors. This section lists some of them along with their fixes:
- The exit IP didn’t change: This can happen if there is a typo in the proxy configuration, the correct scheme isn't specified, or your proxy is down. Test your proxy with a proxy tester like Byteful’s to make sure it's working. Once you confirm that, review your script to pinpoint any possible mistakes in the proxy configuration.
- 407 Proxy Authentication Required: This error might come up when authenticated proxies are not configured properly. To fix this issue, you can use IP whitelisting, the CDP method, or SeleniumBase's built-in authenticated proxy support.
- Loading HTTPS pages fail or leak actual IP: When working with HTTPS pages, you need to set the proxy both for HTTP and SSL. If you configured the proxy just for HTTP, then that can cause this problem and leak your real IP address.
- The page times out: A few reasons for timeouts in your script might be the slow speed of your proxy or your own network. To prevent this from happening, you can raise the value for “set_page_load_timeout” and can also configure retries.
