

Unlike Chrome and Edge, which use system-configured proxies, Firefox offers built-in proxy settings. This makes it a better choice if you're trying to use a proxy in a browser.
If you're trying to set up a proxy with Firefox for the first time, this guide will cover multiple approaches to configuring proxies in Firefox. You'll also learn how to prevent IP leaks, where a proxy can break, and how to fix it.
Firefox Proxy Setup: Which Method Should You Use?
You can configure proxies in Firefox in several ways. The following table gives a glimpse of each approach and what it offers; later sections cover the details.
| Configuration approaches | Scope | Best for |
|---|---|---|
| Manual proxy configuration | Applies to current Firefox profile | Using a separate proxy with Firefox without touching system settings. |
| IP whitelisting | Set on the provider's side, not in Firefox. Applies to any connection from your whitelisted IP | Skipping the repeated proxy authentication dialog. |
| Automatic configuration via URL | Current Firefox profile with rule-based routing | Rule-based traffic routing and centralized proxy management |
| Use a proxy management extension | Current Firefox profile, with different proxies per site, tab, or container | Fine-grained control over which proxy is used with which target. |
| Configuration in Firefox profile | Proxy configuration per profile | Keeping browsing data and proxy configuration separate per identity. |
| Via about:config page | Per-profile or system-wide configuration via policies.json | Power users, scripting, enterprise or automated deployment |
Method 1: Firefox’s built-in Manual proxy settings
This is what sets Firefox apart from other browsers: you can point Firefox at its own proxy without touching your system settings. Here's how to set a manual proxy in Firefox:
Step 1: Find the proxy settings in Firefox
1. From the 3-bar menu in the top-right corner of the Firefox window, go to Settings.
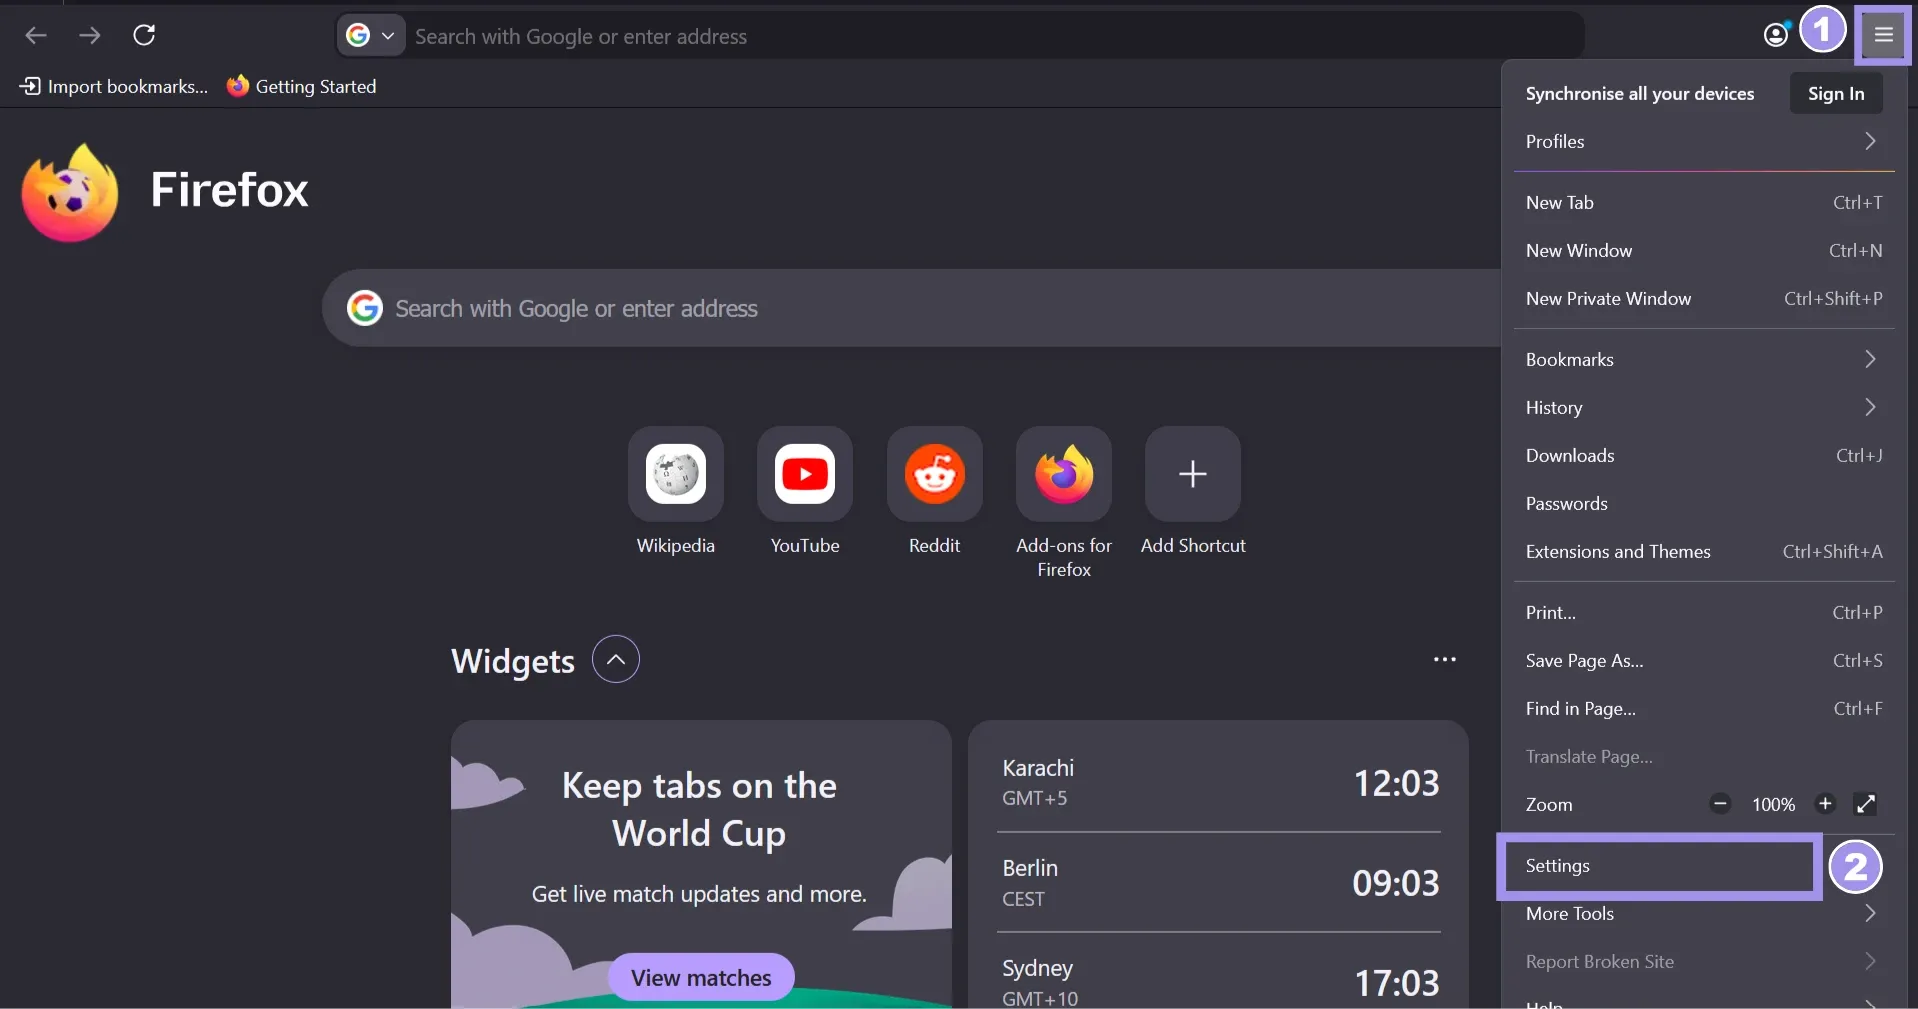
2. From the left-side menu, go to Privacy and Security. Scroll to the bottom, find Connection and software security, and click Advanced Settings.
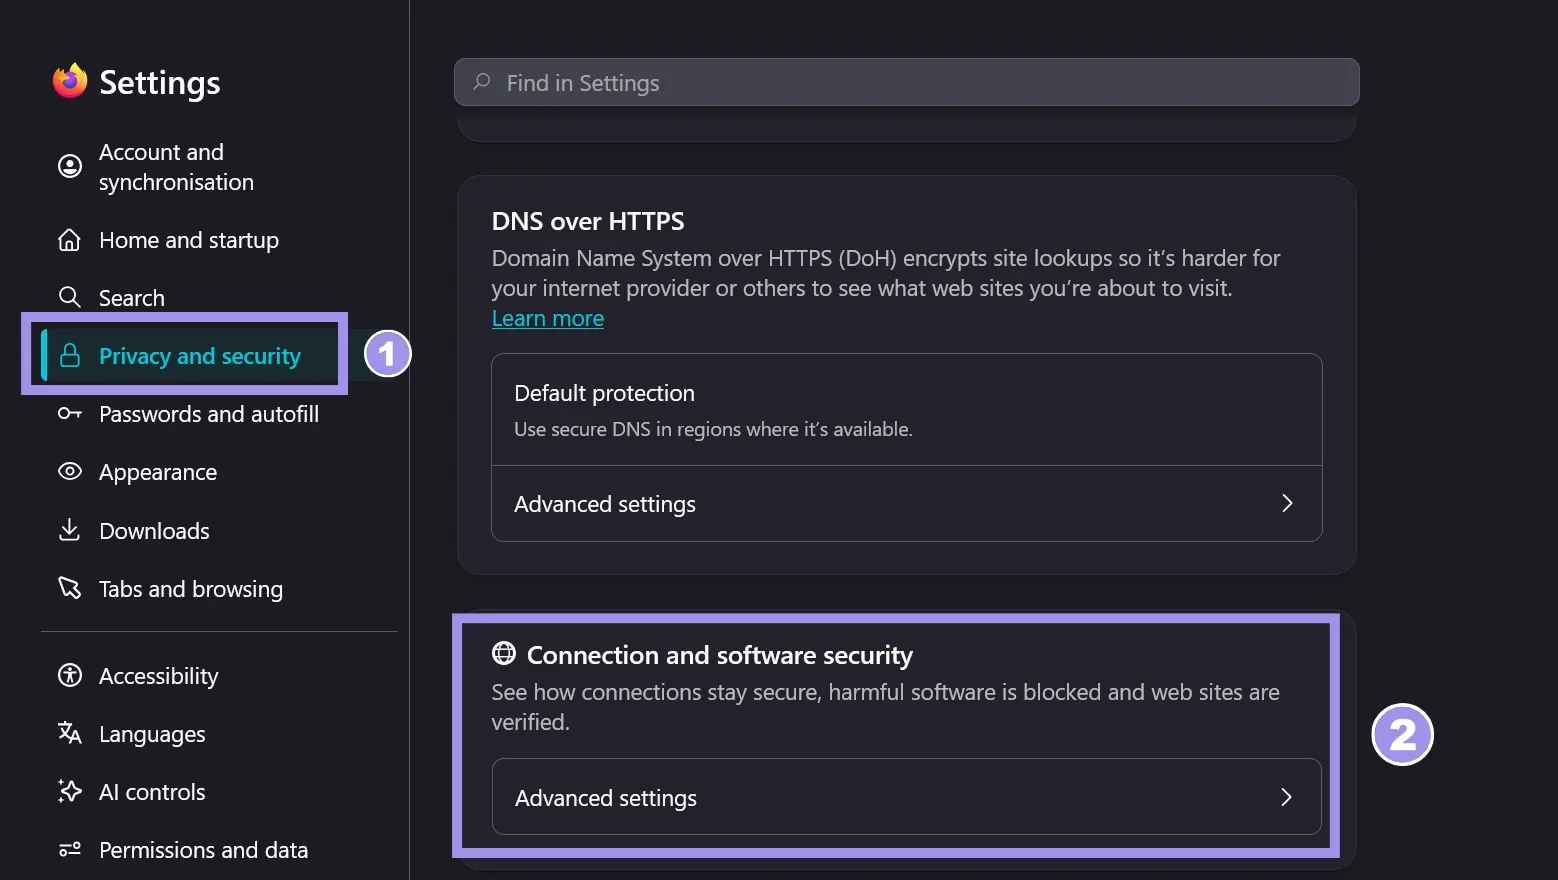
3. Now, scroll down to Proxy settings, then click Configure proxy.
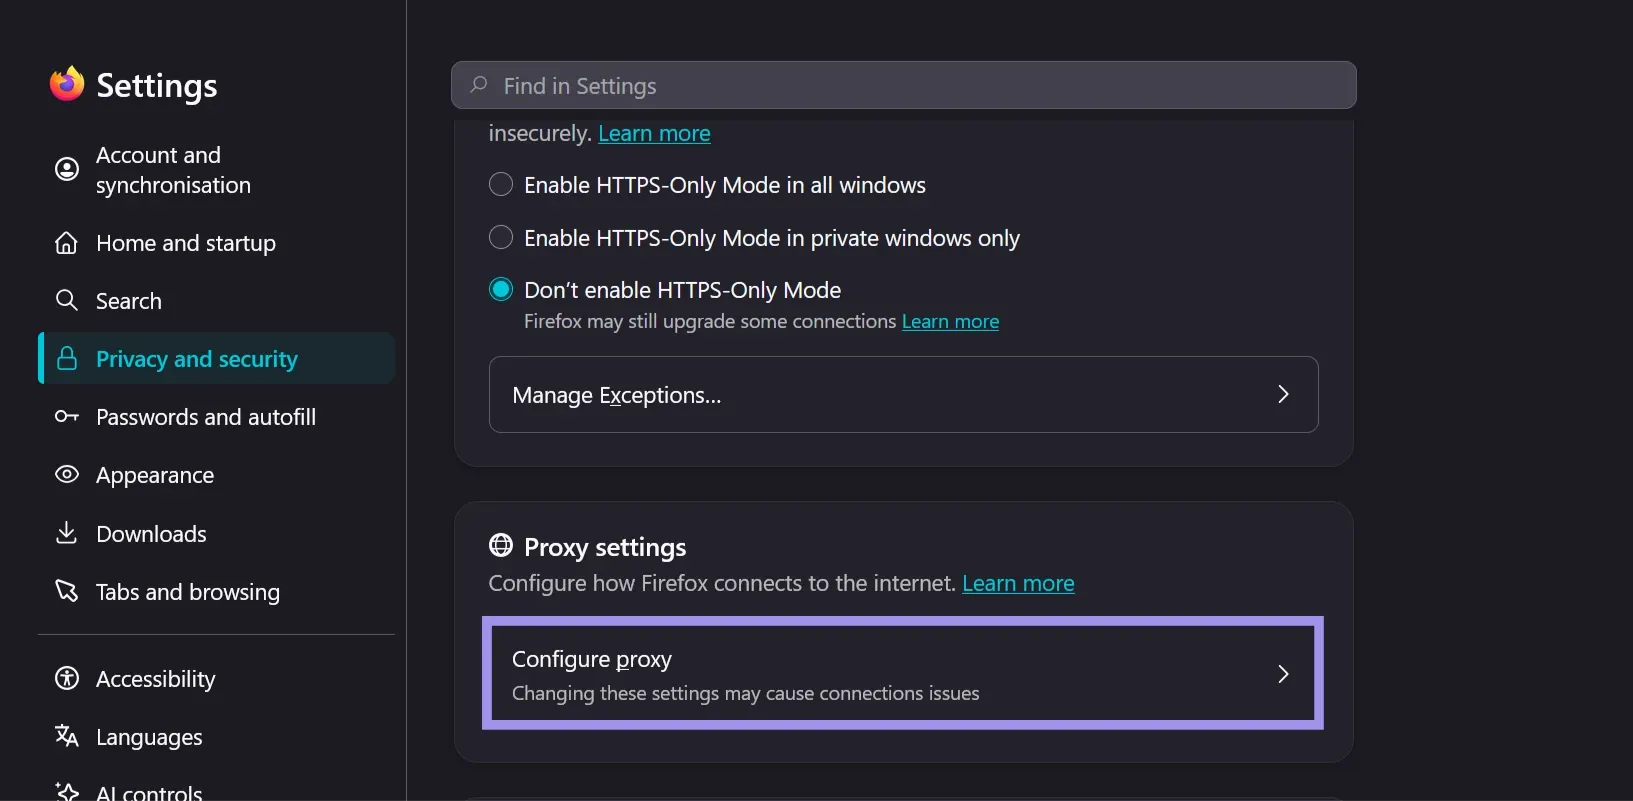
In the Connection Settings dialog that opens, you'll see the available proxy configuration options. By default, Firefox uses the system-configured proxy.
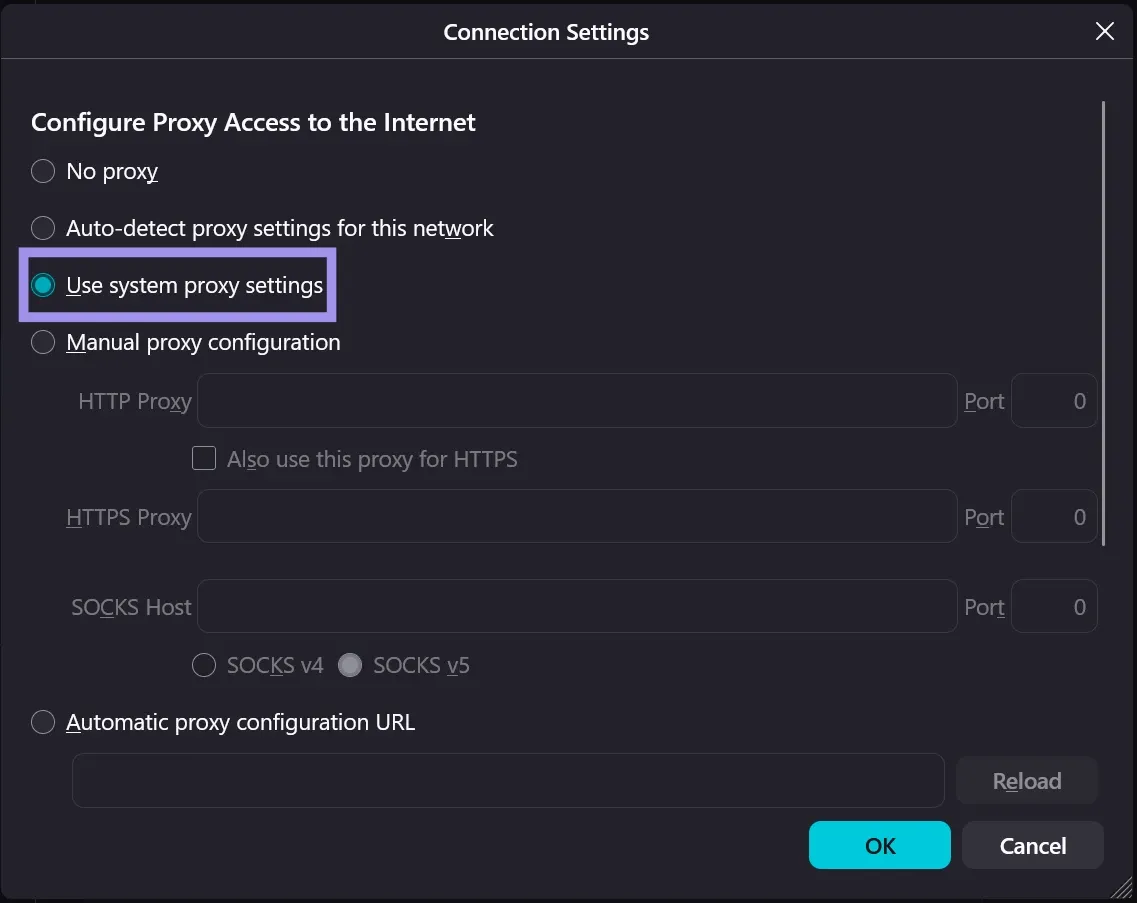
Note: If you are using an older version of Firefox, go to Settings > General > Network Settings > Settings to find proxy settings.
Step 2: Get your proxy details from your provider
To get your proxy details, log in to your provider's dashboard and open the section for the proxy type you want to configure. For demonstration purposes, we are using Byteful’s dashboard to generate sticky residential proxies.
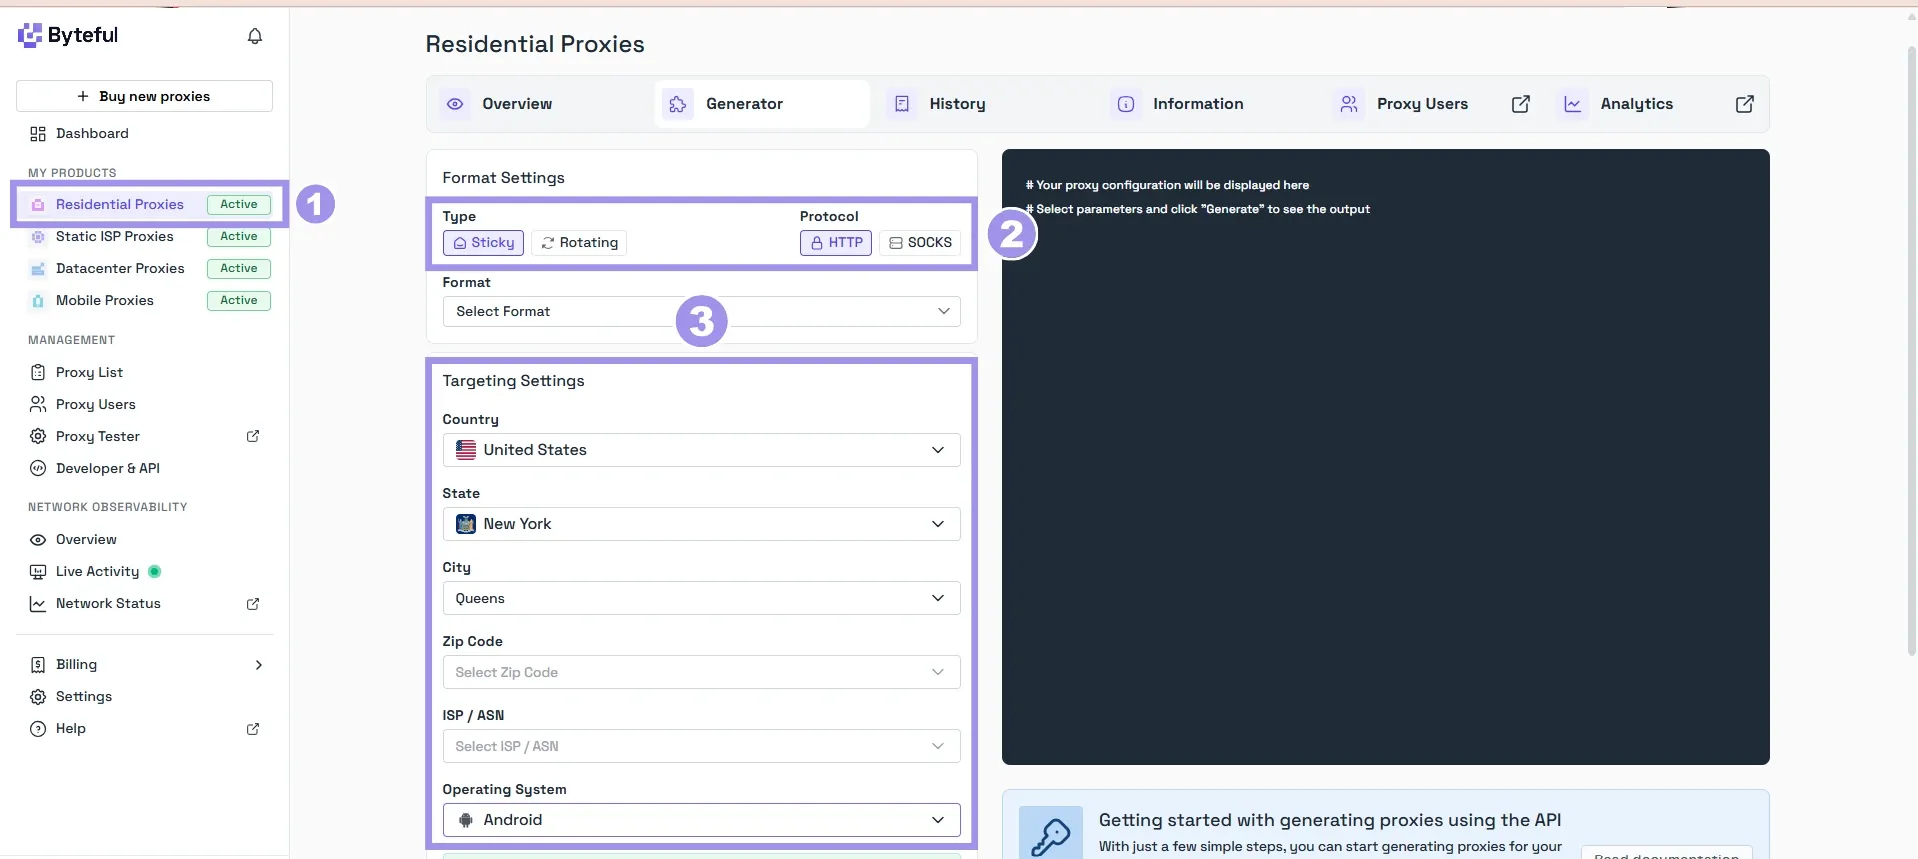
Byteful provides IP addresses from 195+ countries while supporting country- and city-level targeting. Once done with the targeting configuration, click "Generate", and you will get your sticky residential proxy details.
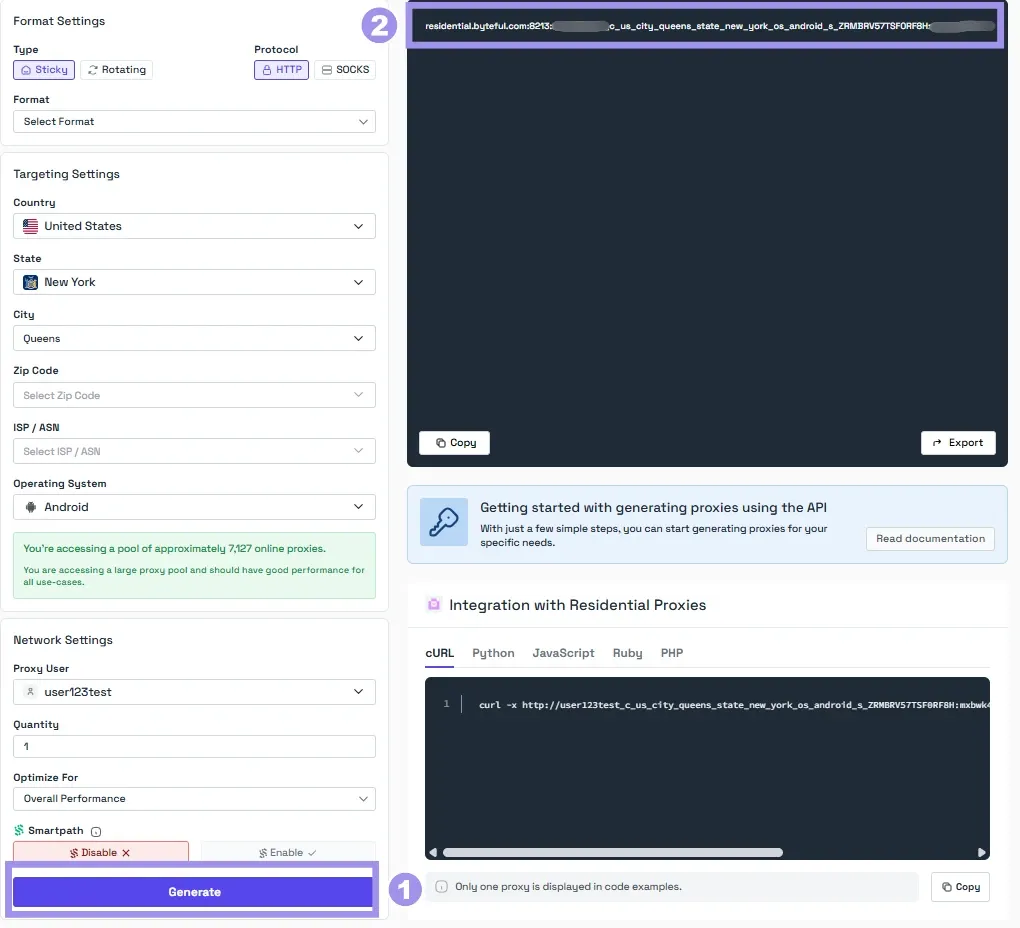
Step 3: Configure the proxy
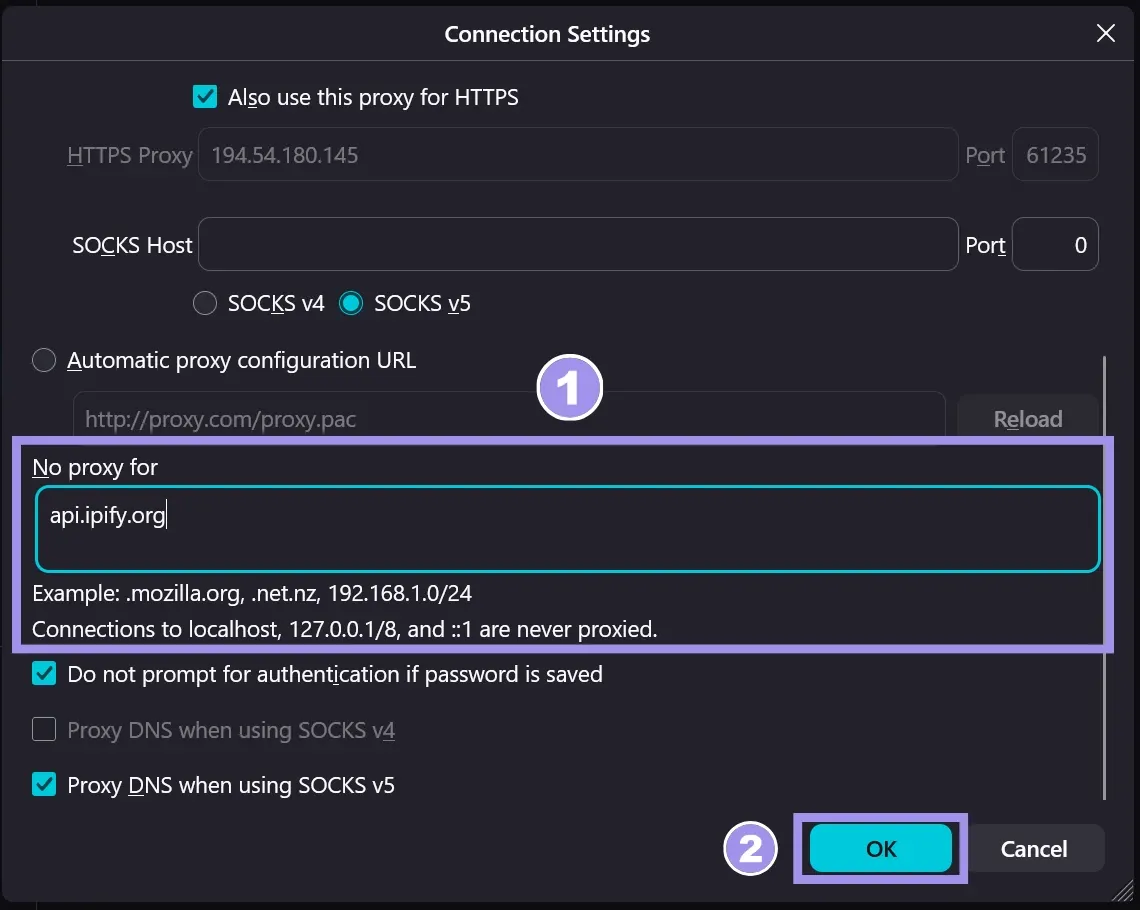
Once you have the proxy details, configure the proxy in Firefox in the Connection Settings dialog, through Manual proxy configuration. The proxy fields will become editable by following the steps given next:
1. Depending on the proxy you are using, enter your proxy host and port in the relevant fields. If using an HTTP proxy, you can check the "Also use this proxy for HTTPS" box to use the same proxy details over HTTPS.
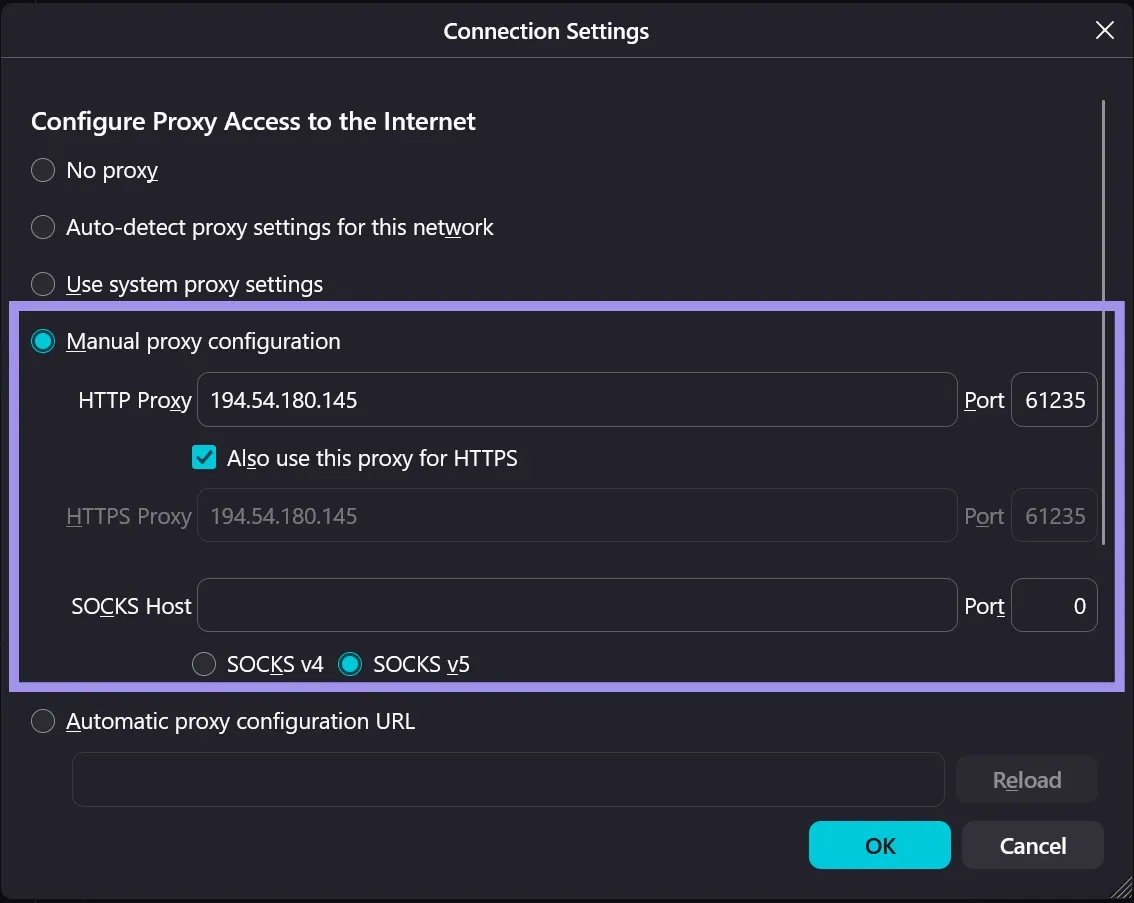
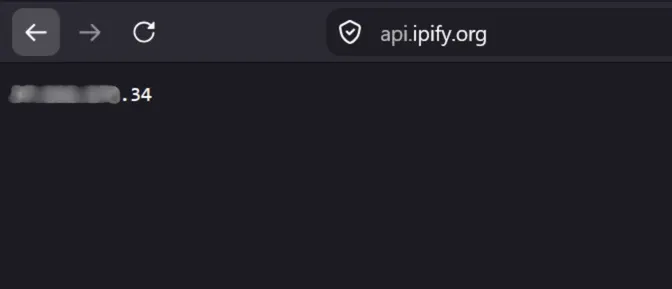
2. If there is any domain you want to bypass the proxy for, list it in the "No Proxy For" field. For testing purposes, we are configuring api.ipify.org to bypass the proxy.
3. Click OK to complete the proxy configuration.
Step 4: Authenticate the proxy
When using authenticated proxies, Firefox will prompt you for proxy authentication after the manual configuration.
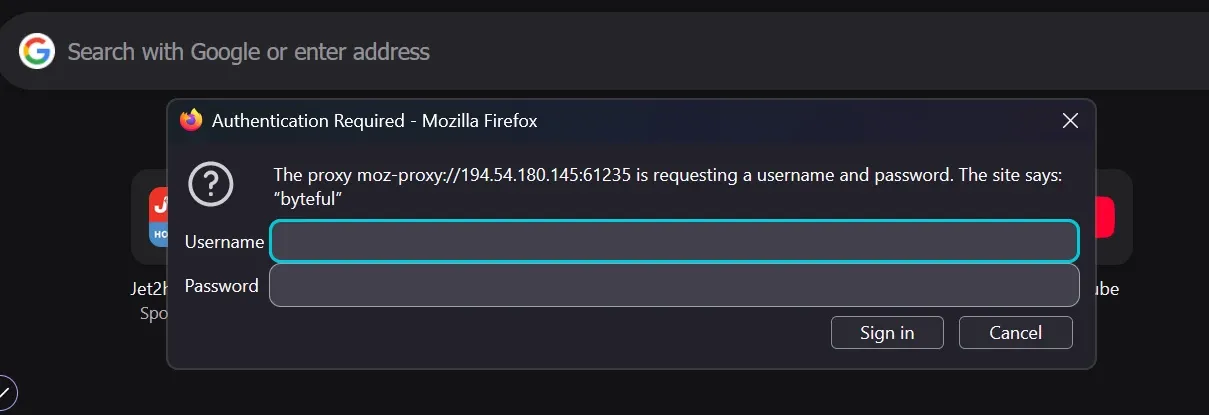
Enter your proxy username and password in the prompt, click “Sign in,” and Firefox will use the configured proxy for this session. You will have to enter your proxy credentials again the next time you open Firefox. You can also save your proxy credentials in your browser for convenience.
Step 5: Verify it’s working
To verify that the proxy configuration was successful, open any IP-echo page like ifconfig.me. If the IP address displayed there matches your proxy IP, the proxy configuration is successful.
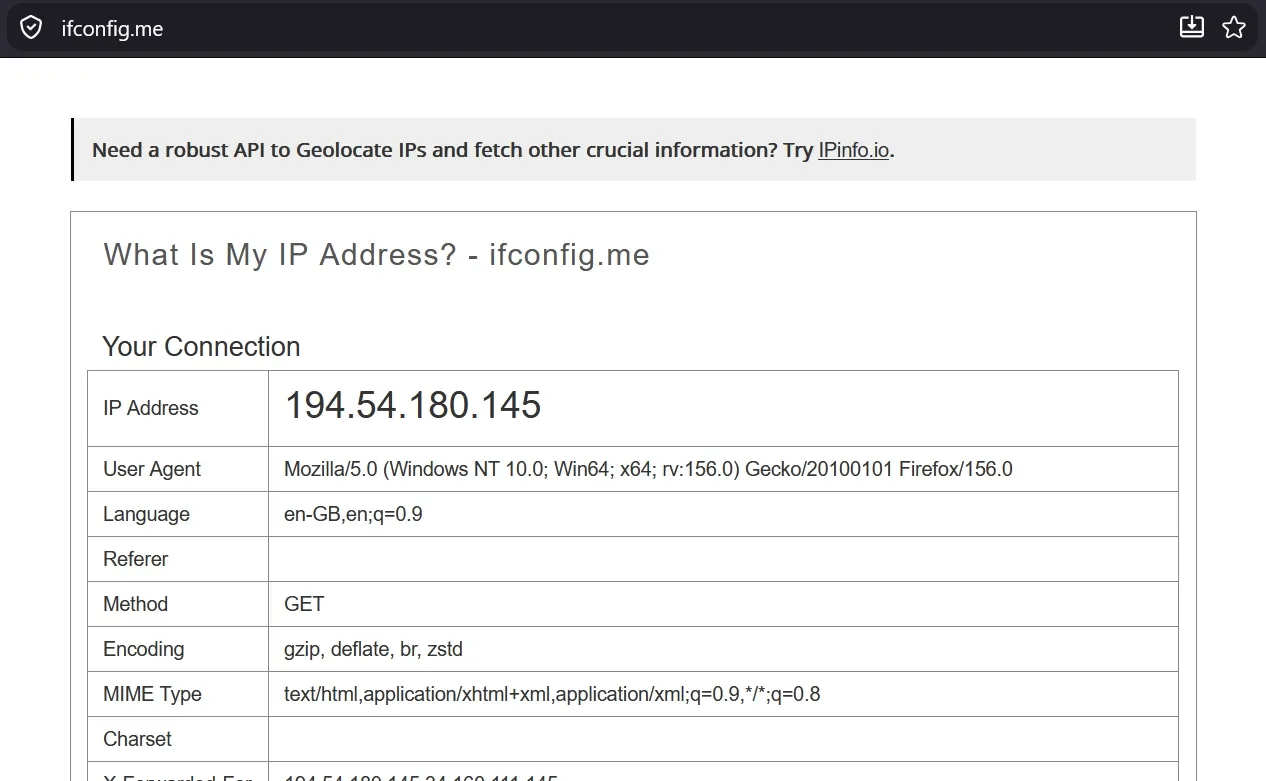
You can use the same method to test if the domain listed in no proxy is bypassing the proxy.
To skip the authentication prompt entirely, use proxy IP whitelisting, which we cover in the next method.
Method 2: Skip the password prompt with IP whitelisting
The proxy authentication prompt adds overhead that you can avoid with proxy IP whitelisting. It lets you skip credential authentication and authenticate your connection to the proxy server based on whitelisted IP addresses.
IP whitelisting availability depends on the proxy provider, and many leading providers offer IP whitelisting. Byteful also supports IP whitelisting for our datacenter and static ISP proxies. To whitelist your IP address from the Byteful dashboard:
1. Use an IP-echo page like httpbin.org/ip to get your public IP address.
2. Log in to the Byteful dashboard. From the left-side menu, go to Proxy Users, then click Add User. If you want to work with an existing user, click “Edit Authentication”.
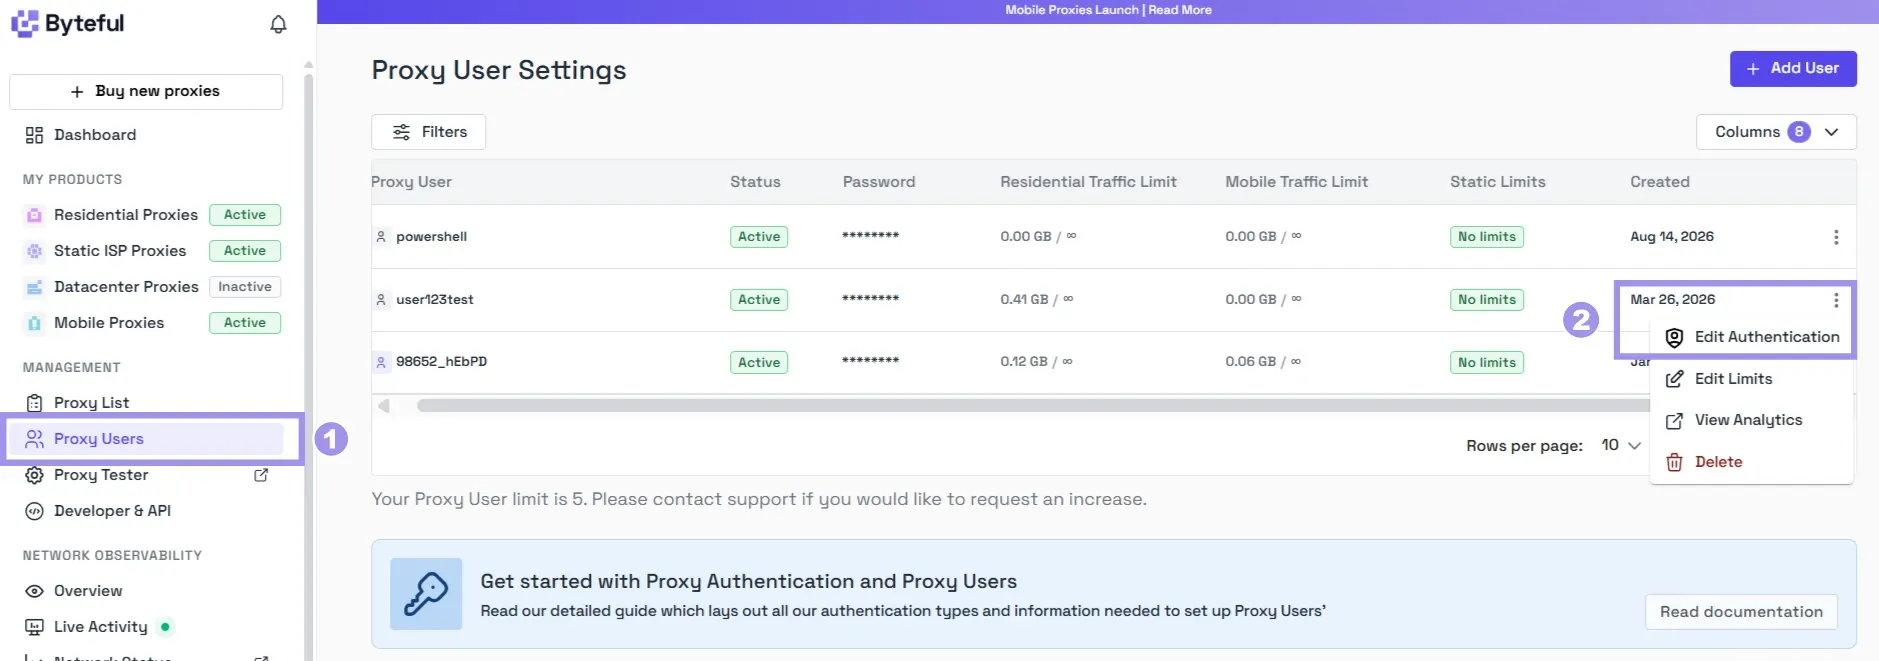
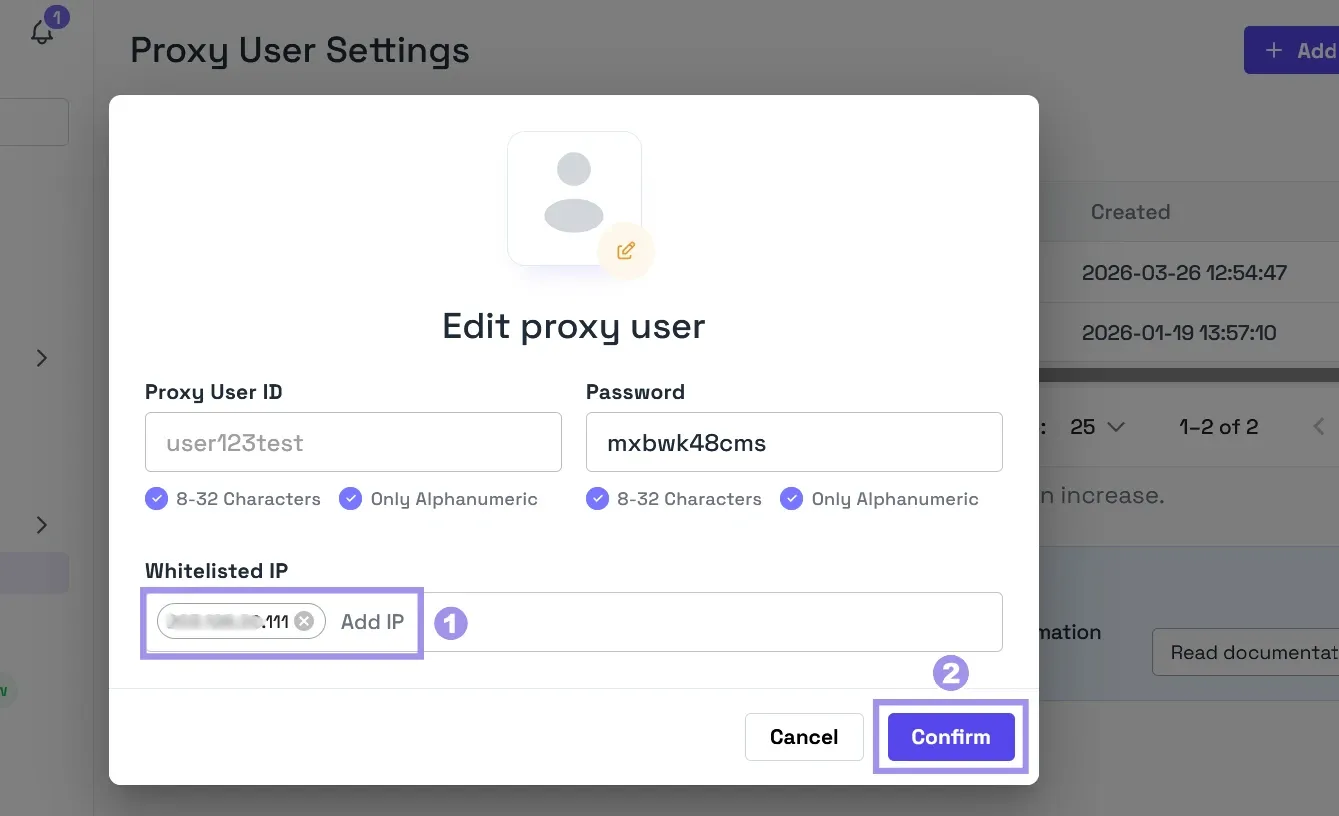
3. In the Edit proxy user dialog, enter the public IP address gathered in the first step in in the Whitelisted IP field. Next, press “Enter,” and then click “Confirm.”
Method 3: Manage Several Proxies With FoxyProxy
If you need to use multiple proxies within the same Firefox profile, or only for certain websites, an extension like FoxyProxy is a better choice. To configure proxies in Firefox via FoxyProxy:
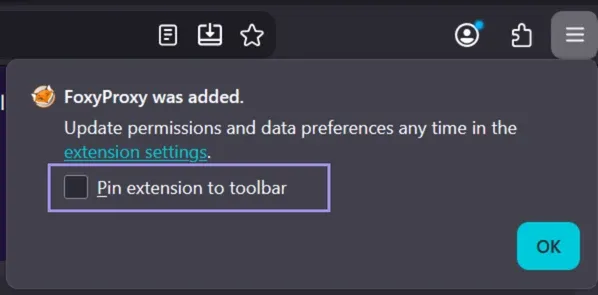
1. Get the Firefox FoxyProxy extension. Once installed, it’ll show a confirmation pop-up. You can also pin the extension for easier access.
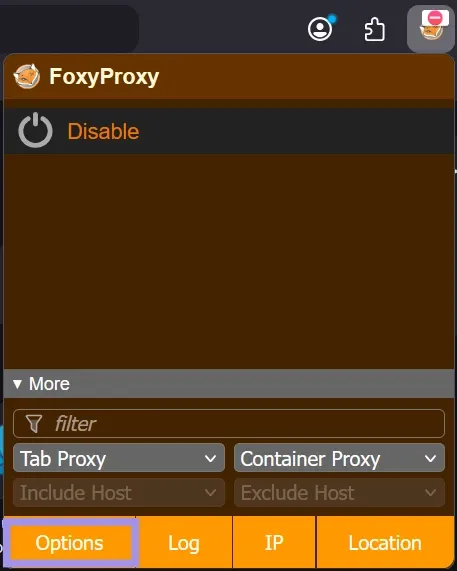
2. From the extension menu, click on Options to open the proxy configuration page.
3. From here, go to the Proxies page and click on Add. Give your proxy a title of your choice, select the proxy type (HTTP, HTTPS, or SOCKS5), then enter the hostname and port. Add the credentials if using authenticated proxies.
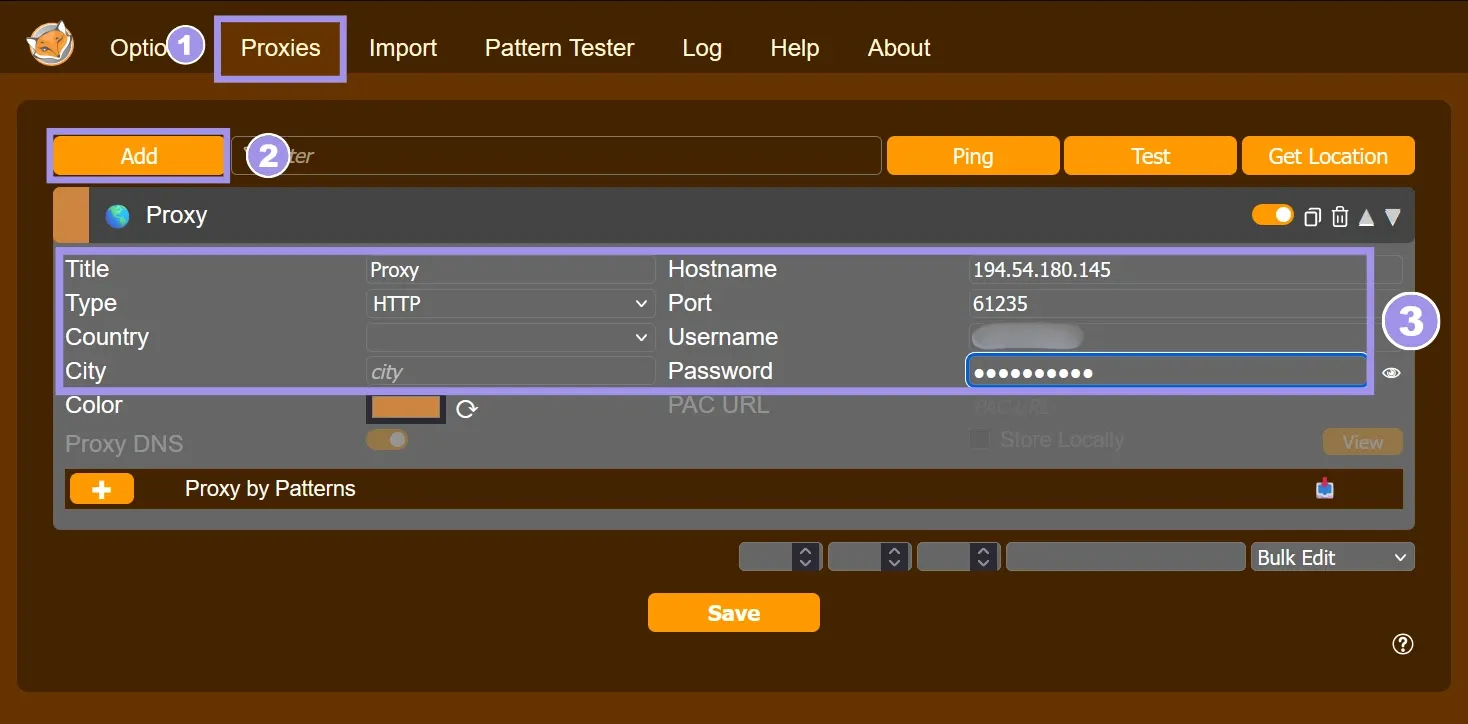
4. Click Save to save the proxy settings.
Now that you have configured the proxy via FoxyProxy, you can easily manage it by turning it on and off from the FoxyProxy extension menu.
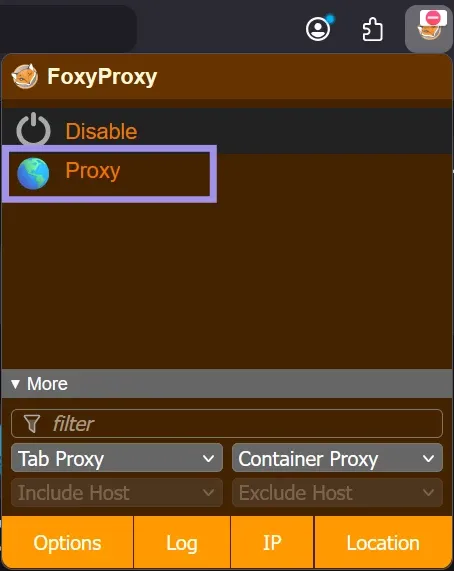
To use a proxy only for certain websites, open the proxy's settings in FoxyProxy and add a URL pattern, for example, *.example.com. Then select Proxy by Patterns from the extension menu, and FoxyProxy will route matching sites through the proxy and everything else directly. FoxyProxy also includes a built-in pattern tester to check your patterns before browsing.
Method 4: One Proxy per Identity With Firefox Profiles
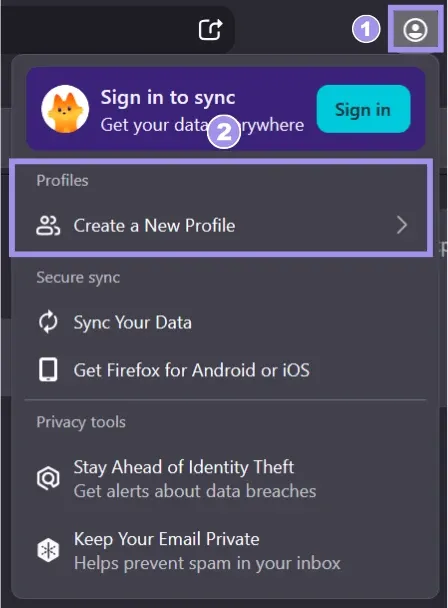
Firefox supports multiple profiles, which keep your browsing data and settings separate. Since proxy settings configured via the Manual method are stored per profile, you can create a profile for each identity and give each one its own proxy. To create a new profile:
1. In the toolbar, click the account icon and select Create a New Profile.
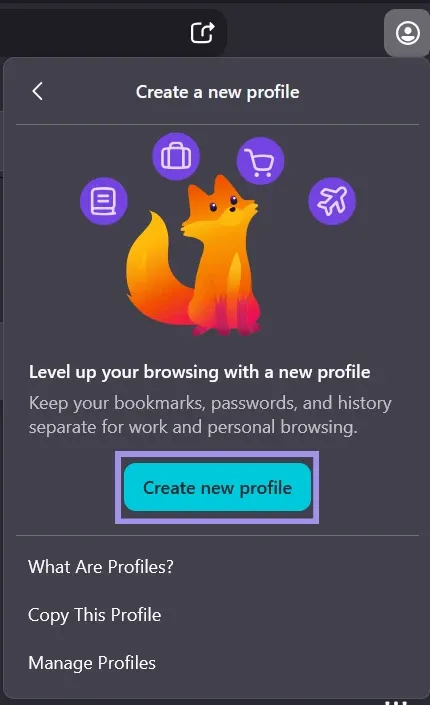
2. Click Create new profile. Firefox will launch the new profile in a separate window. You'll see two Firefox icons in your taskbar or dock.
3. Follow the on-screen prompts to name the profile and pick a theme and avatar. A distinct theme color per profile makes it easy to see which proxy identity you're working in when multiple windows are open. Once done, click Done editing.
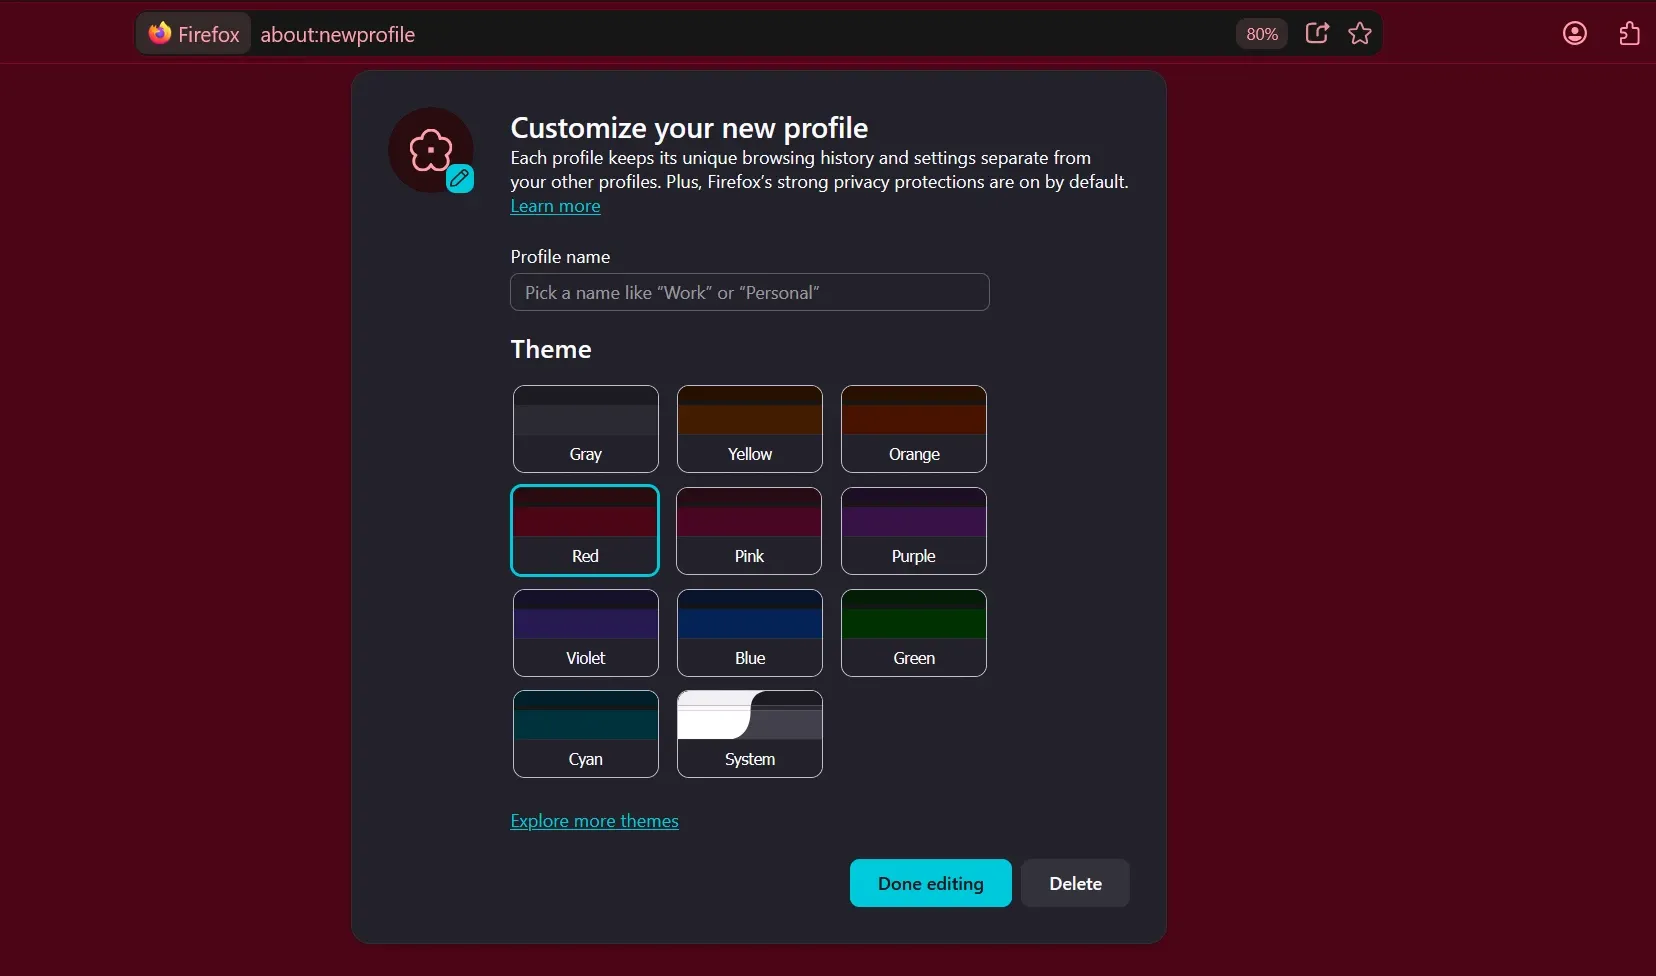
4. In the new profile's window, configure its proxy using the manual method from Method 1.
To switch between profiles later, click the account icon, click your current profile's name, and pick the profile you want from the list. You can also run several profiles side by side in separate windows, each routing through its own proxy.
Note: The Profiles menu is being rolled out gradually, so you may not see it yet. If you don't, type about:profiles in the address bar and press Enter to open the original Profile Manager, where you can create a new profile and launch it in a separate window.
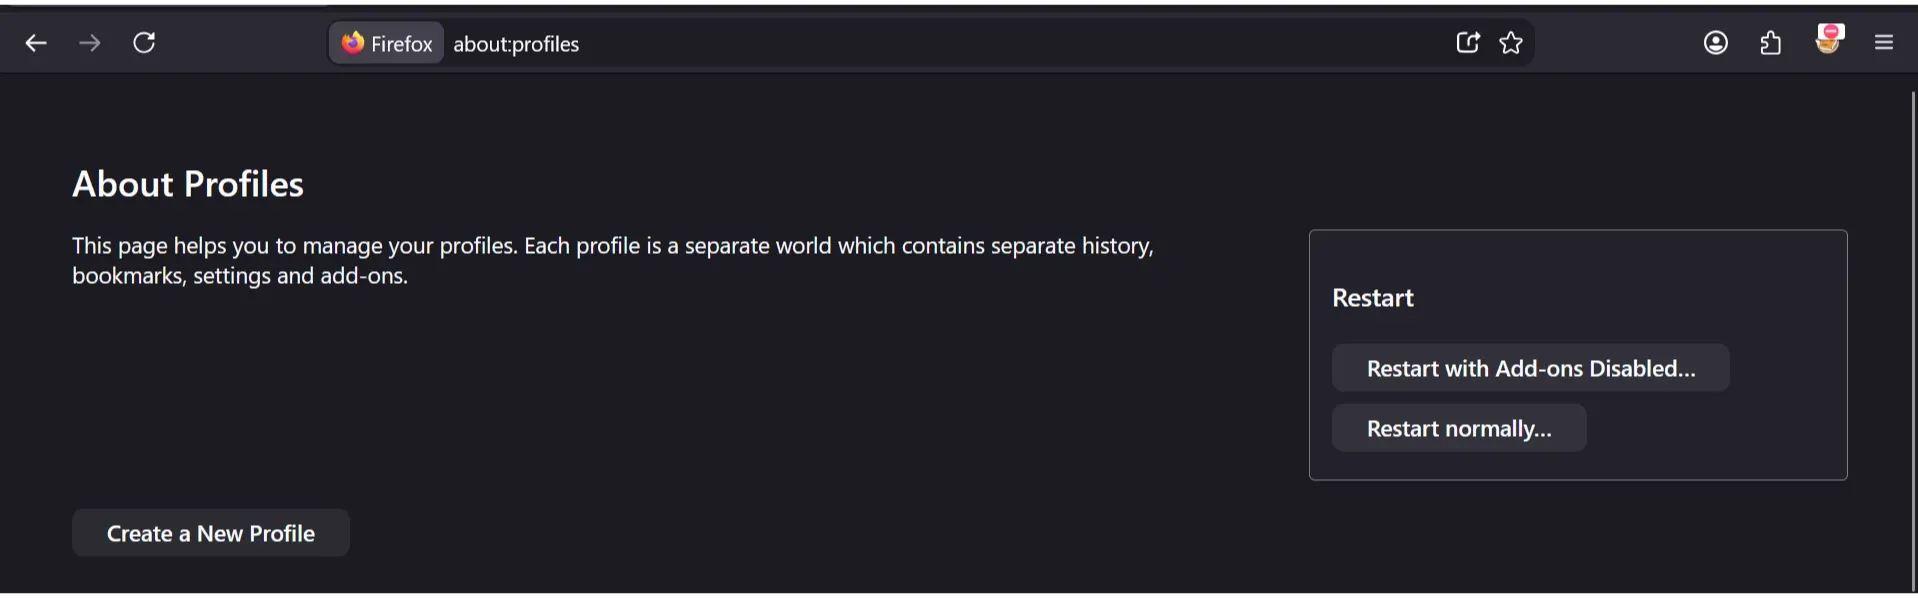
Remember that Firefox profiles separate your browser data, not your fingerprint. You are still using the same browser on the same system, with the same fingerprint, which can link requests from two different profiles.
To avoid this, consider using an anti-detect browser paired with a trusted proxy, such as a residential or mobile proxy.
Advanced Firefox Proxy Setups
The methods above cover most day-to-day use. If you are on a managed network, need rule-based routing, or want to script your proxy configuration, Firefox gives you three more options.
Option 1: Automatic proxy configuration URL (PAC file)
If you are connected to a managed network like a corporate or university network, or need rule-based routing, Firefox supports proxy configuration via a URL. In the Connection Settings dialog, select Automatic proxy configuration URL. Enter the link to your proxy configuration (.pac) file in the field, then click OK.
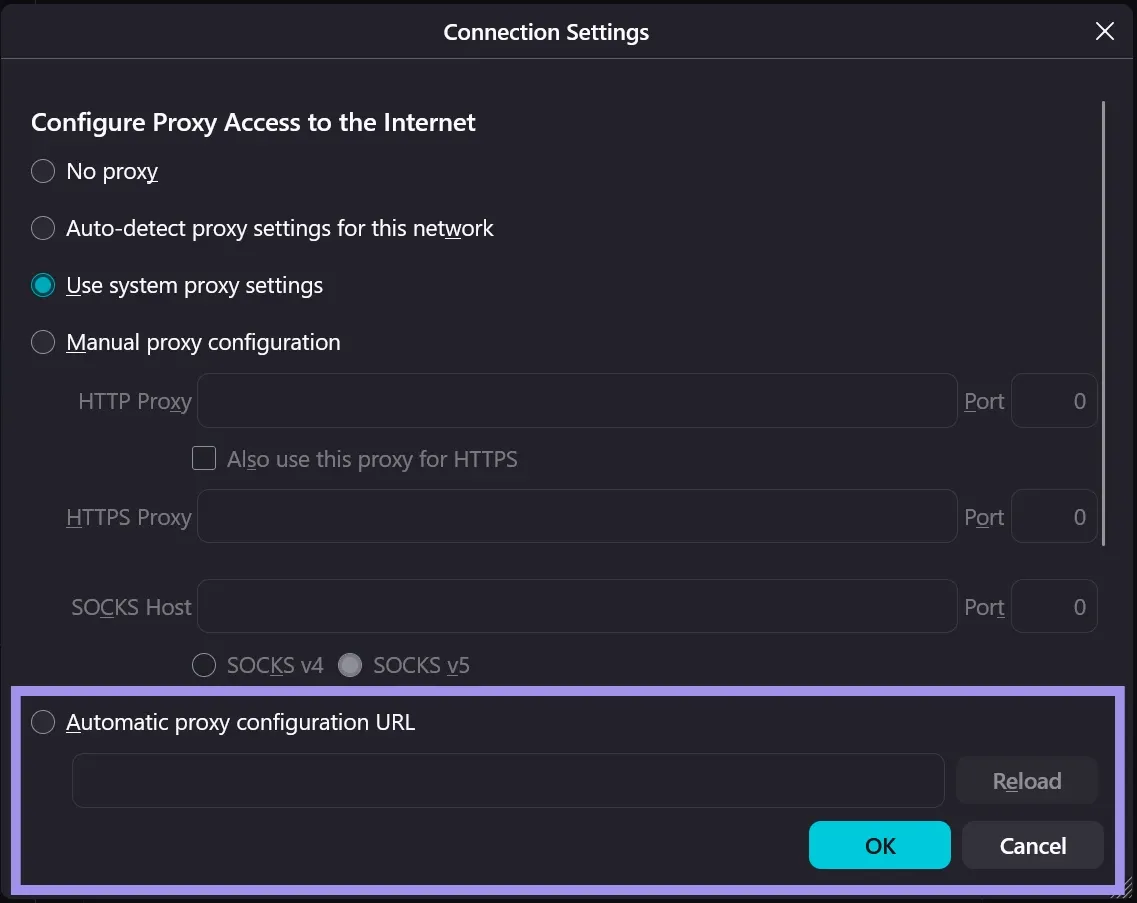
A PAC file is a small JavaScript file with a FindProxyForURL function that decides, per request, whether to use a proxy. For example, this routes one target site through a proxy and everything else directly:
function FindProxyForURL(url, host) {
  if (dnsDomainIs(host, "example.com"))
    return "PROXY proxy.example.com:8080";
  return "DIRECT";
}
Firefox runs this function on each request, which is what enables rule-based routing from a single central file. If the PAC file changes, click Reload in the dialog to pick up the new rules.
You can also point Firefox at a local file using the file: scheme, for example file:///c:/proxy.pac, which is handy for testing rules before deploying them. Note that a PAC file only tells Firefox which proxy to use; if the proxy requires authentication, you'll still see the credential prompt, or you can use IP whitelisting from Method 2.
Option 2: about:config for power users and scripts
Firefox stores all proxy settings as preferences. To access them, type about:config in the address bar and press Enter. You will see a warning screen before the preferences page; accept it, then search for the preference you want to configure.
Start with network.proxy.type, which controls the proxy mode:
0 = No proxy 1 = Manual proxy 2 = PAC 3 = Unused (treated as no proxy) 4 = Auto-detect (WPAD) 5 = System proxy (default)
If you set network.proxy.type to 1, set these preferences to complete the configuration:
- network.proxy.http and network.proxy.http_port: HTTP proxy host and port
- network.proxy.ssl and network.proxy.ssl_port: HTTPS proxy host and port (the "ssl" naming is historical)
- network.proxy.socks, network.proxy.socks_port, and network.proxy.socks_version: SOCKS proxy host, port, and version
- network.proxy.socks_remote_dns: Set to true to route DNS queries through the proxy when using SOCKS
- network.proxy.no_proxies_on: Comma-separated domains to exclude from proxying
Preference names are case-sensitive, so enter them exactly as written.
Option 3: policies.json for enterprise deployment
To configure proxies across a fleet of machines, create a policies.json file with your proxy details. Here is a simple example with an HTTP proxy:
{
  "policies": {
    "Proxy": {
      "Mode": "manual",
      "HTTPProxy": "PROXY_HOST:PROXY_PORT",
      "SSLProxy": "PROXY_HOST:PROXY_PORT",
      "Passthrough": "localhost, 127.0.0.1, .internal.company.com",
      "Locked": true
    }
  }
}
Locked prevents users from changing the proxy settings themselves. Before deploying, verify the policy keys against Mozilla's current policy documentation.
IP leaks via DNS and WebRTC
With a properly configured proxy in Firefox, your real IP can still leak through DNS and WebRTC.
If DNS queries go through your network IP instead of the proxy IP, it can cause IP leaks. With WebRTC, UDP traffic isn't proxied when using an HTTP proxy, which can cause IP leaks.
DNS leaks are mainly a concern with SOCKS proxies, where Firefox can resolve domain names locally before connecting. If you use a SOCKS v5 proxy, keep the "Proxy DNS when using SOCKS v5" box checked in the Connection Settings dialog so DNS queries go through the proxy too. With an HTTP proxy, the proxy server resolves DNS for you, so no extra setting is needed.
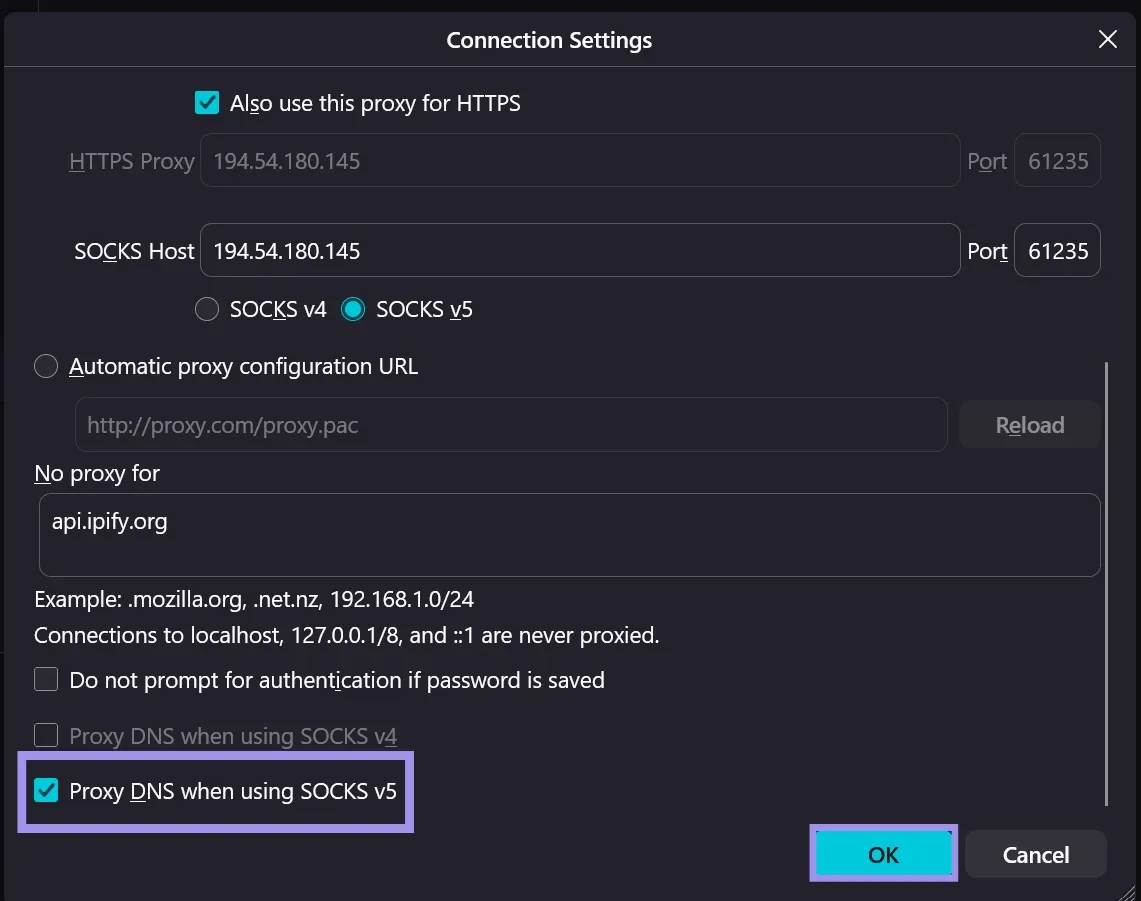
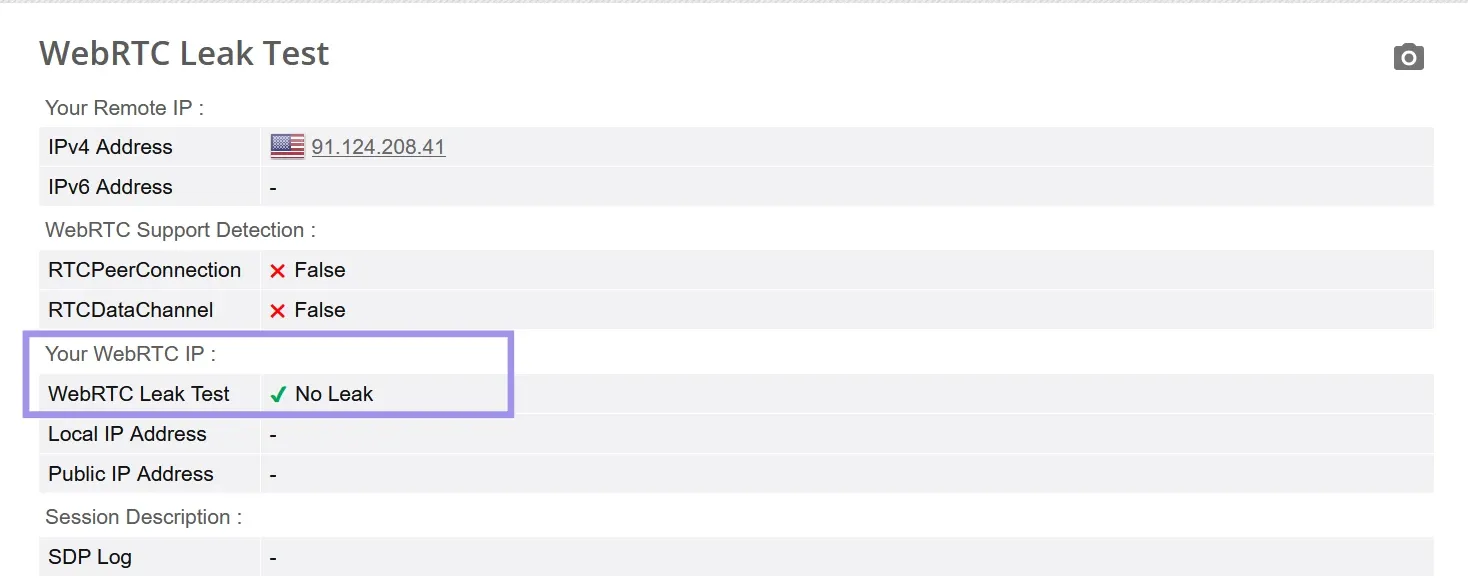
WebRTC discovers your device's real local and public IP addresses while setting up peer connections, and a website can read those addresses through JavaScript even when all your normal traffic goes through the proxy.
To prevent WebRTC leaks, open a new Firefox tab and type about:config, then press “Enter”. From the next configuration page, search for media.peerconnection.enabled and switch it to false using the arrow icon.

This disables WebRTC in Firefox, reducing the risk of WebRTC leaks. Disabling WebRTC in the browser will also break any in-browser voice or video calls, as these rely on WebRTC. To confirm the fixes worked, visit a leak-testing page like browserleaks.com/webrtc with the proxy enabled. It should show your proxy IP and report no WebRTC addresses.
Keep in mind that using proxies and implementing controls against IP leaks only changes the IP address your target site sees. It does not change the fingerprint of your browsing activity.
Two mismatches are common giveaways. First, your timezone and language can contradict your IP's location, so set your device's time and language to match where your proxy exits. Second, the network-level OS signature of the proxy's exit device can contradict the OS your browser reports, which is harder to fix on your end.
For OS fingerprinting, Byteful now supports OS targeting for residential and mobile proxies, which helps match the proxy’s OS with your system’s. This feature is currently in beta. We will keep you posted about any future updates.
When Does Firefox Proxy Setup Break?
Multiple factors can cause Firefox proxy to break. This section covers the most common ones along with the possible solutions:
- The proxy server is refusing connections: This can happen for several reasons, including incorrect proxy details or an offline proxy. Double-check the configured proxy host and port. Use a tool like Byteful’s proxy tester to confirm the proxy is working. When using IP whitelisting, check the dashboard to confirm you whitelisted the correct IP address.
- The password prompt keeps looping: This usually happens when you enter incorrect credentials in the proxy authentication prompt. Make sure you entered the correct credentials. If using the browser-saved proxy credentials, make sure that the saved username and password are correct. Where your proxy type supports it, IP whitelisting (Method 2) removes the prompt entirely.
- Pages load, but the IP checker shows my real IP: If proxies are configured via the ‘Manual’ method, make sure your Firefox settings are set to use the Manual configuration. This can also happen if you configured manual proxies in one Firefox profile but are now using another.
- Browser is slow after proxy configuration: When you use proxies, you add another hop to the path your request takes from your device to the server. Adding that hop will slow your browsing, especially when using a residential or mobile proxy. To minimize this effect, consider using a datacenter or static ISP proxy closer to your location.
- The site is still blocking me: A proxy only changes the IP address your target site sees and isn't an anti-detect tool. Different browser fingerprints can still get you blocked or restricted, even with proxies. To reduce that risk, combine residential proxies with an anti-detect browser. You can also change your system's timezone and language to match the proxy’s.
Which Proxy Type Fits Firefox Browsing?
You can configure any proxy type in Firefox, but they suit browsing differently, largely because of the IP sessions each type supports: static (one constant IP), sticky (same IP for a set time, then rotates), or rotating (new IP on every request).
- Datacenter proxies give you a static, usually dedicated IP that is fast and cheap. Fine for everyday browsing on lenient sites, but datacenter IPs are the easiest to flag, so avoid them on strict targets.
- Static ISP proxies also give you a constant dedicated IP, but one registered to a real internet provider, which makes it far more trusted. The best default for browsing, especially logged-in sessions on strict targets.
- Residential proxies route through real users' devices, typically with sticky or rotating sessions. Use sticky sessions for browsing that needs a persistent identity on strict targets; avoid rotating sessions for browsing, since an IP that jumps location on every request is easy to flag.
- Mobile proxies work like residential but exit through mobile carrier networks, making them the most trusted and the priciest. Same rule: sticky for browsing, rotating only for non-browsing workloads.
Byteful offers all four proxy types (datacenter, static ISP, residential, and mobile), covering static, sticky, and rotating sessions. Our proxies are ethically sourced and have the fastest mobile response time globally (0.48s) and the fastest residential proxy response time (0.41s) [Proxyway's Proxy Market Research 2026].
You can also test our proxies with our 1 GB of non-expiring residential trial data. You can get the trial data after signing up on the dashboard and completing a short KYC. We KYC every user to ensure everyone sharing the pool is legitimate, which means cleaner, less-abused IPs for every user.