


Configuring a proxy on macOS sounds easy enough until the traffic itself starts going around it. The browser respects the proxy, but Terminal doesn't, and Firefox runs on its own settings entirely. And a setup that works on one network service may not apply to another.
macOS has three main configuration methods to look at: System Settings, the networksetup command, Configuration Profiles, plus bypass rules sitting alongside. In this guide, we'll go through when each method applies, when it doesn't, and how you can confirm that your proxy is routing the traffic as intended.
What are the macOS Native Proxy Options?
macOS stores proxy settings within the network service you configure, but then grants access to those settings to apps via Apple's standard networking layer. Most apps that rely on Apple's system networking stack for HTTP(S) traffic, such as Safari, many WebKit-based apps, Mail, the App Store, and Software Update, pick up the proxy with no extra setup.
Apps that ship their own networking stack, or use non-HTTP protocols, may not. That alone makes proxy setup on macOS simpler than Windows or many Linux desktops.
One thing to know before you start: on macOS, a proxy isn't enabled machine-wide. It is associated with a particular network service like Wi-Fi or Ethernet. So if you configure a proxy on Wi-Fi and then plug in Ethernet, the traffic can go directly because that interface was never configured.
This goes for USB tethering, Thunderbolt bridges, or any VPN service that creates its own virtual network adapter. For scripted setups, list all your active network services first, then apply the proxy only to the interfaces you use.
Understanding System-Wide vs. App-Specific Behaviour
Most apps that use Apple’s standard networking behaviour can use the proxy you configured in System Settings. Native Apple apps and browsers like Safari, Chrome, Mail, Messages, App Store, and so on, usually follow these settings without separate proxy configuration.
Some apps don't follow the system proxy at all. Browsers with their own proxy stack, Mozilla Firefox being the most common one, maintain independent network preferences. You either configure them on their own or explicitly point them to the system settings.
Then there are command-line tools. curl, wget, git, and npm use environment variables (http_proxy, https_proxy, HTTPS_PROXY) instead of the system proxy. This is why your terminal (the command line shell running on the same Mac) behaves differently from your browser.
Configuring Proxies via macOS System Settings
The path of System Settings is the most conventional because macOS has a special proxy settings panel for each network service. You are setting up a proxy on one Mac and want most system-aware apps to use it through the selected network service.
If you're doing anything account-related, it's worth checking proxy IP reputation before you commit to a pool. If you are managing a fleet or scripting changes, then Terminal and Configuration Profiles will work out better for you, but we'll get into those in a bit.
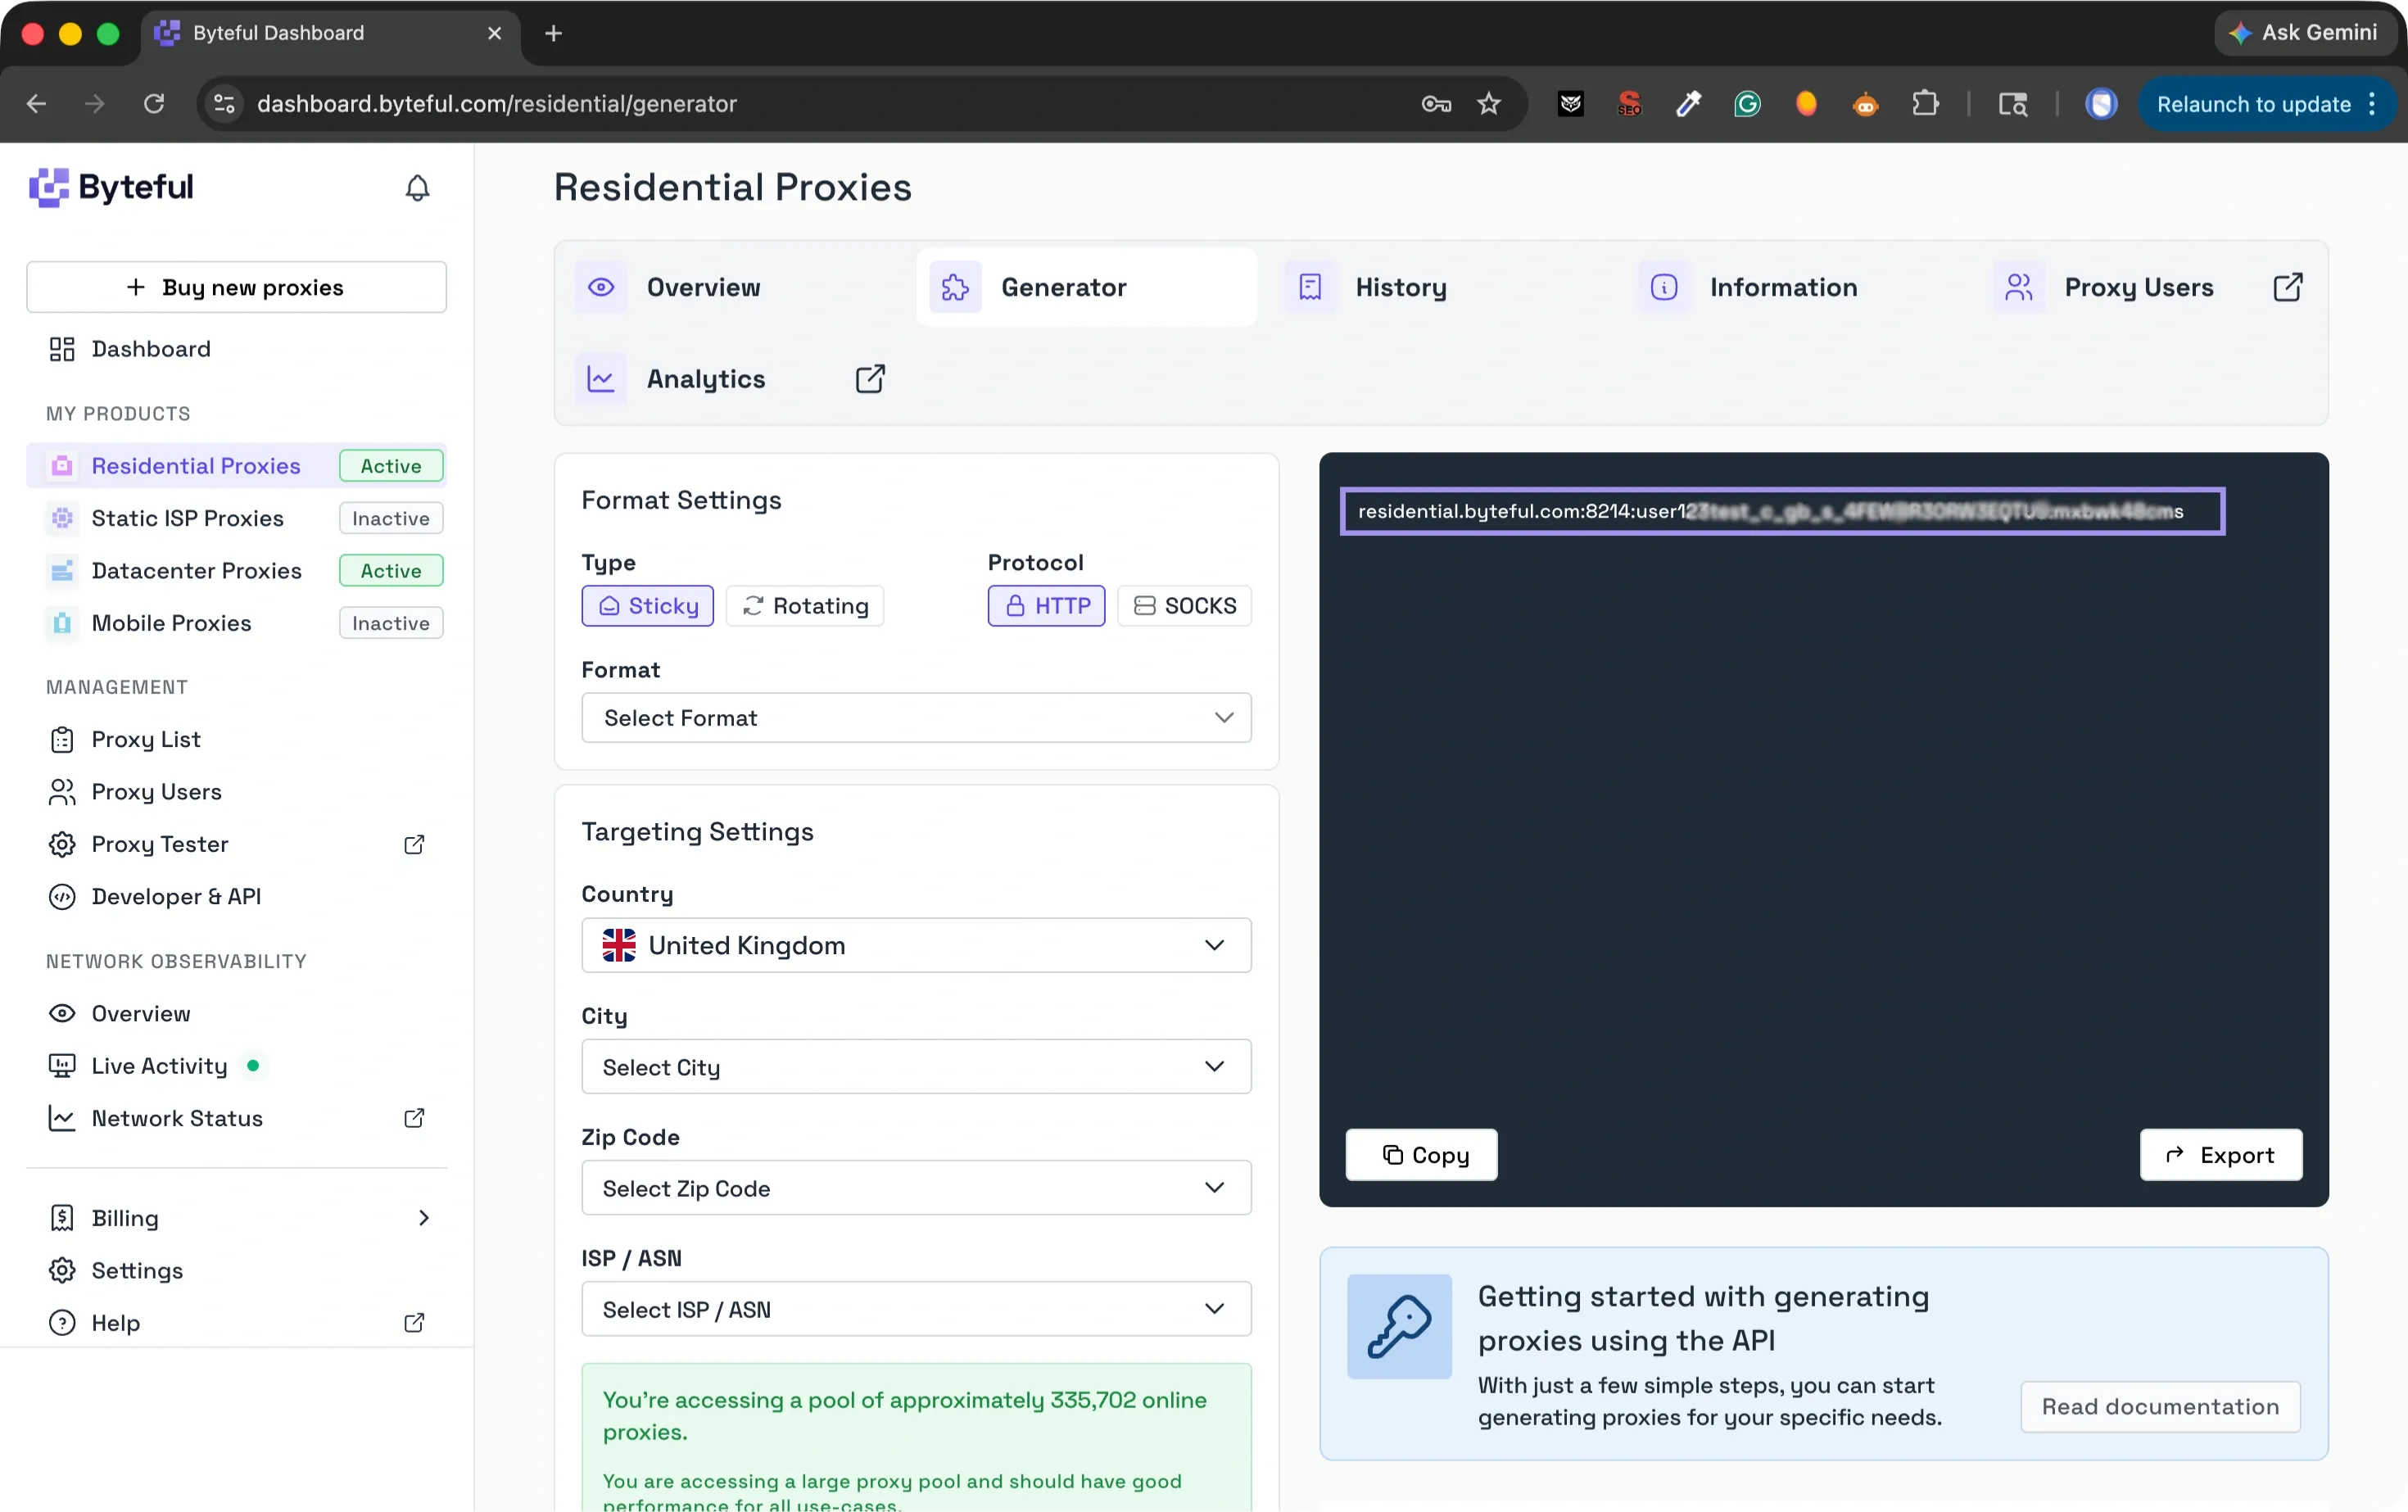
You need proxy credentials before starting the setup. The steps will differ based on your provider, so in this guide, we'll use Byteful to pick: proxy type, protocol, location, and session style for the task, and finally generate the credentials.
Datacenter proxies often work the best if speed is the priority. When session stability matters more, residential or static residential proxies are the safer call. Once that's sorted, copy the host, port, username, and password across to macOS.
Once you've got those ready:
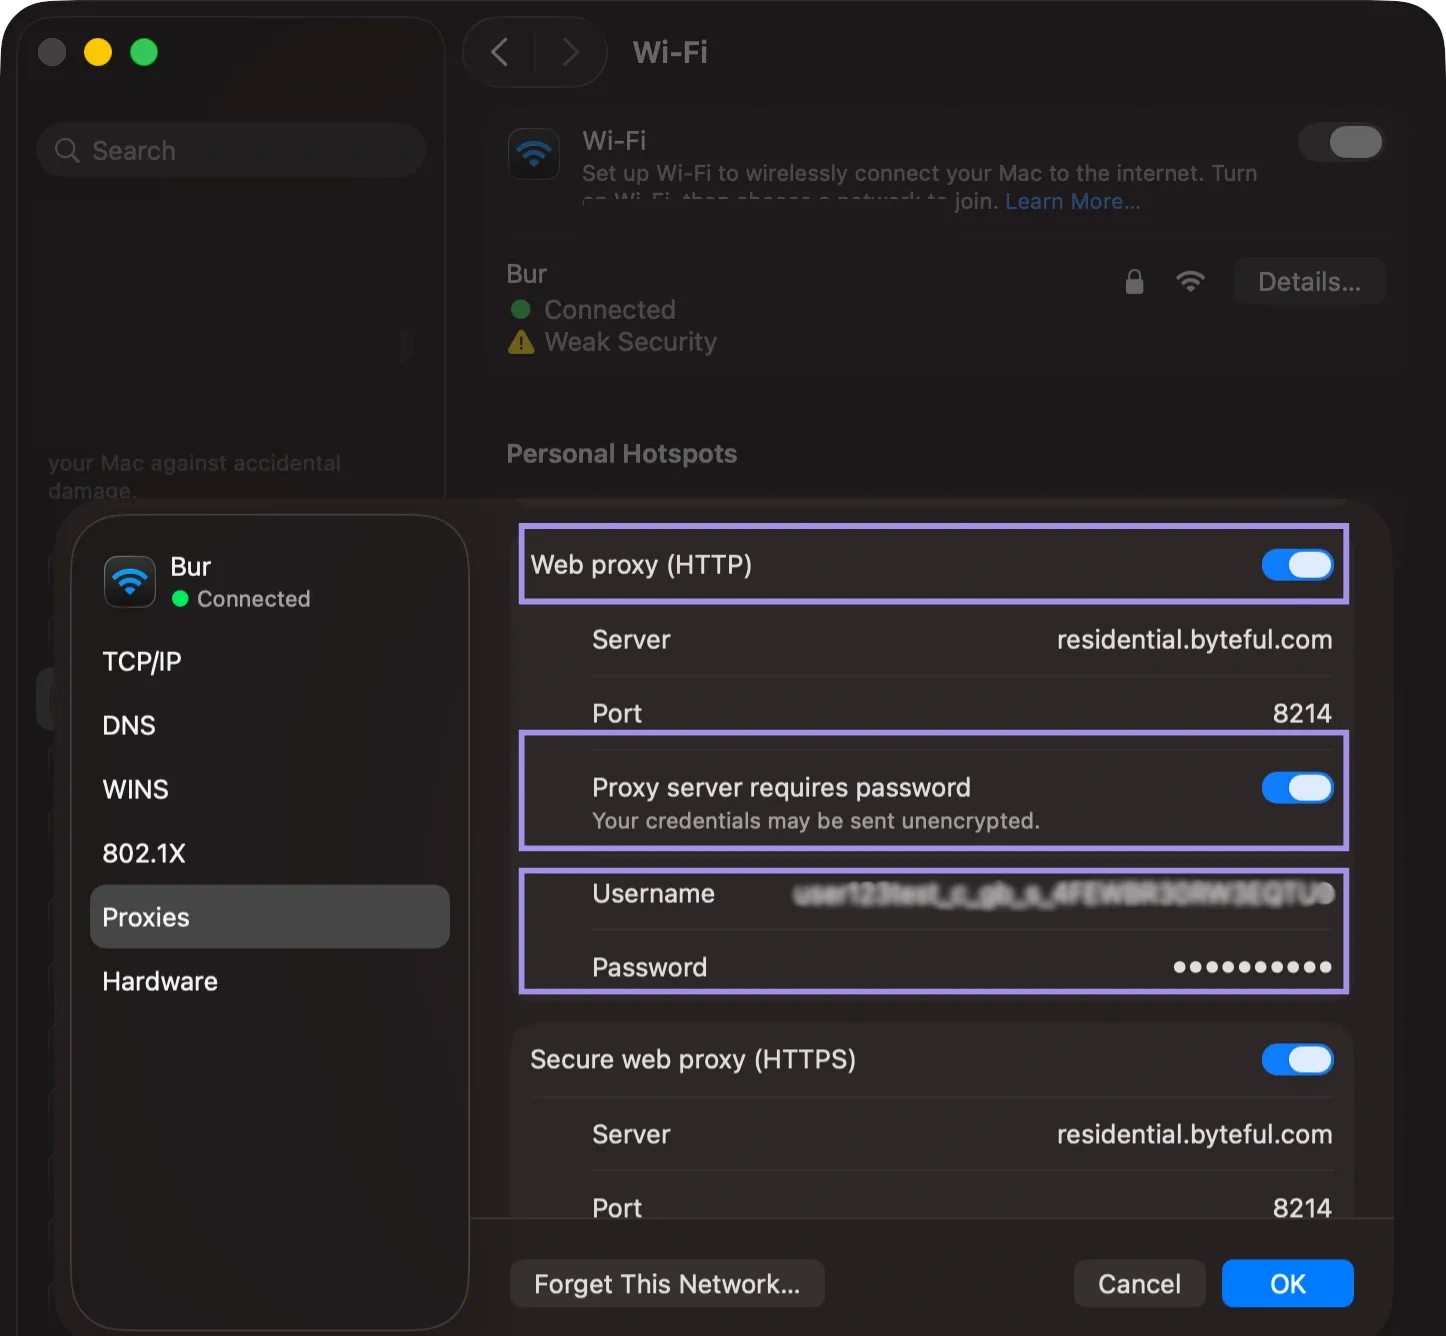
1. Open the Apple menu and go into System Settings.
2. Select Network from the sidebar.
3. Select your current network service (Wi-Fi or Ethernet) and click on Details.
4. Go to the menu (left-side menu), select Proxies.
5. Enable Web Proxy (HTTP) and enter your host name and port.
6. Enable Secure Web Proxy (HTTPS) and enter the same hostname and port. This is one of the most common macOS setup mistakes, skipping this step. Most modern web traffic uses HTTPS, so skipping this field can leave secure web traffic outside the proxy route.
7. Turn on Proxy server requires password, and fill in your proxy credentials.
8. Click OK, then Apply.
For SOCKS5 proxies, we will cover a significant limitation of macOS's native SOCKS implementation later in the article.
Temporary and Permanent Proxy Configuration via Terminal
The Terminal path is useful when the System Settings GUI slows things down. This is especially useful for scripted setups, faster proxy switching, and remote troubleshooting over SSH, or if you have a workflow that requires toggling the same settings on multiple Macs.
The command line tool that you will be using is called networksetup. It ships with macOS and controls the same proxy settings you see in System Settings, so changes made here also appear in the GUI.
You can apply a proxy via Terminal (one-time option for this shell or permanent option for selected network service). Each of the methods below covers a different use case.
Temporary configuration via environment variables
Say you want to test a curl request through a proxy on a single terminal session, without touching your system settings. The way to do this is by setting environment variables in the shell:
export http_proxy="http://username:[email protected]:8080"

export https_proxy="http://username:[email protected]:8080"
Most command-line tools don't inherit the proxy from System Settings. Tools like curl, wget, git, and npm read it from these environment variables (http_proxy / https_proxy) instead, or from their own config, like git's http.proxy. Note that these only apply to the current shell session and will disappear as soon as you close the window, so nothing else on your Mac is affected. To clear them sooner, run:
unset http_proxy https_proxy.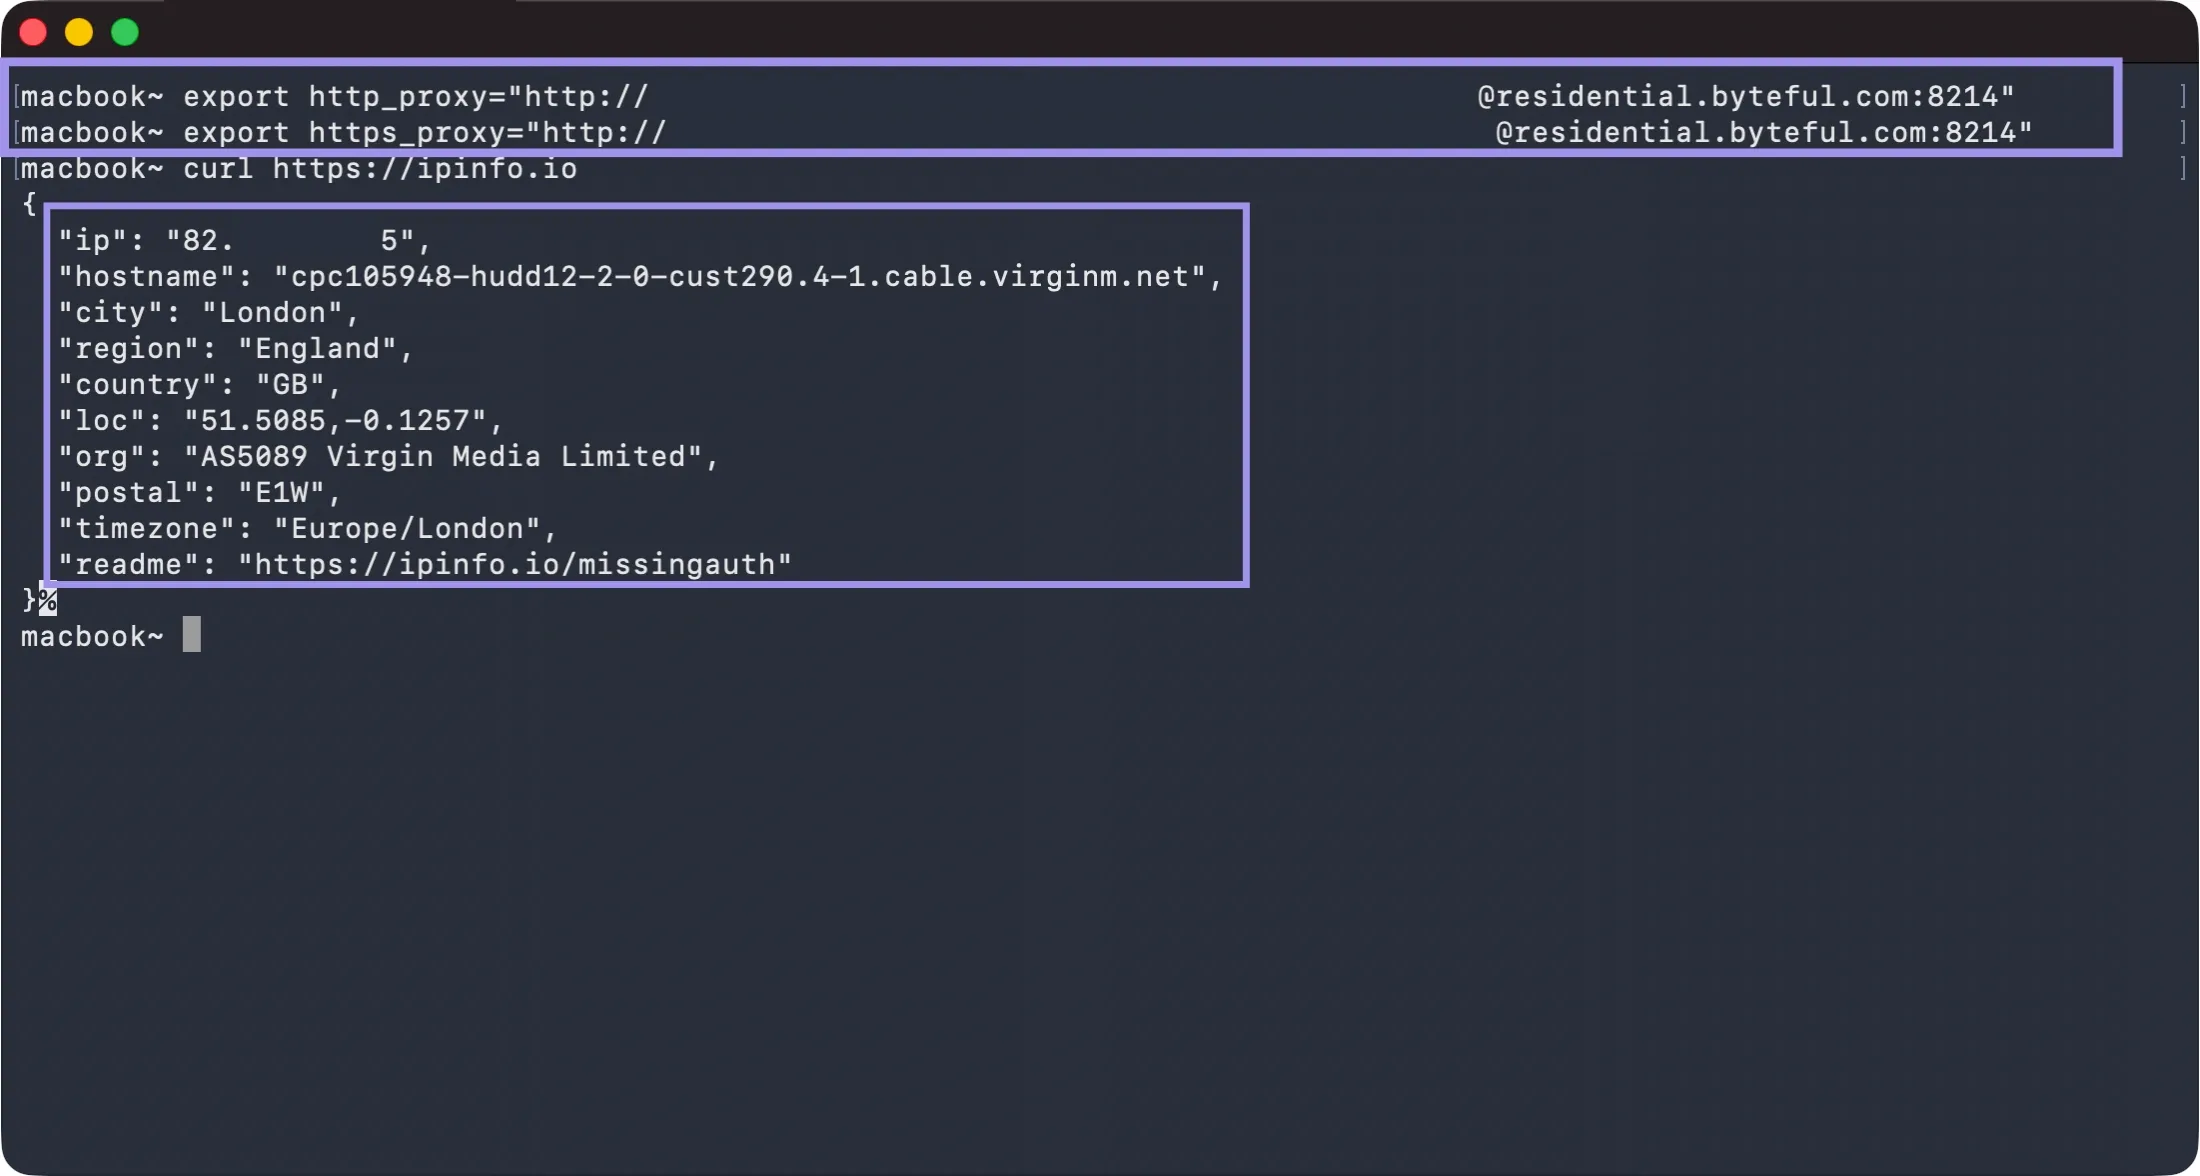
Permanent configuration via networksetup
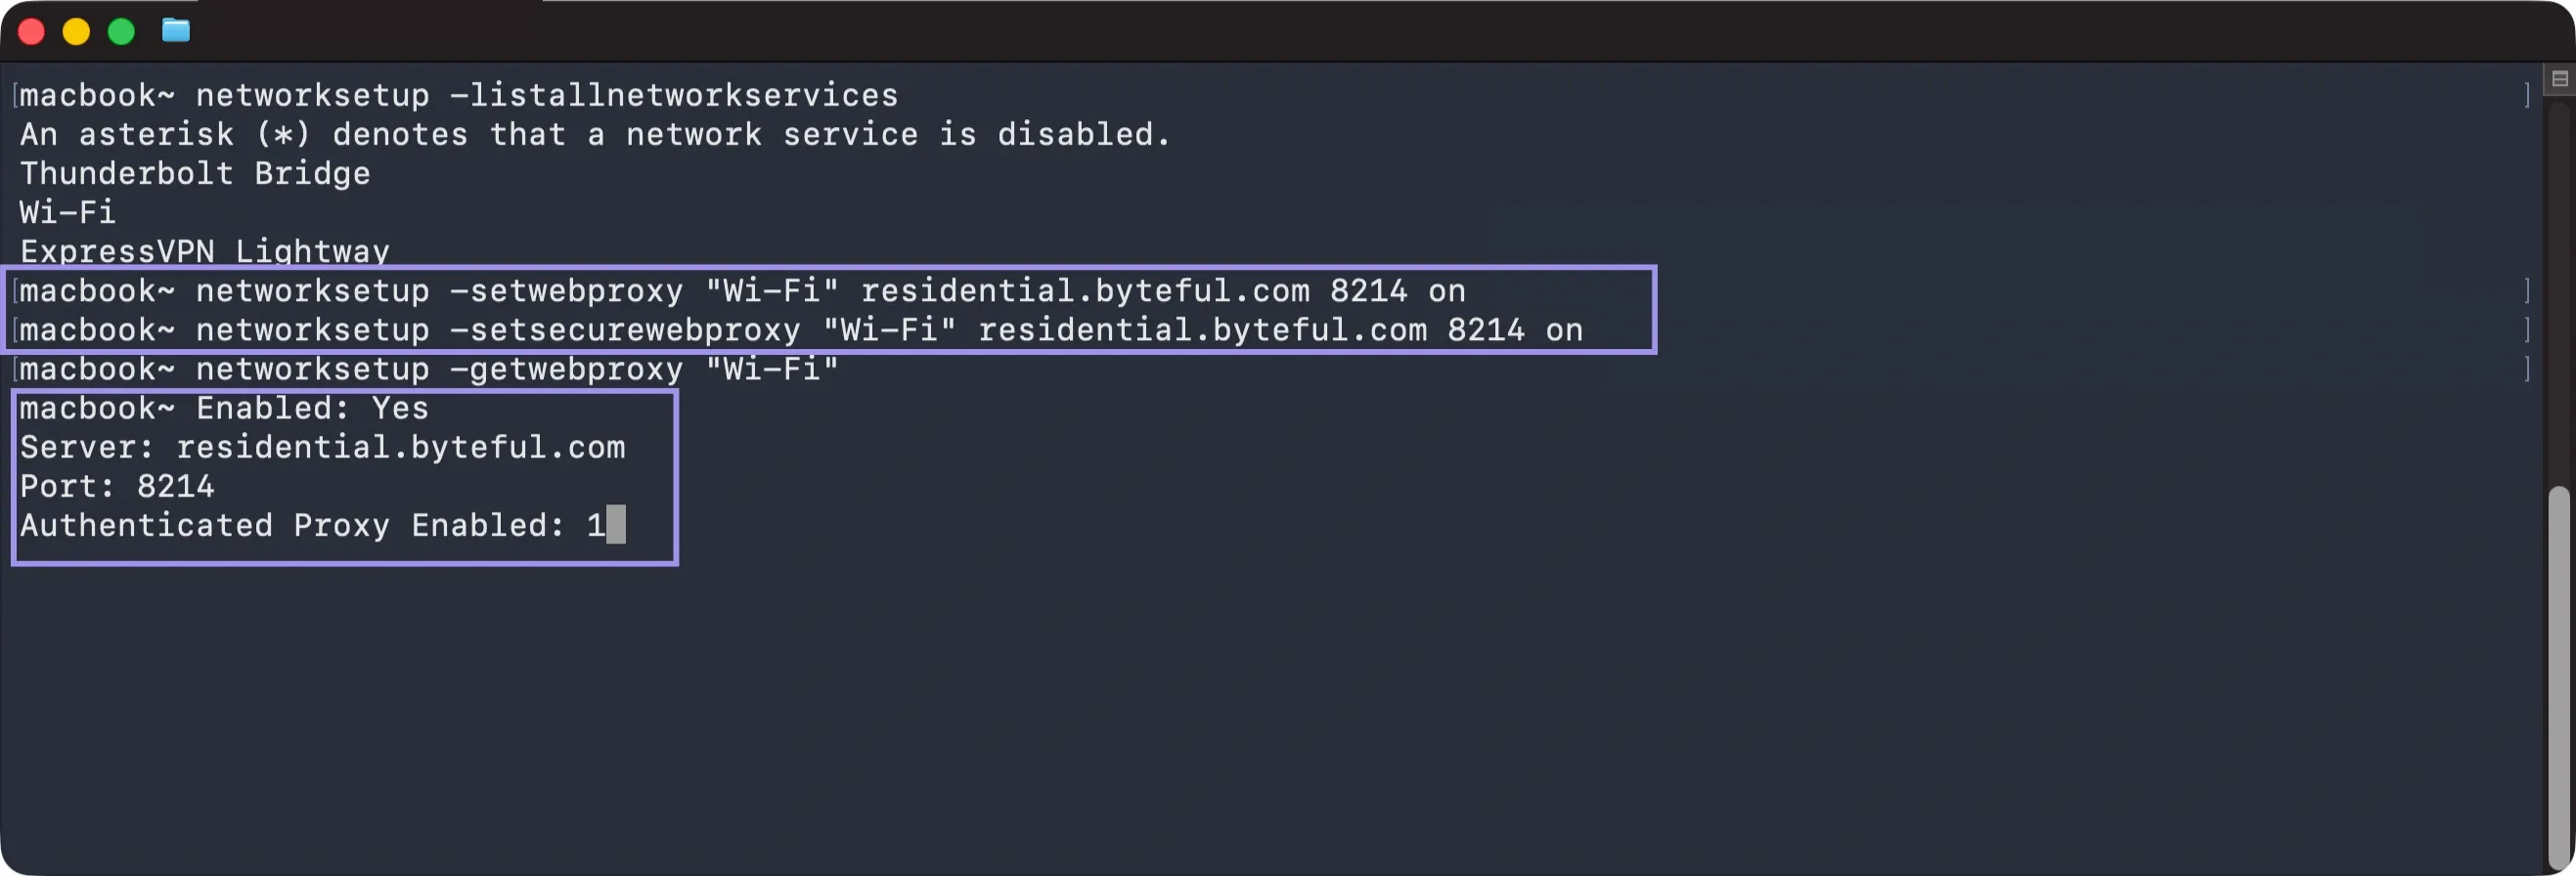
If you want a persistent change to a selected network service, use networksetup. Start by listing the active network services so you'll know which one to target:
networksetup -listallnetworkservicesThen apply the proxy to whichever service you need (swap out Wi-Fi with the actual name from your list):
networksetup -setwebproxy "Wi-Fi" proxy.byteful.com 8080 on username password
networksetup -setsecurewebproxy "Wi-Fi" proxy.byteful.com 8080 on username password
The on flag is what turns the authentication on. For when the proxy is to be turned off but its saved values are kept as they were, use this:
networksetup -setwebproxystate "Wi-Fi" off
networksetup -setsecurewebproxystate "Wi-Fi" off
To turn the proxy off but keep the saved values, use networksetup with -setwebproxystate off. To wipe them completely, use networksetup to set blank values as needed or remove them under System Settings > Network > Details > Proxies. Exact behaviour can vary by macOS version, but removing saved values is not GUI-only.
For scripted configurations, looping through -listallnetworkservices lets you push the same proxy to multiple network services in one command. Bypass domains can be set per service too, which helps when a Mac moves across different networks.
Deploying Managed Proxies via Configuration Profiles
Configuration Profiles are what you use in environments where the same proxy settings have to apply across multiple Macs without you setting up every device by hand. This applies to dev teams, school labs, company fleets, and other managed environments where it does not make sense to expect the users to fiddle with their own network settings.
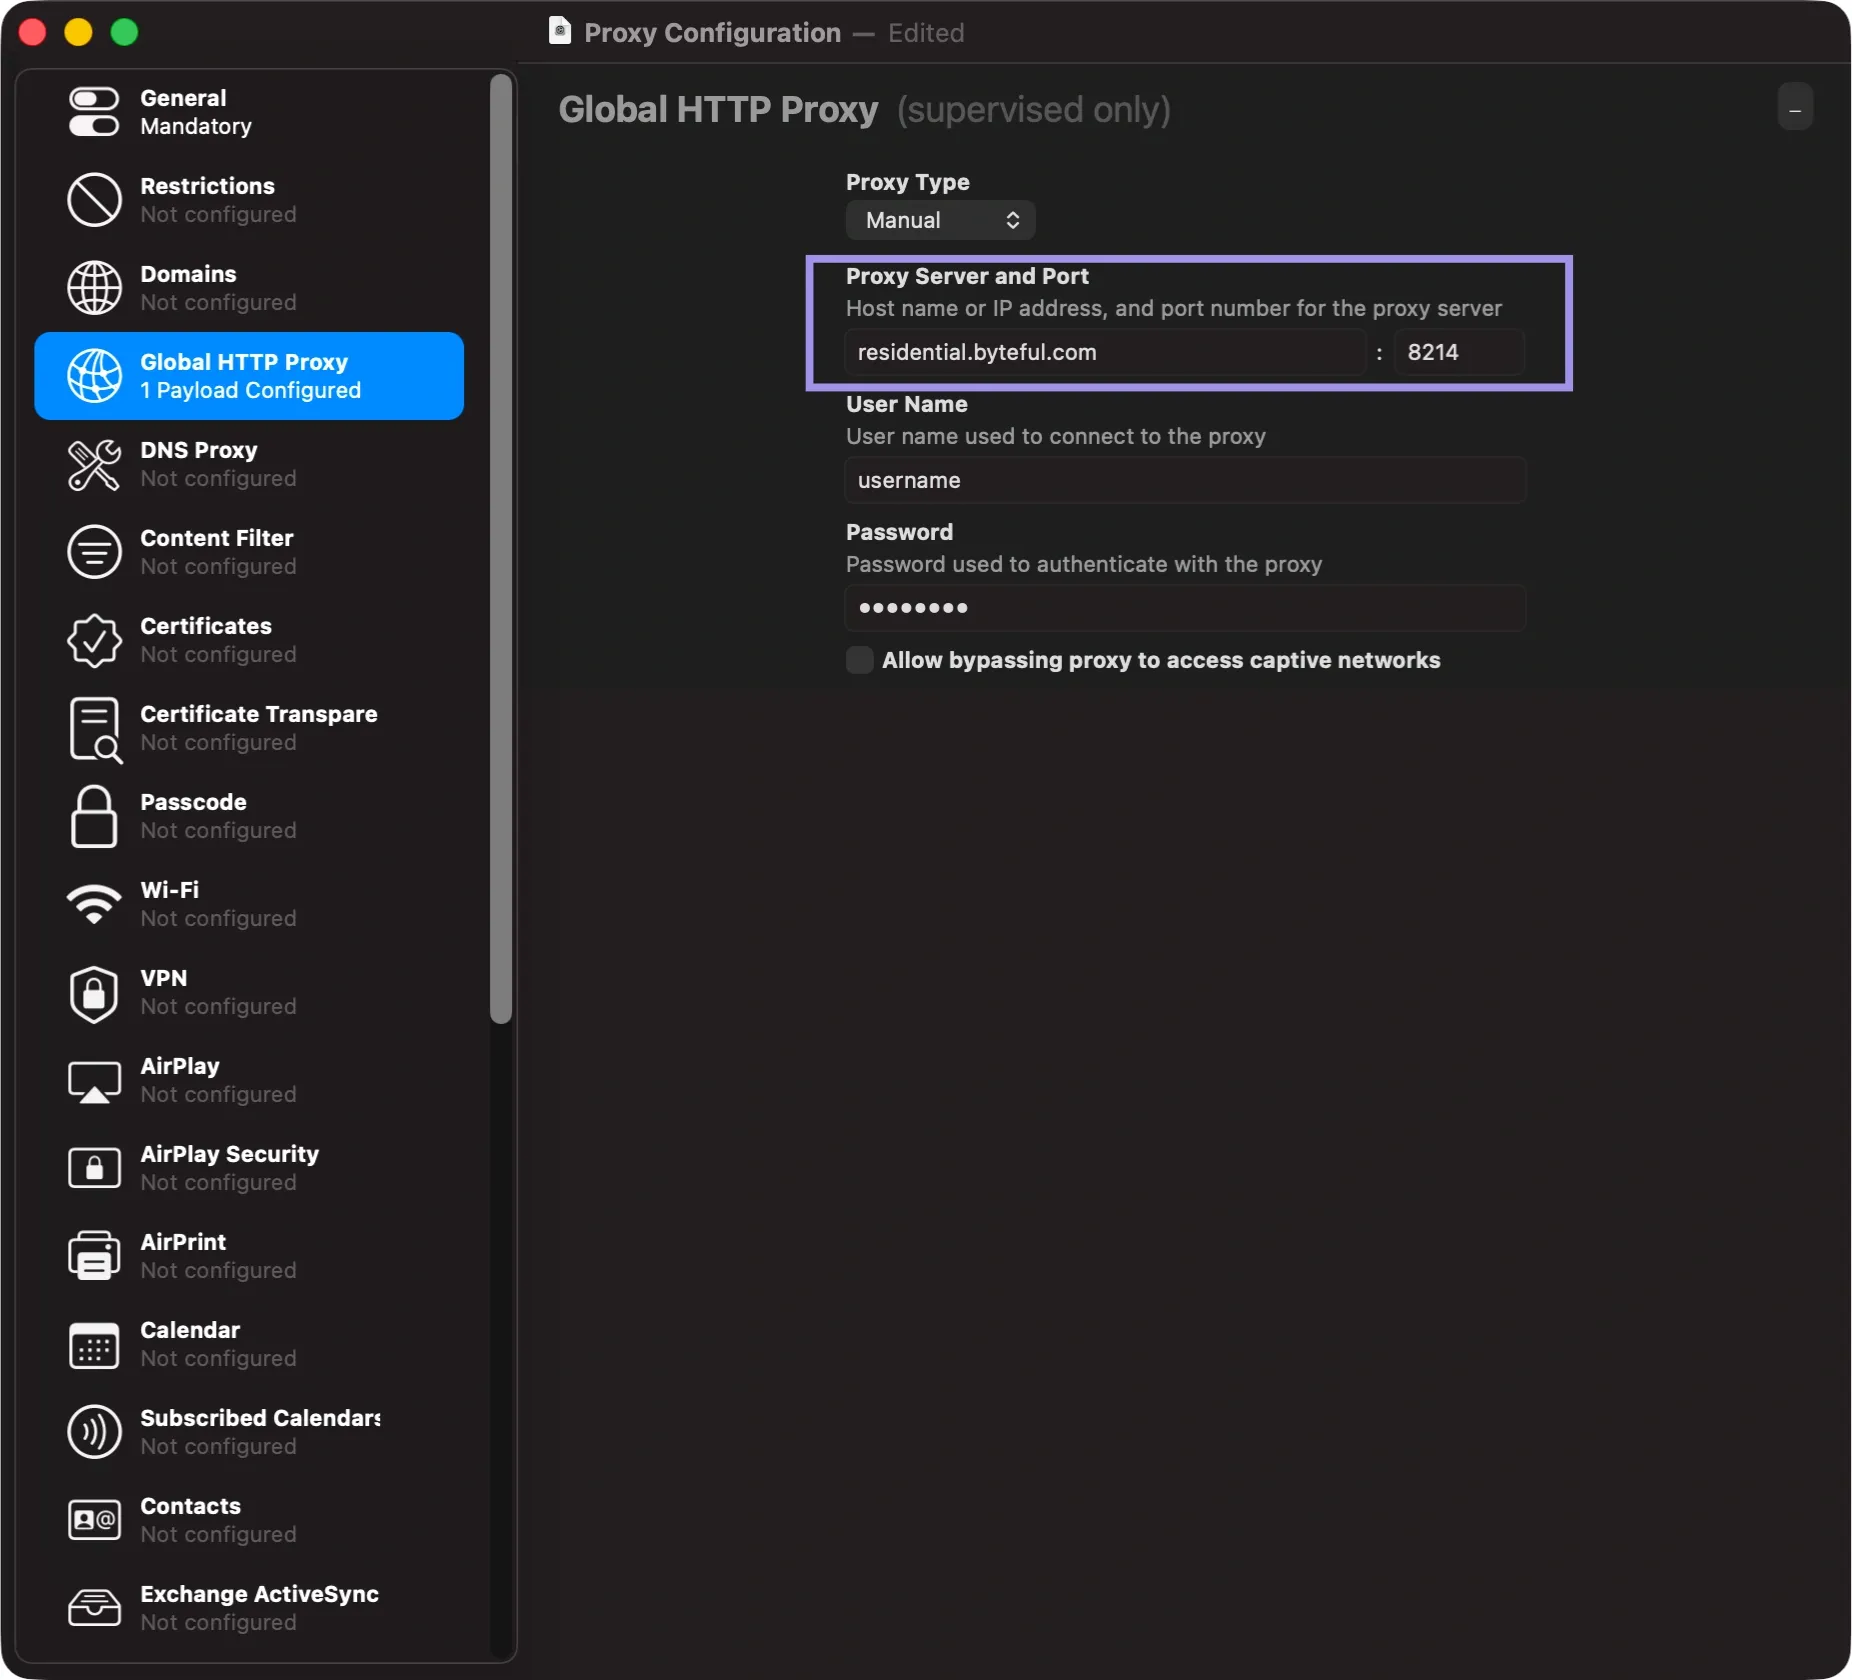
A Configuration Profile is essentially a signed .mobileconfig file delivered through an MDM tool such as Jamf, Kandji, Mosyle, or Microsoft Intune. After being installed, the profile pushes the proxy automatically. The configuration may also restrict the user from being able to change those settings, depending on what the MDM policy says.
Apple supports a Network Proxy Configuration payload for managed Macs, which pushes proxy settings through a configuration profile. It is built for manual proxy configuration, Automatic Proxy Configuration via a PAC file URL, and web proxy auto-discovery via DHCP or DNS.
The payload itself includes HTTP, HTTPS, and SOCKS as the proxy types it covers, plus there is a Proxy Exceptions field where bypass domains have to be added. The deployment for this would look something like:
- In the MDM console, create a new Configuration Profile that targets macOS.
- Add the Network Proxy Configuration payload. The menu name varies a little between MDM vendors.
- Fill in the proxy details. Manual setup needs the hostname and port; automatic configuration only needs the PAC URL.
- Enable the proxy types you need. Any bypass entries go in the Proxy Exceptions field.
- Save and sign the profile, then push it to your device group through the MDM.
- The presence of the profile is determined on each of these target Macs under System Settings > General > Device Management. You will need to have the proxy itself active in Network > Details > Proxies.
The benefit of deploying credentials via an MDM is that you have the same configuration across all machines automatically. Users do not have to enter credentials manually, which reduces mistakes.
Configuring Bypass Rules and Exclusions on macOS
You use bypass rules to inform macOS which traffic you don't want to be routed through the proxy and perform a direct connection instead. Helpful for internal company resources, local development servers, services that will not accept proxied traffic, and tools operating off of strict network allowlists.
Apple's proxy settings support several bypass patterns, depending on exactly what you want excluded. Inside the "Bypass proxy settings for these Hosts & Domains" field, these are the formats that are commonly used:
- Single domain: Entering apple.com bypasses that exact domain and nothing else.
- Wildcard for subdomains: Using *.apple.com will instead bypass each and every subdomain sitting under it. So mail.apple.com, store.apple.com, support.apple.com, and all the others as well.
- Specific subdomain: Just putting store.apple.com in there will only bypass that specific subdomain on its own.
The entries you would almost always want to be adding into the list: localhost, 127.0.0.1, along with *.local, so that the loopback and local-network traffic gets kept direct. Plus any internal hostnames your team uses.
From Terminal, bypass domains are applied with:
networksetup -setproxybypassdomains "Wi-Fi" localhost 127.0.0.1 *.local *.yourcompany.com
In a Configuration Profile, those same entries go into the Proxy Exceptions field of the Network Proxy Configuration payload.
Why does UDP traffic bypass the native macOS SOCKS5 proxy?
macOS system proxy settings are most reliable on TCP-based HTTP(S) traffic. UDP traffic, including QUIC and HTTP/3, may bypass the system proxy depending on the app and protocol. This can affect video streams, online games, DNS over QUIC, and real-time voice apps.
SOCKS5 does support UDP at a protocol level with UDP ASSOCIATE, but Apple's proxy UI documentation is ambiguous as to how this is handled. This means that if SOCKS Proxy is enabled, it does NOT mean that UDP is also already covered.
Test it with a UDP-specific check and go VPN style or tunneling-based client if UDP coverage is important. There are tools like ProxyBridge and tun2socks that can route TCP and UDP through SOCKS5, but this is less reliable depending on the configuration.
It's not macOS; on your side, it only works if both the client tool and the upstream proxy support what you need in your workflow, or if the bottleneck lies at the proxy endpoint. For session-heavy work, residential or static residential proxies hold up better than rotating ones.
How to Verify if macOS Proxy Configuration is Successful?
A proxy can look configured and still fail to route traffic correctly. So it's worth checking three layers: that macOS has registered the proxy, that your browser is routing through it, and that command-line tools can reach it too.
You only need to do the three checks the first time. The Byteful Proxy Tester can provide a more rapid pre-check to validate the connection, geo-location, and response time prior to using the proxy in macOS.
The System Status Check
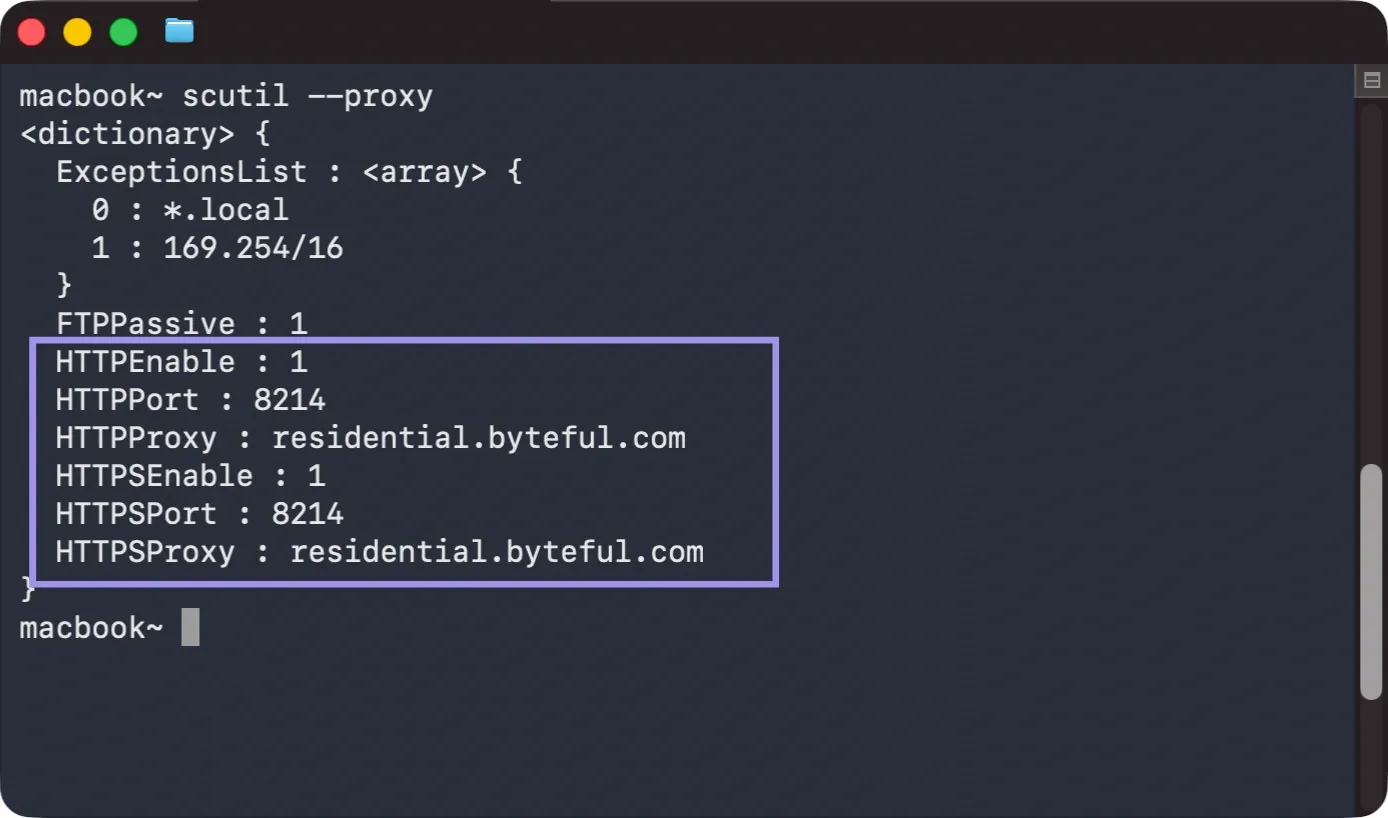
To quickly verify that macOS picked up the proxy config, you can check directly with the system. Open Terminal and run:
scutil --proxyYou will see the active proxy dictionary, with HTTP, HTTPS, and SOCKS entries and their hostnames, ports, and enable flags. The system is reading the proxy correctly during this check if the values are exactly what you configured (or what your Configuration Profile pushed). If the dictionary returns mostly empty, then the configuration wasn't applied. Time to either go through System Settings again or recheck your networksetup commands.
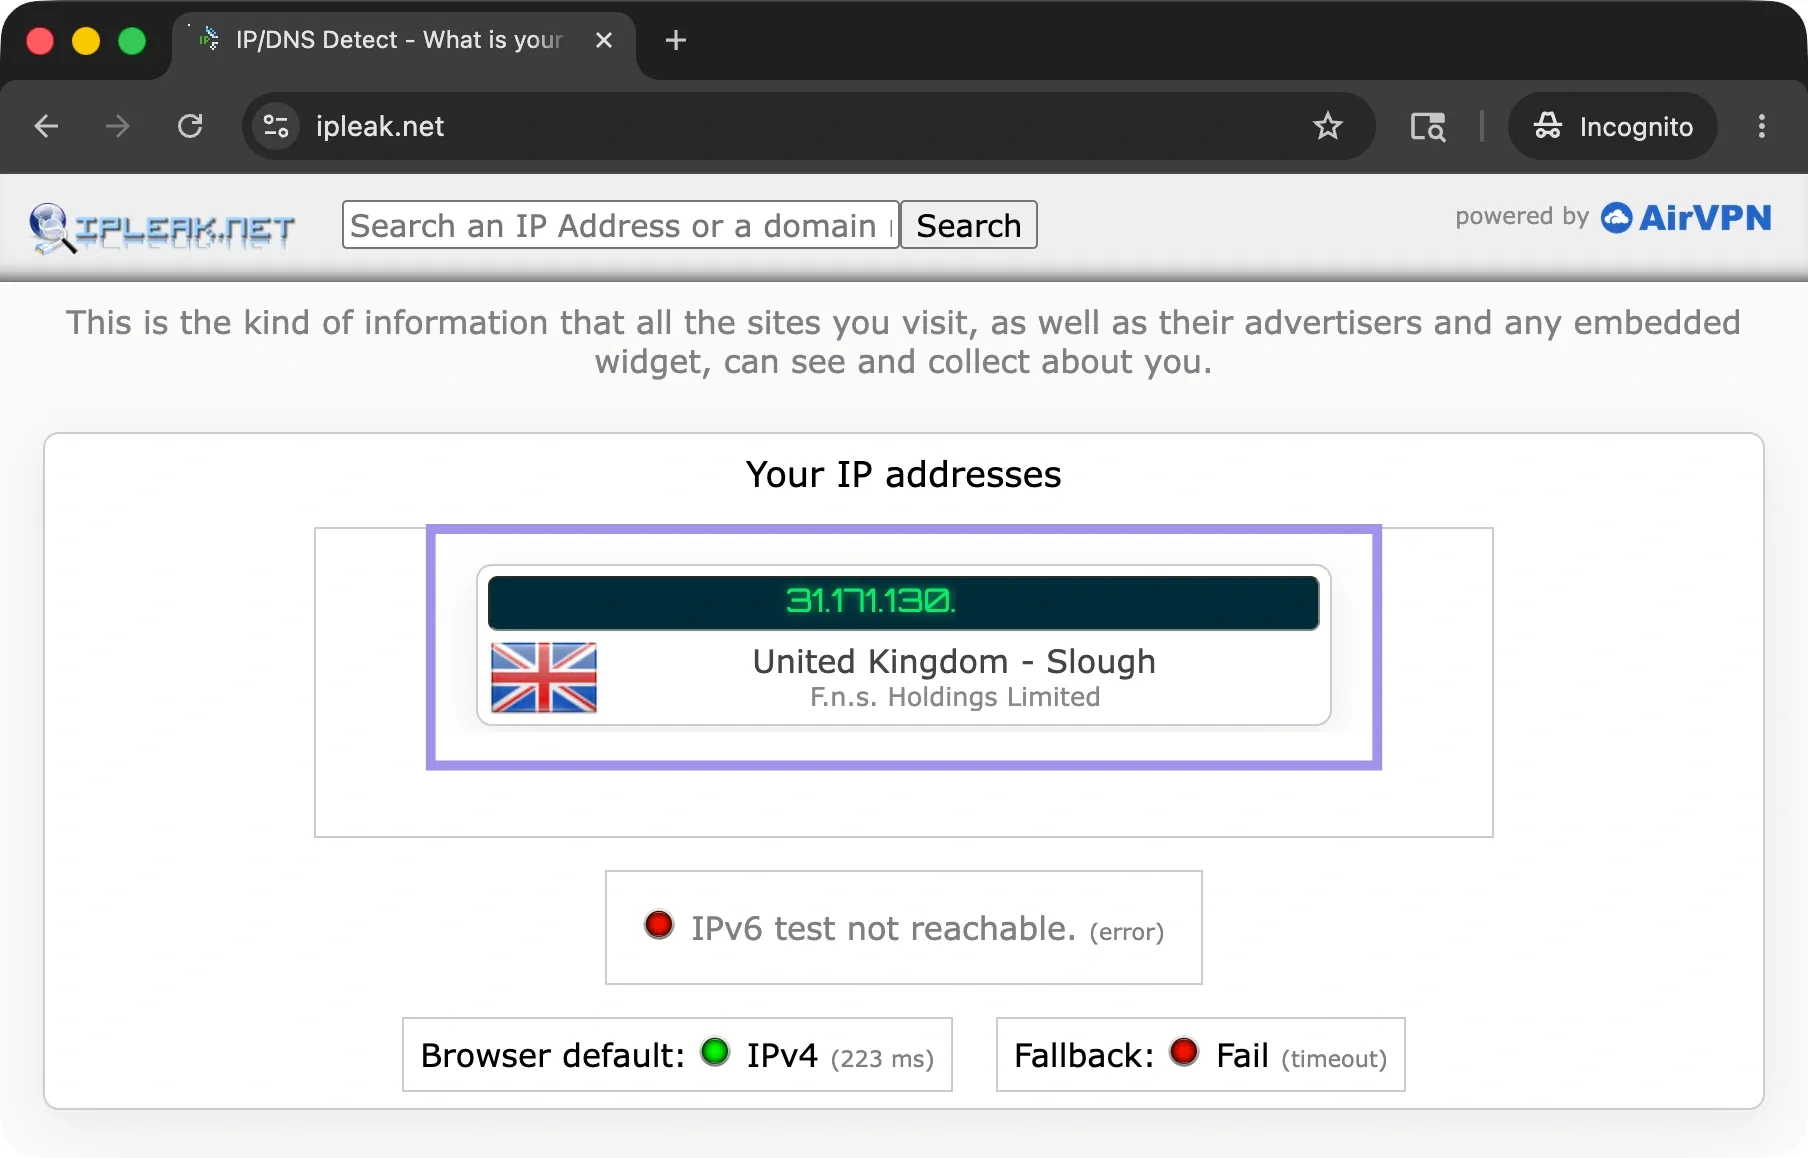
The Browser Test
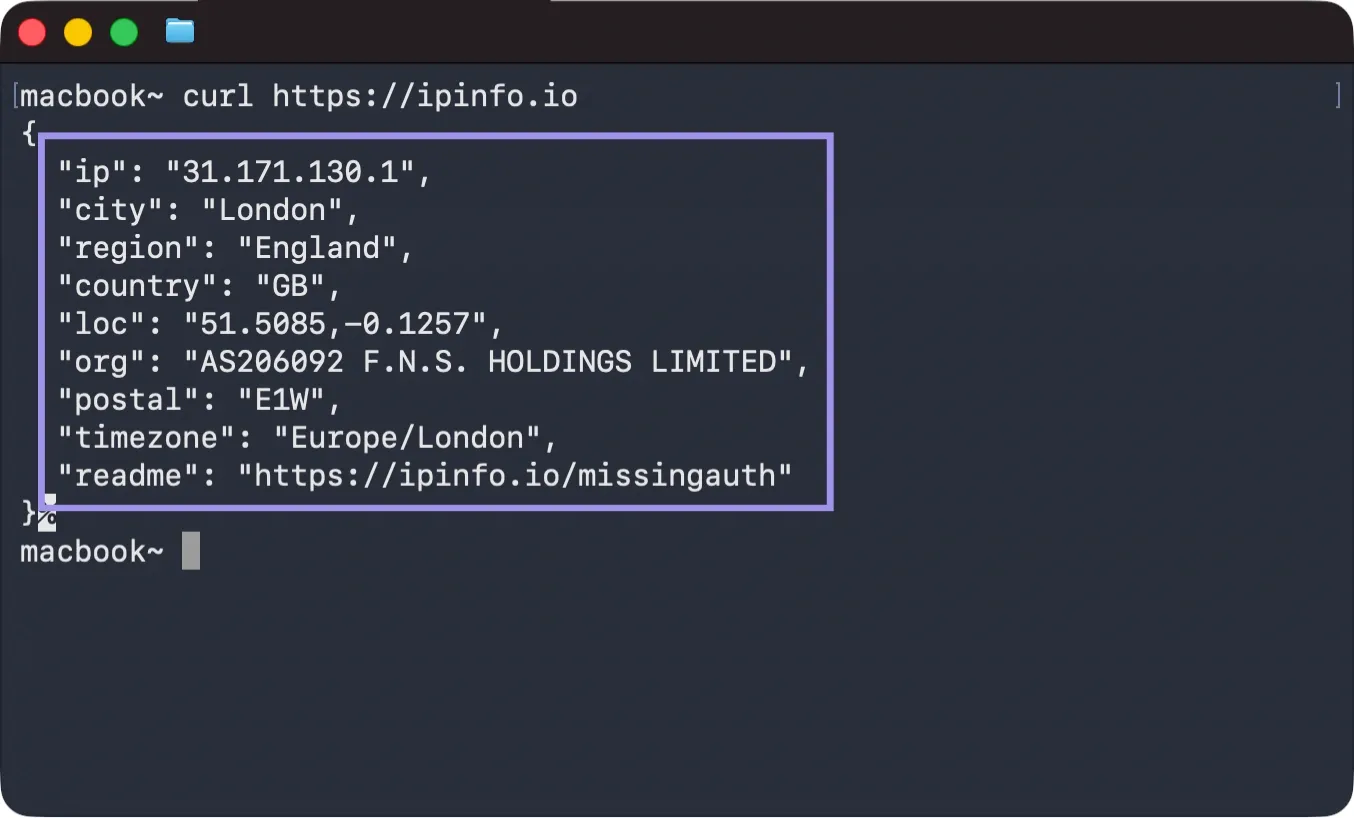
Open Safari, Chrome, or Microsoft Edge and visit whatismyip.com or ipinfo.io. If the IP and location displayed match the proxy you configured, your TCP and HTTP traffic are routing properly.
If the page is showing your real IP instead, one of two things is happening. Either the proxy is not applied to the network service you are on, or the browser is using its own proxy stack. Firefox is a common one to check since it has its own Connection Settings menu, including options for system proxy settings and manual proxy configuration.
The Terminal Test
Command-line tools don't always read system proxy settings. So they need to be tested separately. Run this:
curl -x http://your-proxy-address:port https://ipinfo.io
If you're using authenticated proxies, the credentials go inline:
curl -x http://username:password@your-proxy-address:port https://ipinfo.io
What comes back ought to be the proxy's IP and location. That tells you curl is honouring the -x flag properly, and that the proxy is reachable from Terminal. If you get a connection refused error or it times out instead, then either the proxy itself is down, or your network is blocking outbound traffic on that port.