


Ubuntu offers many ways to configure a proxy depending on different use cases and their scope. This gives you the flexibility of configuring a proxy for a specific use case without interfering with the system-wide or user-specific proxy settings but it also adds complexity, as there is no single place to configure the proxy for the complete system for all users, services, or applications.
This article will go through different ways to configure a proxy in Ubuntu, what parts of the system they affect, and where they fall short.
What are Ubuntu's Native Proxy Options?
Unlike Windows and macOS, Ubuntu offers numerous ways for proxy configuration, each with a different scope, but none of them will work in every context.
Some of the options to configure the proxy on Ubuntu are via desktop settings, environment variable configuration, apt, and system service-specific configuration. When it comes to configuring a proxy on Ubuntu Desktop and Ubuntu Server, they both support almost the same proxy configuration methods. The only difference is that Ubuntu Desktop additionally offers a GUI option. All of the other ways to configure proxy work the same across both.
HTTP and HTTPS proxies are the most universally supported types across Ubuntu. These handle web traffic routing over HTTP and HTTPS, but can’t handle UDP, QUIC, or some other types of traffic.
FTP proxies, which handle file transfer traffic routed through FTP, are a supported option in Ubuntu's environment variables and desktop settings. But it is less common in modern setups, as actual behavior depends on whether the tool being used honors the ftp_proxy variable.
A SOCKS5 Proxy can handle more types of traffic than a traditional HTTP proxy. Unlike HTTP proxies, SOCKS5 can tunnel TCP or UDP traffic regardless of the application protocol. This makes it useful for applications that go beyond plain web browsing, like SSH tunneling, torrenting, and other similar use cases.
While configuring a proxy on Ubuntu Server, be cautious about the proxy type you choose. Certain proxies, like HTTP may break SSH access if you try to encapsulate all outgoing traffic, making your server inaccessible.
Configure a Proxy via Ubuntu Desktop Settings
This is the easiest way to configure the proxy on Ubuntu and is ideal for someone who is less comfortable with the terminal. To configure the proxy on Ubuntu via Desktop settings:
1. Go to the Activities overview from the top left corner of the desktop.
2. Open Settings by searching for it in the search box.
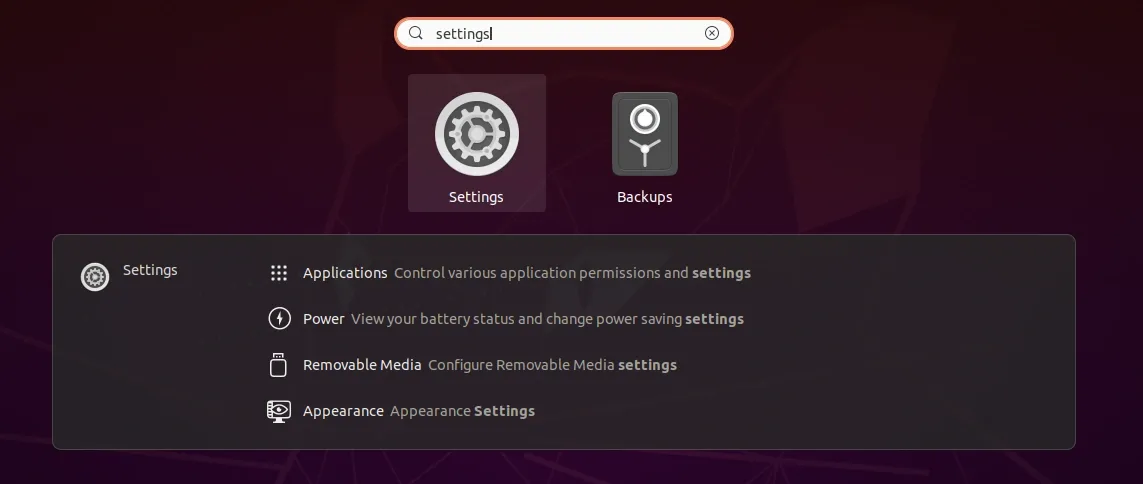
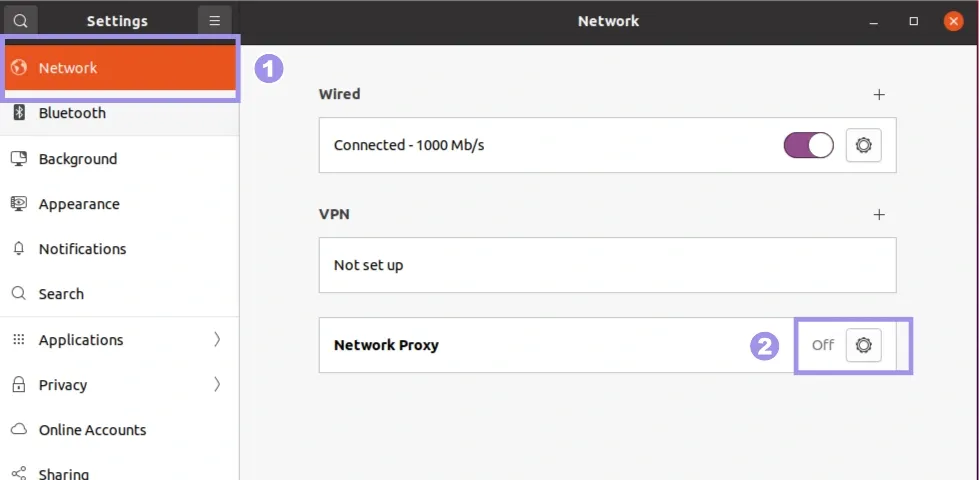
3. From the Network tab, locate Network proxy, then click the gear icon next to it.
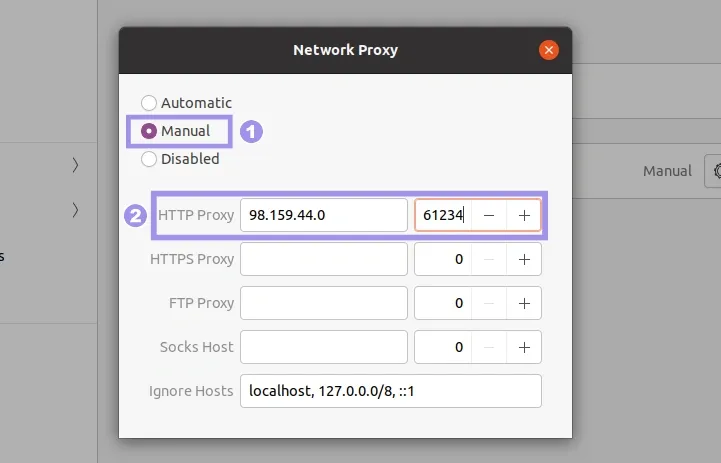
4. Select Manual from the list, then enter your proxy server address and port number.
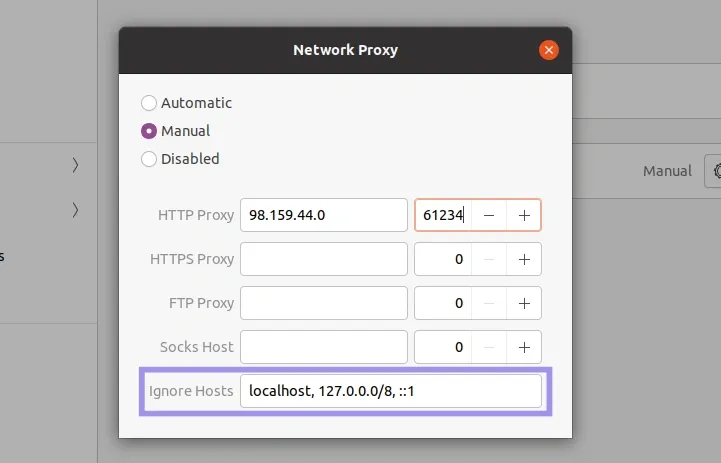
5. Add local domains to the Ignored hosts section to bypass the proxy for local traffic.
6. Close the dialog box to complete the proxy configuration.
Configuring a proxy via desktop settings applies the proxy settings system-wide for the current user and is consistent between reboots. Any apps that are set to use system-wide proxy settings will use the configured proxy.
A limitation of configuring a proxy via desktop settings is that you cannot specify the proxy credentials. So if your proxy requires credential authentication, you will need to enter your username and password each time you use an app/tool that uses the configured proxy, or you will get a 407 authentication error on most terminal tools.
To remove the proxy configuration, simply set the network proxy to disabled again. The settings will take effect immediately for the browsers. For the terminal, the updated settings will be effective in a new terminal session.
Configure Proxy Settings for Browsers
Most browsers, like Microsoft Edge and Safari, use system-wide proxy configuration and do not have their own proxy settings. But some browsers, like Firefox, can use system-wide settings and support in-browser configuration as well. It is ideal for situations where you want the browsers to use a different proxy than the system-configured one.
To configure a proxy in Firefox:
1. Go to the settings from the 3-dash menu in the top right corner in Firefox.
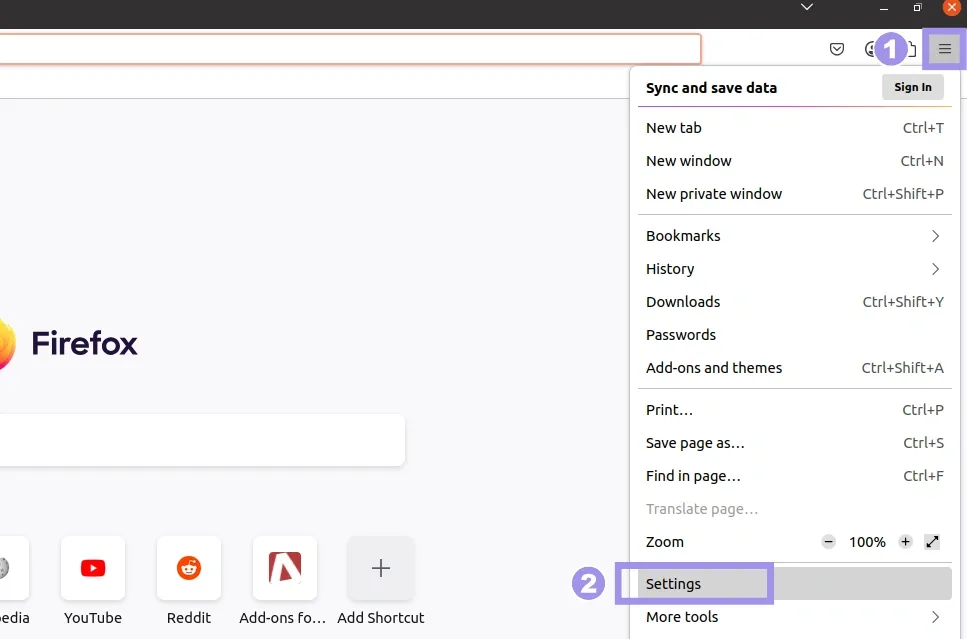
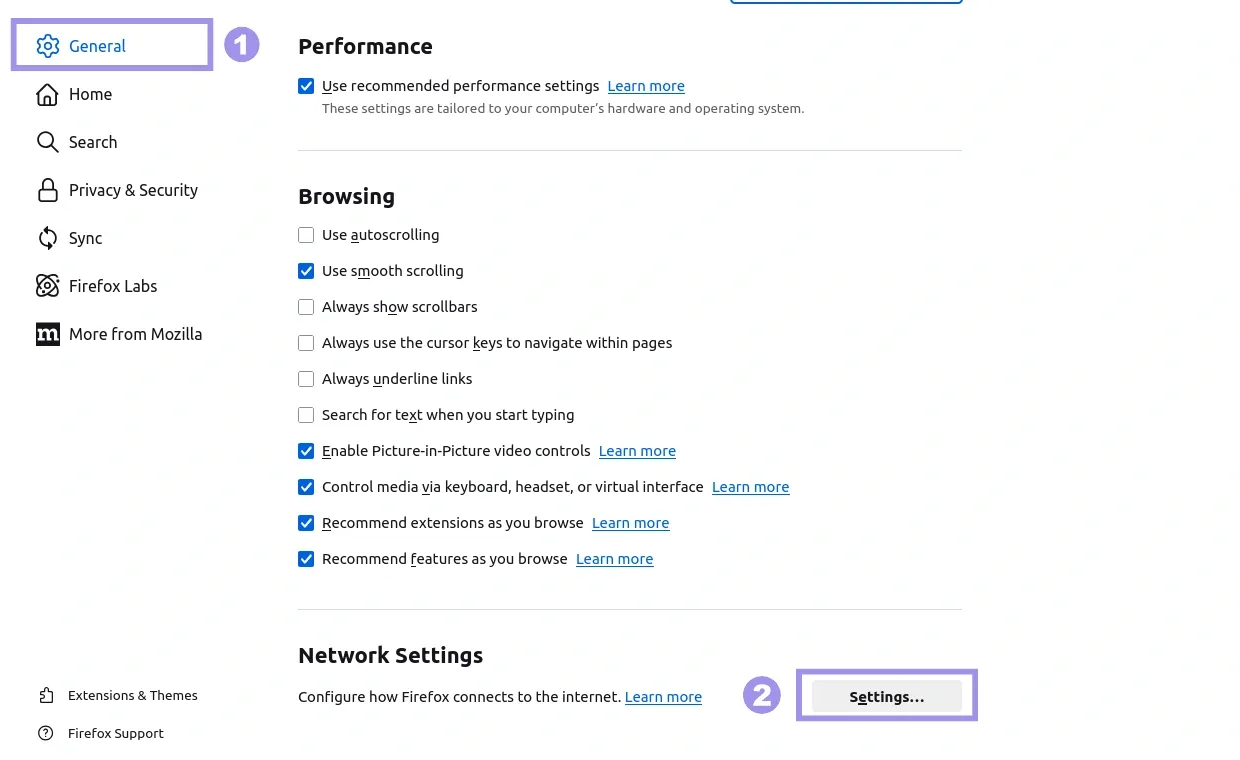
2. From the General tab on the left-hand side, scroll to the bottom, locate Network Settings, and go to Settings.
3. Select Manual proxy configuration, enter your proxy server address and port number, and then click OK to complete the configuration.
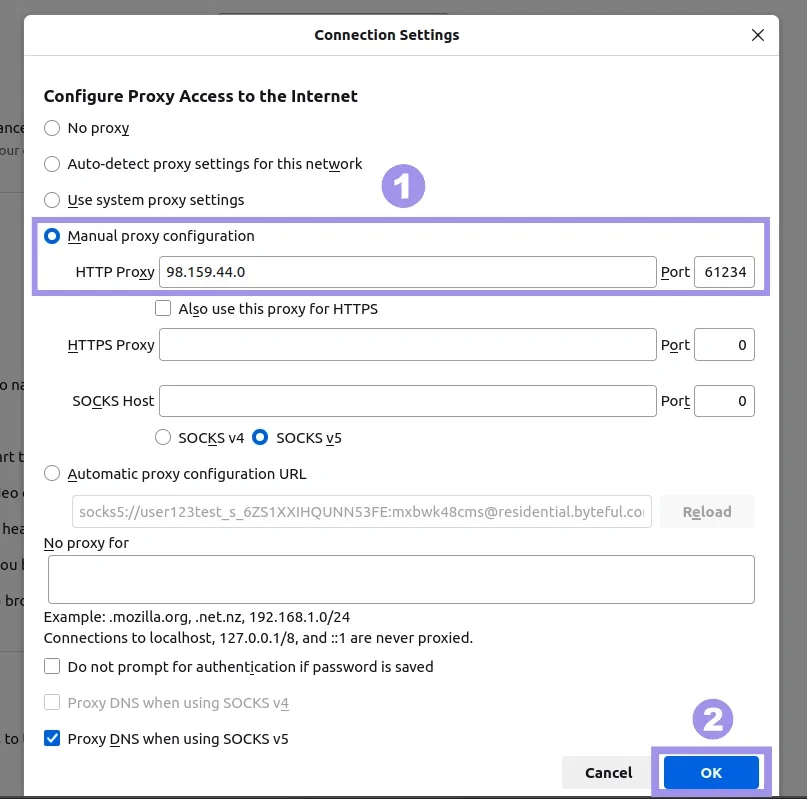
The changes will be effective immediately without restarting the browser, and the proxy configured directly in the browser will override the system proxy settings for the browser.
Set Proxy Environment Variables in the Terminal
There are various ways to configure a proxy in the terminal, each with a different scope of effect and precedence.
Temporary proxy configuration in Terminal
For configuring a temporary proxy for the current terminal session, run the export command followed by the proxy details in the terminal.
export http_proxy=”http://proxy-address:port”Replace the “proxy-address” and “port” with your proxy details. If your proxy requires authentication credentials, use:
export http_proxy=http:”//username:pass@proxyaddress:port”The proxy URL part of the command can be in double-quotes, single quotes, or without quotes. It does not have any effect on the configuration.
This temporary proxy configuration will get removed automatically when you close the terminal. You can also use “unset” the proxy variable to disable the proxy.
unset http_proxy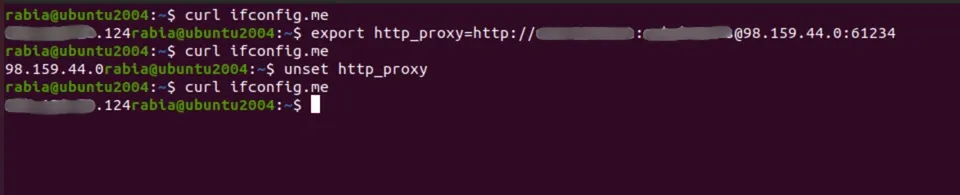
System-wide proxy configuration for all users
To configure the system-wide proxy for all users, you can edit the /etc/environment file to include proxy configuration. To do so:
1. Navigate to the /etc directory.
2. Open the environment file via a file editor like nano with sudo permissions. The file will not be writable without sudo permissions.
sudo nano environment3. Add the proxy variables in this file.
http_proxy=”http://username:password@proxyaddress:port”
https_proxy=”http://username:password@proxyaddress:port”
no_proxy=”localhost,127.0.0.1”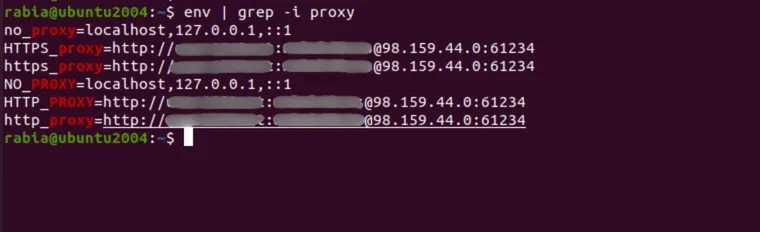
4. Save the file with Ctrl (Command for macOS) +S and exit with Ctrl (Command for macOS) +X.
These proxy configurations will be effective after a re-login to the system and is consistent between reboots.
If you have a proxy configured via desktop settings and another proxy configured via the etc/environment file, the environment file configuration will have higher precedence in the terminal. But apps like browsers will use the proxy configured via desktop settings.
To disable the proxy, simply remove the proxy variables from the environment file. A system reboot will be required for these changes to be effective. You can also unset the proxy variables to disable the proxy temporarily.
Proxy configuration for user-specific bash shell sessions
To configure the proxy for the bash shell sessions of the current user, you can edit the .bashrc for that specific user.
1. Navigate to the home directory of the current user.
2. Open the .bashrc file using a text editor: nano .bashrc
3. Add these lines at the end of the file:
export http_proxy="http://proxy-address:port"
export https_proxy="http://proxy-address:port"
export no_proxy="localhost,127.0.0.1,::1"
export HTTP_PROXY="http://proxy-address:port"
export HTTPS_PROXY="http://proxy-address:port"
export NO_PROXY="localhost,127.0.0.1,::1"
4. Save the file with Ctrl (Command for macOS) +S and exit with Ctrl (Command for macOS) +X.
5. Reload the file for the changes to be effective
source .bashrcThe proxy configured by editing the .bashrc file will be effective after reloading the file or in a new terminal window for the bash shell session of the specific user. When removing proxy configurations from the file, changes will be effective in new terminal windows.
Proxy configured via the .bashrc file will override the /etc/evironment file configuration for the shell session of the specific user and will be consistent between system reboots.
If your proxy username or password contains a special character, for successful configuration, you will need to use URL encoding for that character in the configuration files instead of the character itself. Otherwise, it will break the URL parsing for the proxy URL, and you might face an unsupported proxy syntax error.

Configure Proxy Settings for APT
Ubuntu’s Advanced Package Tool (apt) often ignores the proxy environment variables, and that is why it requires separate configuration. To configure the proxy for apt:
1. Navigate to the /etc/apt/apt.config.d directory.
2. Create and edit a new file with sudo permissions for proxy configuration. The name you choose for the file does not make any difference.
sudo nano proxy 3. Write these proxy configuration lines in this file
Acquire::http::Proxy "http://username:pass@proxy-address:port";
Acquire::https::Proxy "http://username:pass@proxy-address:port";
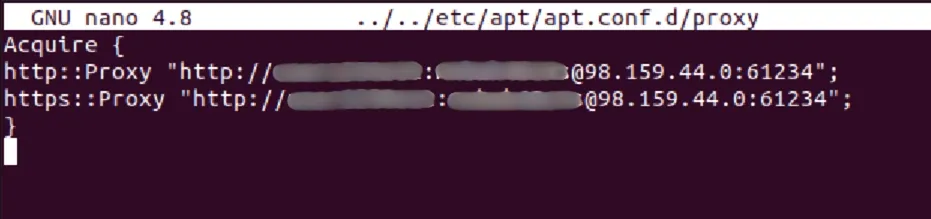
Or you can also write the configuration lines in this format for simplicity:
Acquire {
http::Proxy "http://username:password@proxy-address:port";
https::Proxy "http://username:password@server-address:port";
}
4. Save the file with Ctrl (Command for macOS) +S and exit with Ctrl (Command for macOS) +X to complete the configuration.
These configurations for apt will take effect immediately without requiring a re-login, reboot, or anything else. The apt proxy configuration is specific to package management, completely independent of other proxy settings, and consistent between system reboots.
An important point to note is that any proxy configuration file that comes later in the apt.conf.d directory will override the existing configuration for the proxy.
Apply Proxy Configurations for System Services
If you want the system services to use the proxy, you will have to configure it separately. That is because the background services and systemd-managed apps do not use the same environment as a logged-in user does, and hence do not use the same configuration as a logged-in user does.
To configure a proxy for a system service
1. Create a service override file for that specific service
sudo systemctl edit <service-name>2. Then add your proxy details to the file
Environment="http_proxy=http://proxy-address:port"
Environment="https_proxy=http://proxy-address:port"
Environment="no_proxy=localhost,127.0.0.1"
3. Save the file with Ctrl (Command for macOS) +S and exit with Ctrl (Command for macOS) +X.
4. Reload the systemd daemon
sudo systemctl daemon-reload.5. Finally, restart the service to complete the configuration.
sudo systemctl restart <service-name>Different command-line tools, like curl, can also be configured separately to use a proxy. This can be done via editing their configuration file or using a flag in the command.

An important point to note here is that while configuring the proxy via editing configuration files, your proxy credentials are stored in plain text. Anyone on the system will have access to the configuration files and hence will have access to these proxy credentials, which raises security concerns.
You can also restrict access to these configuration files to the root user only, though any user with root privileges will still have access.
For a more secure approach, you can use IP whitelisting for your proxies. This way, you do not have to store your credentials anywhere in the system, and the proxy authentication will be managed based on your public IP address.
How to Verify if Ubuntu Proxy Configuration is Successful?
There are various ways to test if the proxy configuration is successful and working fine, depending on how you configured the proxy.
Global Variable Verification
If you configured the proxy through environment variables, you can run this command to verify if the proxy variables are set correctly:
env | grep -i proxyIf this command outputs the configured proxy variable, it indicates that the proxy configuration was successful and is active.
Tool-Specific Success Checks
Depending on what tool you configured the proxy for, there are different ways to verify its success.
To verify proxy configurations for apt, run the command:
sudo apt updateIf it completes the execution without any errors, your apt-specific configuration is active and working fine.
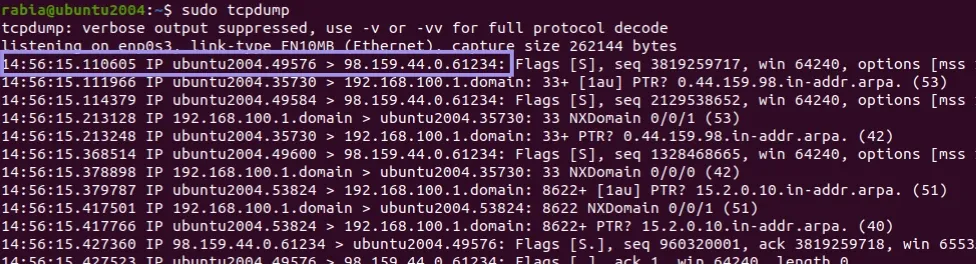
You can also use “sudo tcpdump” in another terminal while running the update command to make sure that the traffic is routing through the proxy server.
For Background Services, you can verify the proxy configuration by running:
systemctl show --property=Environment <service-name>If the output shows your configured proxy for the service, the configuration is successful.

End-to-End Connectivity Tests
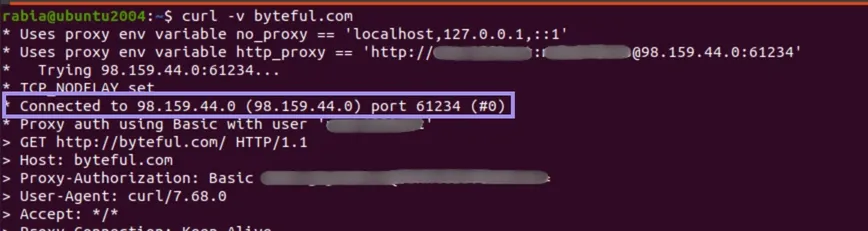
You can verify the proxy configuration by checking if your system connects to the internet via the proxy IP address. To do that, you can curl any website, byteful.com, for example, with the verbose flag.
curl -v byteful.comIf the results indicate anything that proves the connection to the proxy, then it means that your traffic is routing through the proxy server.
Another method is to check your public IP address. cURL a website like ifconfig.me.
curl ifconfig.meIf the results return the IP address of the proxy server, it confirms your connection with the proxy.

Troubleshooting False Positives
There are some scenarios where everything seems to be working fine after configuring the proxy, but your traffic might be routing through a direct connection.
When the proxy is configured through the .bashrc file, and sudo commands are running successfully, that does not verify a successful proxy connection. As the .bashrc file configures the proxy for the shell sessions of the current user, sudo commands do not use these configurations and route traffic through a direct connection.
If you configured the proxy through environment variables using lowercase letters, some tools will ignore those variables and establish a direct connection. This is because these tools look for uppercase, while others look for lowercase environment variables. So if a tool is working without any errors, that does not always mean a successful proxy configuration. To encounter this, you will need to configure the proxy using both uppercase and lowercase letters.
A successful ping test does not verify a successful proxy configuration. Ping uses ICMP packets, while the proxies often handle HTTP, HTTPS, FTP, UDP, and TCP traffic. So, ping always ignores the proxy configuration and connects to the target directly.
If everything seems to be configured correctly, but your system is still not able to connect through the proxy, test your connection with a proxy tester to see where the connection breaks.