


Do you want to set up proxies on Windows? It looks simple, but you can run into problems really fast. One app follows the proxy settings, and another ignores them. Then, SOCKS5 connections fail even when all of your credentials are correct.
But there’s no need to worry. This guide breaks down the entire Windows proxy integration process. We will explain how to configure proxies via Settings, the Control Panel, command-line tools, and Group Policy. We will also provide practical solutions for the Windows SOCKS5 proxy problem, so you can ensure your setup works with all proxy formats.
What are Windows' Native Proxy Options?
Windows offers native support for HTTP and HTTPS proxies. It also supports PAC (Proxy Auto-Config) scripts and proxy discovery via WPAD (Web Proxy Auto-Discovery).
Another layer you should know is WinHTTP. A lot of Windows services and background applications use it instead of user-level proxy settings. Therefore, WinHTTP settings can matter if your traffic comes from system services. You can manage most of these proxy settings from the Network & Internet section in Windows Settings.
There are some limitations as well. For example, Windows doesn’t provide native support for SOCKS5 at the system level. So, it usually won't work if you enter SOCKS5 credentials unless you use a third-party client.
It is also common for a lot of applications to ignore your Windows proxy settings. That’s because they may use their own networking libraries. This can bypass the system proxy configurations.
Proxy Configuration Methods on Windows
Windows proxy integration doesn’t use one layer for everything. It uses two main APIs: WinINet and WinHTTP. These APIs are the base that proxy configuration sits on. They affect which apps actually follow your configuration. This system is similar to macOS’s proxy configuration approach, which relies on User Defaults & System Configuration Framework.
Here is how both of these APIs work:
- WinINet is the user-level layer. It is built for interactive desktop apps that run in a signed-in user session. That’s why this is the proxy path most people see first. You usually work on WinINet settings when you set a proxy in the Settings App or Control Panel.
- WinHTTP covers the system side. It is used by services, background tasks and processes that don’t rely on the user sessions. That is why a proxy can work in your browser but fail for Windows Update, an agent, or a scheduled task. You can configure Windows proxy settings in Settings, the Control Panel, and PAC scripts. But these methods mostly affect user-side behavior unless you also set the system-side proxy.
Windows handles traffic differently depending on the application or service. Thus, we will focus on the following four methods that cover the full spectrum of Windows usage:
- Individual user needs (GUI)
- System-wide level background services (Netsh)
- Legacy compatibility (WinINet)
- Centralized fleet management (Group Policy)
Moreover, Windows provides some tools for policy control and automation. First, you have Group Policy. It pushes proxy settings across users or machines in managed environments. PowerShell can automate proxy checks and registry edits. And Netsh WinHTTP is used to configure, reset, or import proxy settings for Windows system services.
Here’s a quick comparison of their offerings.
|
Feature |
WinINet | WinHTTP |
|---|---|---|
| API Type | High-level HTTP/FTP library | Low-level HTTP library |
| Primay Use Case |
Desktop applications and legacy apps |
Services, background tasks, and automation |
| Reads Window/IE Proxy Settings | Yes (automatic) | No (manual config only) |
| Configuration Method | Control Panel > Internet Options or Registry | Command-line (netsh) or code |
| Supports WPAD (Auto-Discovery) | Yes (automatic) | Requires manual implementation |
| Supports PAC Files | Yes (automatic) | Requires manual implementation |
| User Session Dependency | Requires a logged-in user | Works without a user session |
| Per-Protocol Proxy Settings | HTTP, HTTPS, FTP separate |
HTTP, HTTPS separate |
| Proxy Bypass List | Yes | Yes |
| NTLM/Kerberos Auth | Yes (automatic via Windows) | Yes (manual code required) |
| Performance | Good | Better (lightweight) |
| Memory Footprint | Larger | Smaller |
| Learning Curve | Easy | Moderate |
| Flexibility | Moderate | High (full programmatic control) |
How to Configure a Proxy via Windows Settings?
You can set a proxy in Windows 11 and Windows 10 via Settings. But first, you need to generate proxies.
The process to generate proxies can vary depending on your provider. However, it is very easy to generate proxies with Byteful. Also, you can find all types of proxies at Byteful, including residential, datacenter, and ISP proxies with support for HTTP and SOCKS5.
That said, this is how you can generate and configure a proxy via Windows Settings:
- Go to your proxy provider’s dashboard and generate proxies. At Byteful, all you need to do is choose the proxy type, select the protocol and format, adjust advanced targeting settings, and select quality to generate proxies.
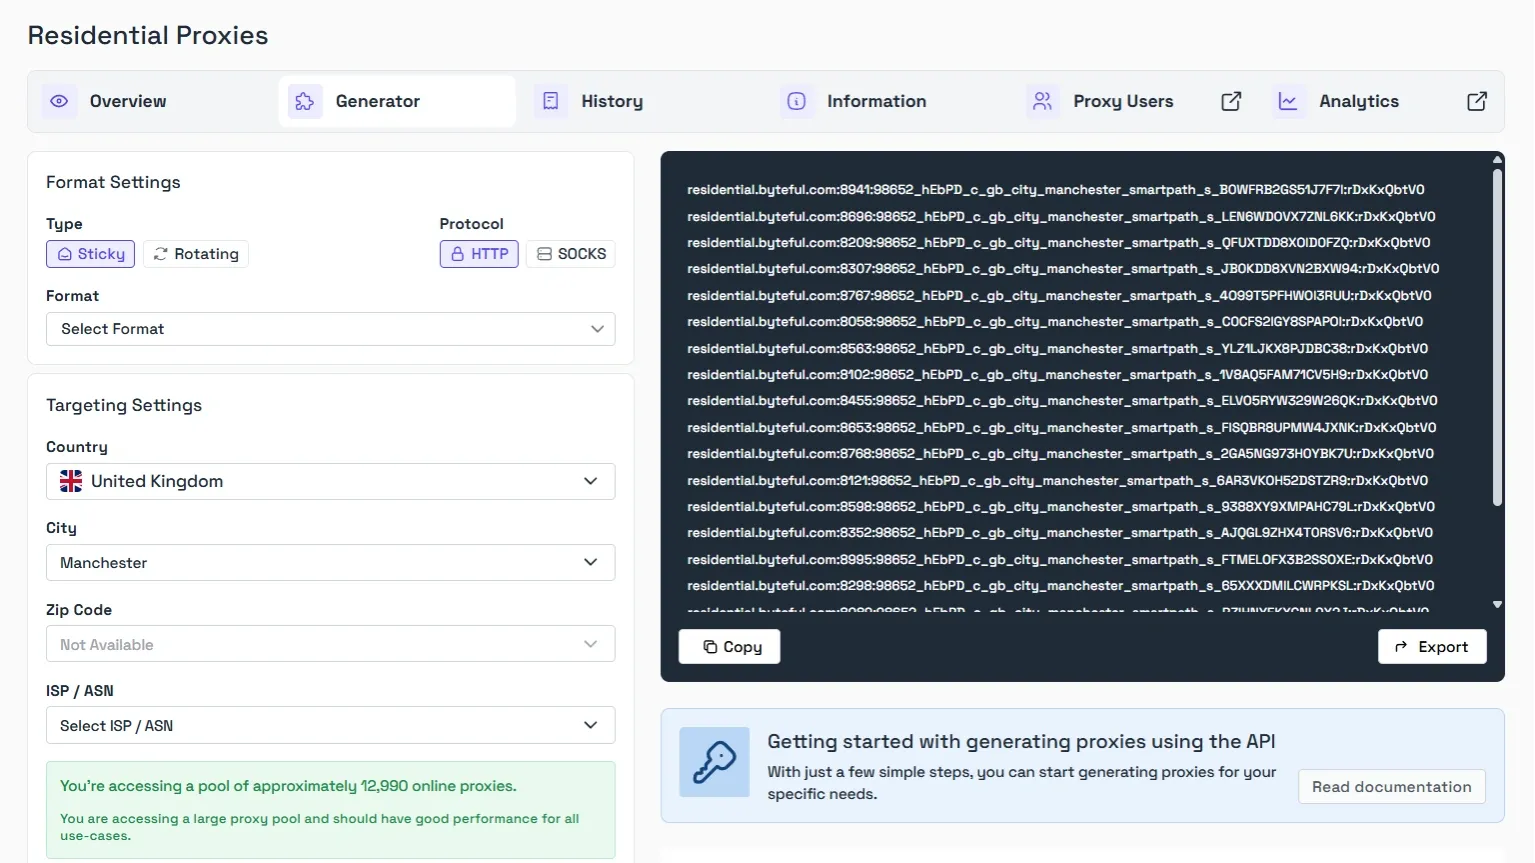
Pro Tip: If you don’t have proxies, you can get started with Byteful’s 1GB free residential proxies.
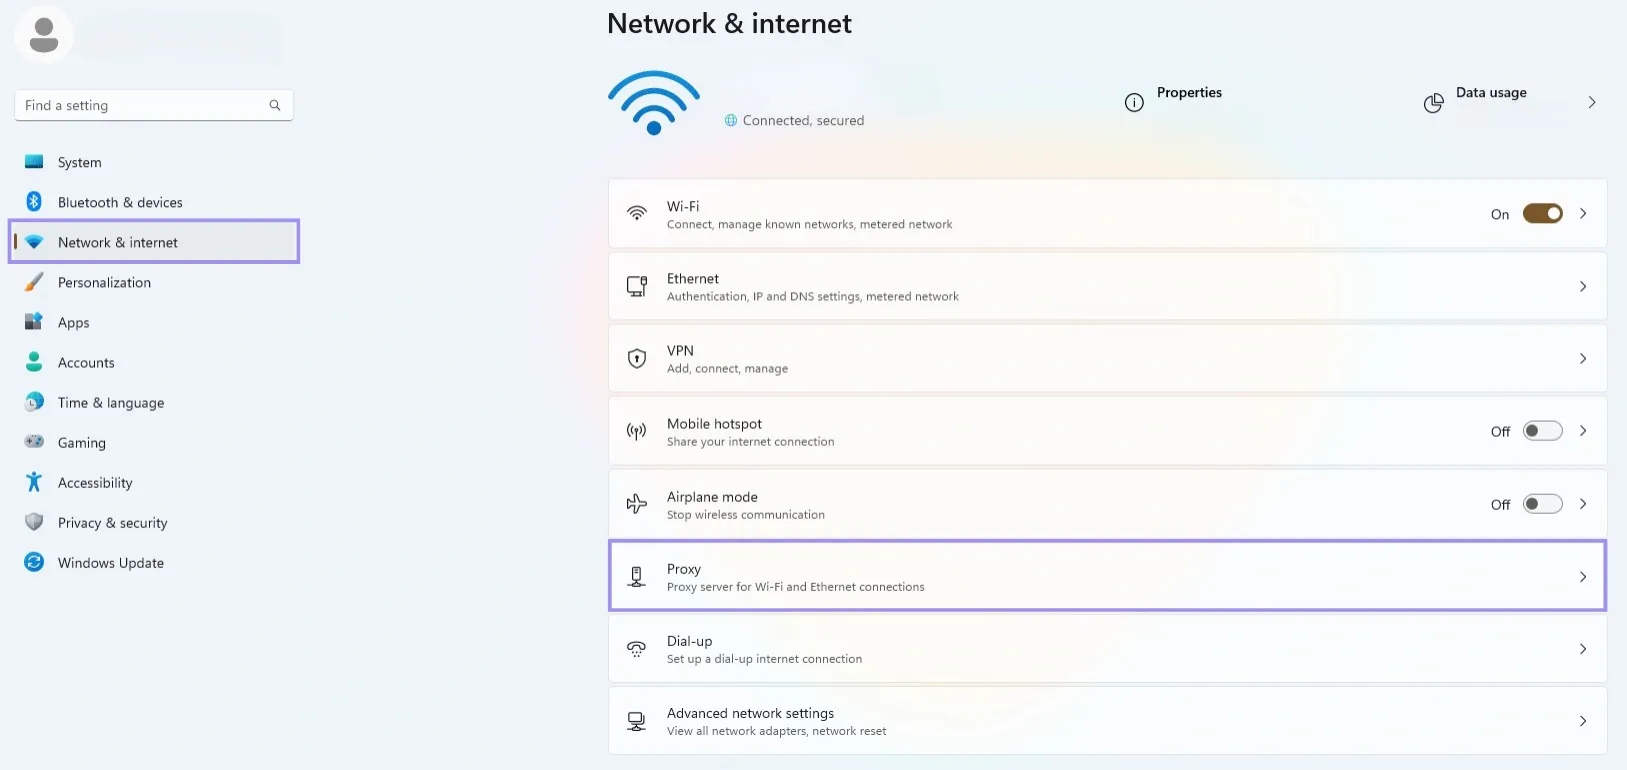
2. Now, open Settings on your Windows device and select Network & Internet from the left panel. Click Proxy from the menu under Airplane Mode.
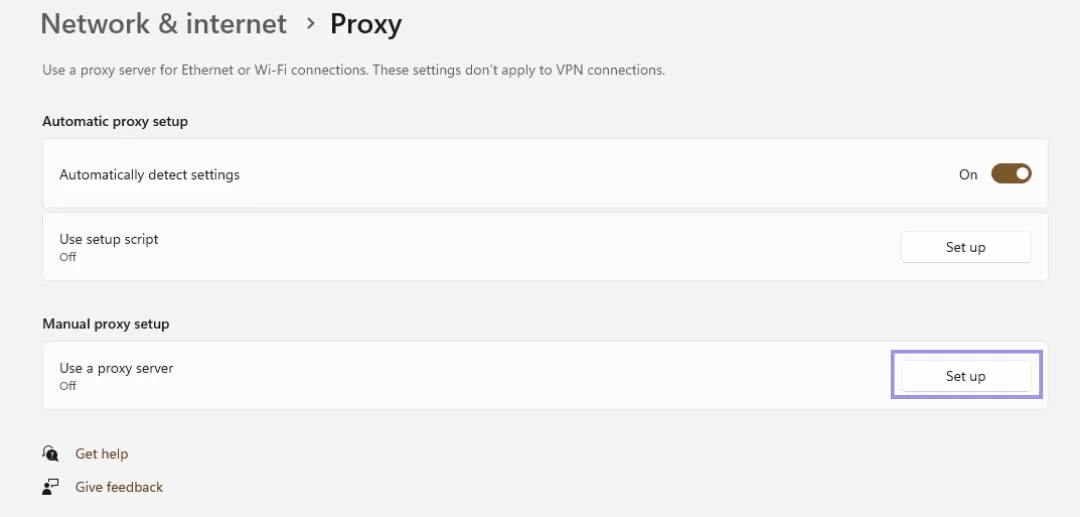
3. Next, click Set up under the Manual proxy setup tab.
4. Turn on the Use a proxy server option. Then enter proxy details, such as the IP address and port. Click Save when you are done.
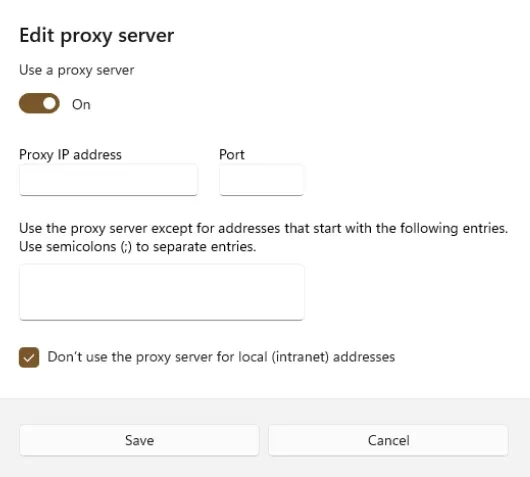
Note: Check Don’t use the proxy server for local (intranet) addresses if you want local traffic to skip the proxy.
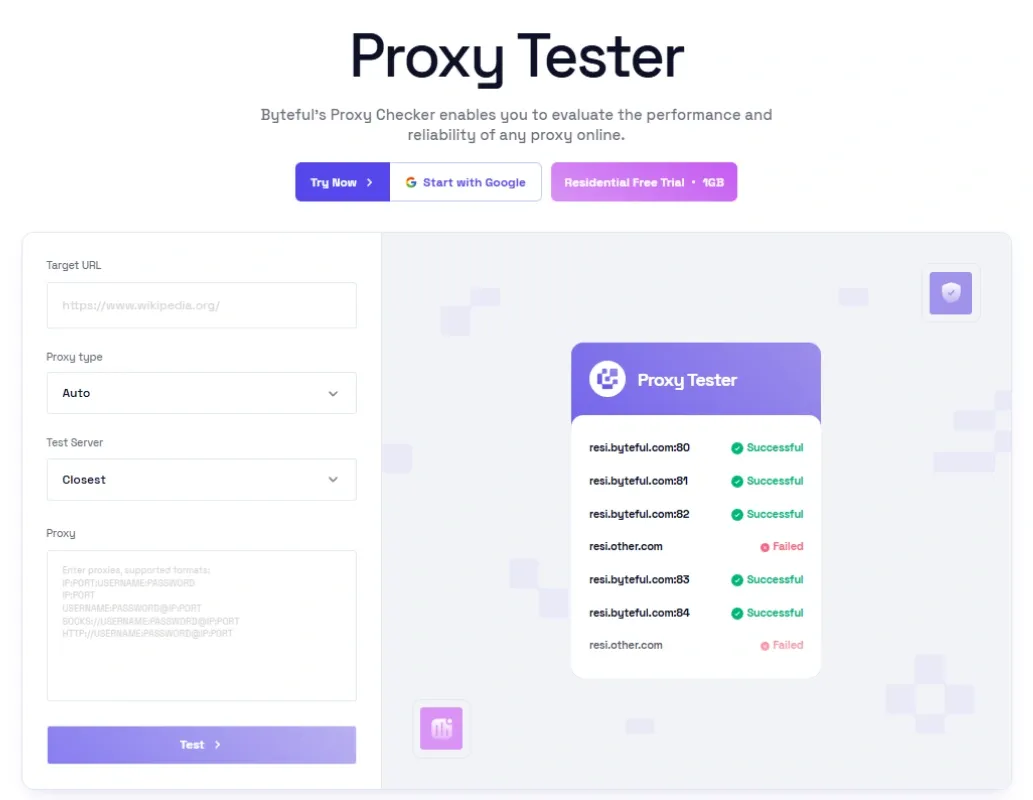
You can also check the proxy’s validity now. This can help you detect any connectivity issues early on. For instance, you can use Byteful’s Proxy Tester to test the reliability and performance of your proxies.
How to Set a System Proxy via Command Line?
Windows Settings work for most desktop browsing. But you need a command-line configuration when a service, script, installer, or system component uses WinHTTP instead of the normal user proxy settings.
Here is how you can set up a system proxy via the command line:
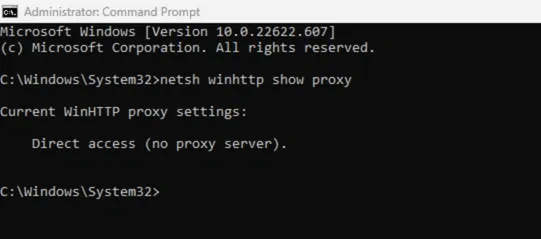
1. Search for cmd, right-click Command Prompt, and choose Run as administrator.

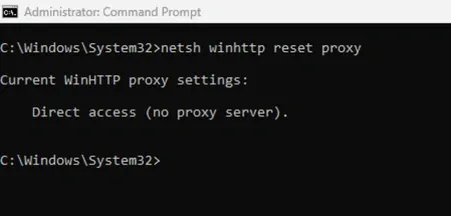
2. Now, run netsh winhttp show proxy on the command line. This shows if WinHTTP is using direct access or an assigned proxy.
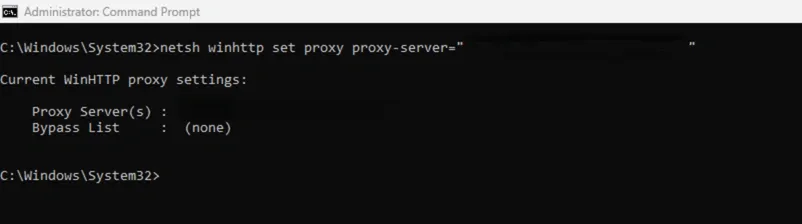
3. To set the proxy server, run netsh winhttp set proxy proxy-server="IP_ADDRESS:PORT.” But replace IP_ADDRESS:PORT with your proxy host and port.
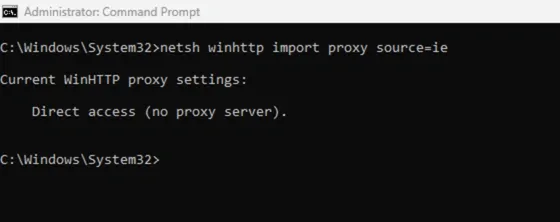
4. You can also import your user proxy settings if they are already configured in Windows. Run this command: netsh winhttp import proxy source=ie. This imports from the Windows user proxy store used by system internet settings. If you have no configured proxies, you see "Direct access (no proxy)."
5. Lastly, reset the proxy when you no longer need it. Run: netsh winhttp reset proxy.
It is important to note that netsh winhttp does not set proxy usernames and passwords directly in the command. Thus, apps must either support NTLM authentication or you must use third-party clients for authenticated proxies.
Also, you should check whether the app uses its own proxy settings instead of WinHTTP if this setup fails.
How to Configure User-Level Proxies via Control Panel?
You need a Control Panel proxy setup when an app reads the current user’s Internet Options instead of the newer Windows Proxy page. This is usually common with older desktop programs and with browsers that rely on system proxy settings, such as Chrome and Edge.
Also, it is the better path when you want a proxy for your user account without changing WinHTTP settings used by some system services.
Here is how to configure proxies via Control Panel:
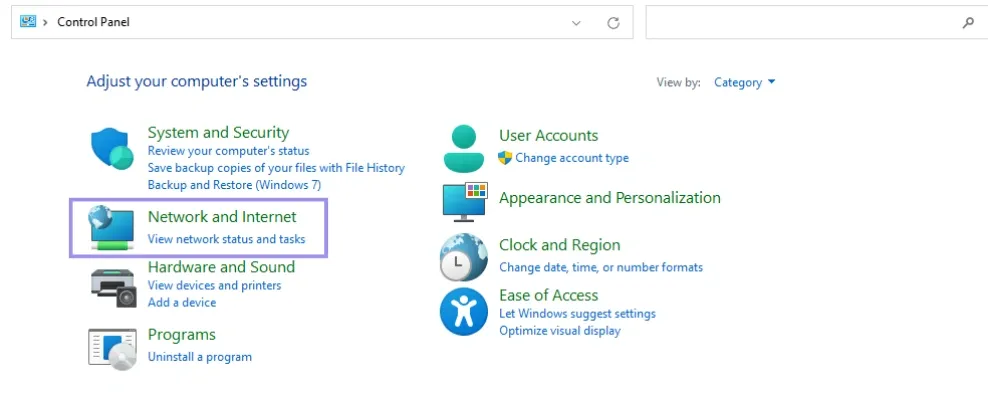
1. Open the Control Panel and select Network and Internet from the menu.
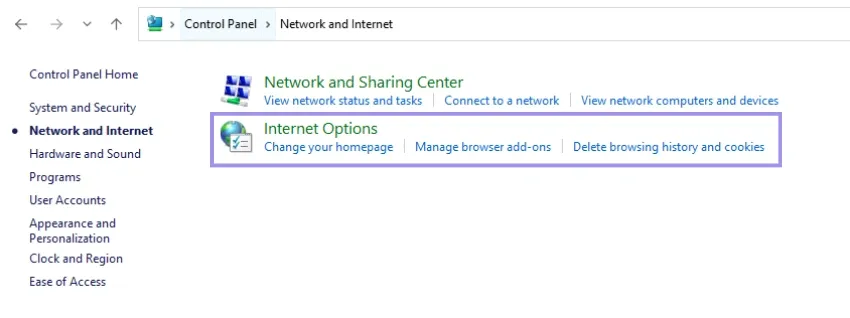
2. Next, select Internet Options from Control Panel.
3. Head to the Connections tab and click LAN settings.
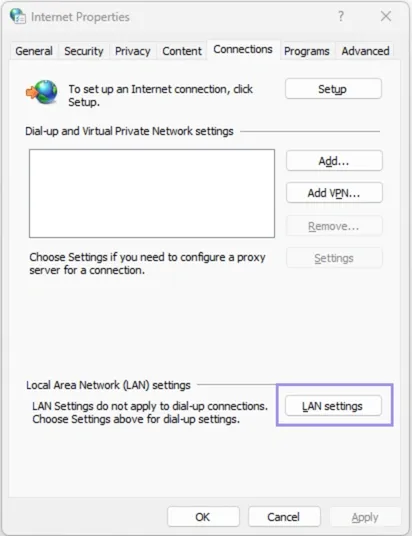
4. Then, check Use a proxy server for your LAN. This turns on manual entry for your account. Enter the proxy Address and Port given by your provider.
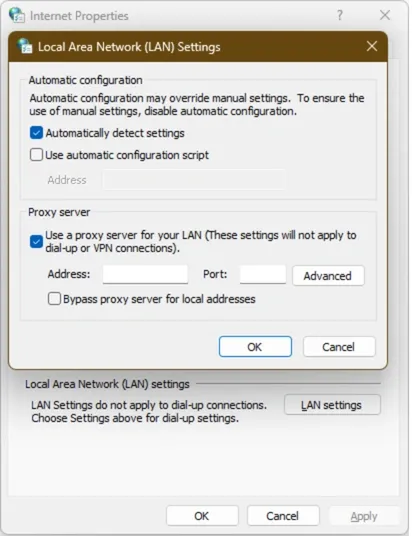
Note: You can check the Bypass proxy server for local addresses if you want local network traffic to stay direct. You can also head to Advanced settings. Here, you can separate proxies for HTTP, Secure, FTP, and Socks, and add exceptions that should skip the proxy.
5. Click OK to close the LAN settings window. Then, click Apply to save the proxy settings.
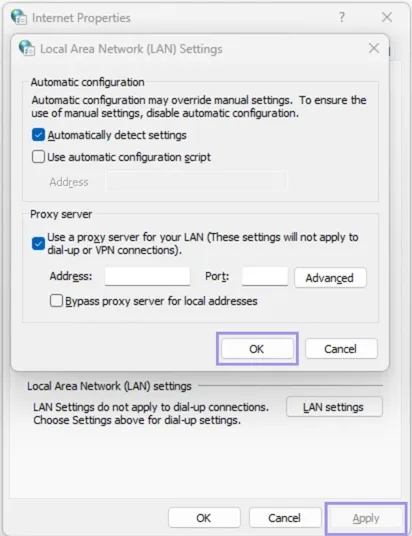
Control Panel proxy settings don’t give you fields for proxy username or password. So, Windows or an app may prompt you for authentication if the proxy requires it.
How to Deploy Proxy Settings via Group Policy?
Group Policy settings allow you to push one proxy configuration from Active Directory and keep settings consistent. This can be really useful if you manage shared workstations or locked-down server environments.
Follow the steps below to configure proxy settings on Windows servers using GPO:
1. Open Group Policy Management on your device.
2. Then, right-click and create a new GPO. Link it to the OU that contains the target users or devices.
3. Next, go to User Configuration > Preferences > Control Panel Settings > Internet Settings.
4. Now, create a new Internet Explorer preference item. Internet Explorer is deprecated in later versions. But this still controls the Windows proxy settings for modern system-wide use cases.
5. Open Connections > LAN Settings. Then enable Use a proxy server for your LAN.
6. In the proxy info fields, enter the proxy server address and port. You can also add any bypass list entries for local or internal addresses.
7. Lastly, save the policy and run gpupdate /force on a test machine.
Once done, you can verify the proxy settings. They appear in Settings > Network & Internet > Proxy.
How to Fix SOCKS5 Connectivity Issues in Windows?
SOCKS5 problems on Windows usually come from one of these three places:
- The app does not support SOCKS5
- Windows proxy settings are pointed at the wrong field
- DNS traffic is still going out locally
That is why a proxy can work in cURL or Firefox but fail in Edge because SOCKS5 proxies don’t work the same way as HTTP or HTTPS proxies in Windows. You need to use a setup that your application actually supports.
Also, many apps might only accept HTTP or HTTPS proxy settings. They will not work with SOCKS5 unless you use a separate client, unlike Ubuntu's native SOCKS5 support.
The following are the two methods you can use to fix the Windows SOCKS5 proxy connectivity problem:
Use Browser-Specific Proxy Profiles
You can use a browser profile extension instead of Windows proxy settings. This can be very useful if your issue only affects browser traffic. A proxy profile is a saved browser rule that sends only selected traffic through your SOCKS5 server.
You can configure FoxyProxy for Chrome and Firefox. Here’s how it works on Chrome
1. Install the FoxyProxy extension in Chrome or Firefox.

2. Click the FoxyProxy extension and select Options.

3. Now, select the Proxies tab from the top and click the Add button to enter a new proxy.

4. Here, you will find different fields for proxy details. Add info for each field to add your proxy to FoxyProxy. Click the Save button after you’ve entered the details.

This method can avoid a common Windows failure: the browser and the operating system do not always handle SOCKS5 the same way. You can generate SOCKS5 proxies from Byteful and easily add them to the FoxyProxy extension in your browser.
Use Third-Party Proxy Clients
Another method is to use a proxy client if your browser works, but desktop apps still fail. A proxy client sits between Windows apps and your proxy server. Then, it forces selected traffic through your proxy, including SOCKS5.
Proxifier is a good option for Windows. It helps you redirect network traffic from almost any application through a proxy. Plus, it works even if the app doesn’t support proxy settings.
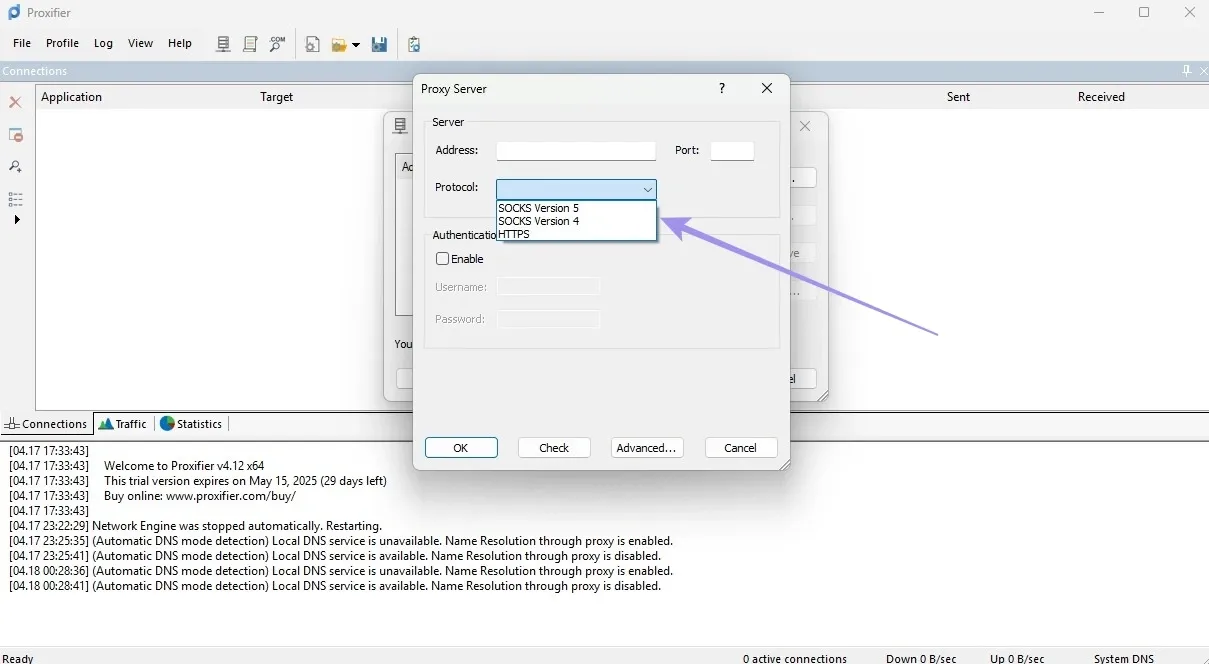
Here’s how to set up proxies with Proxifier:
1. Open Proxifier and click Profile on the menu bar. Then, click Proxy Servers from the list.
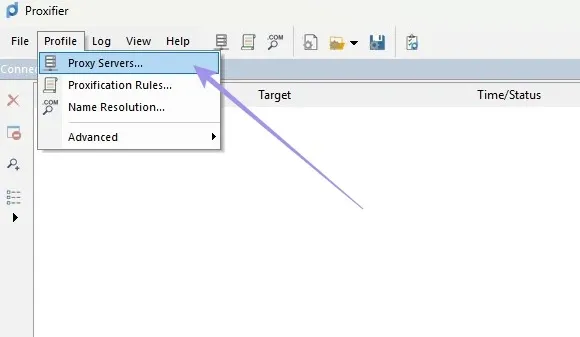
2. This will open the Proxy Servers window. Click the Add button to add a new proxy.
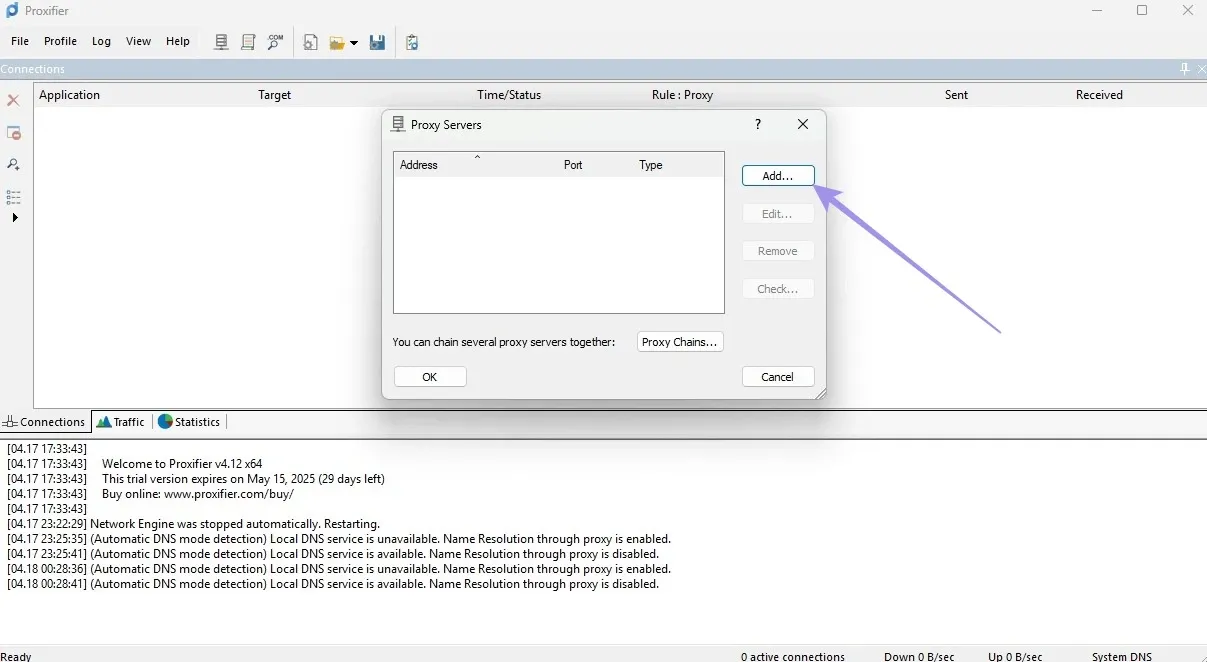
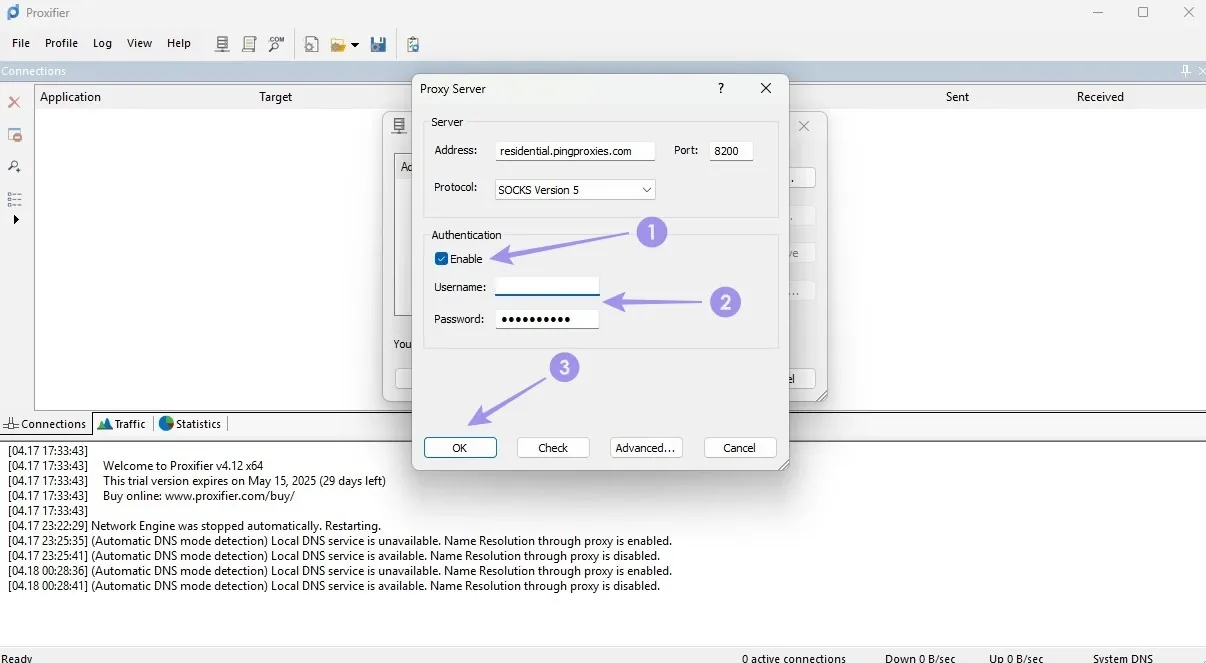
3. Now, enter your proxy details and select the protocol. You should select the same format that you used to generate your proxy.
4. Check the Enable option under Authentication. Enter your username and password. Lastly, click OK to finalize the setup.
Third-party clients like Proxifier can be useful when a browser or app can’t load websites even when your SSH tunnel works. This usually means the tunnel is good, but the app path has problems. Therefore, a client like Proxifier fixes that gap.
How to Verify if Windows Proxy Configuration is Successful?
A proxy setup is not finished when you click save. It is finished when your traffic actually leaves through the proxy. You can use these three checks to confirm that Windows, your browser, and command-line tools all behave the way you expect.
The Browser Test
Start with the simplest check. Open your browser and visit WhatIsMyIP.com. Here, you can see if the IP on that page matches your proxy IP.
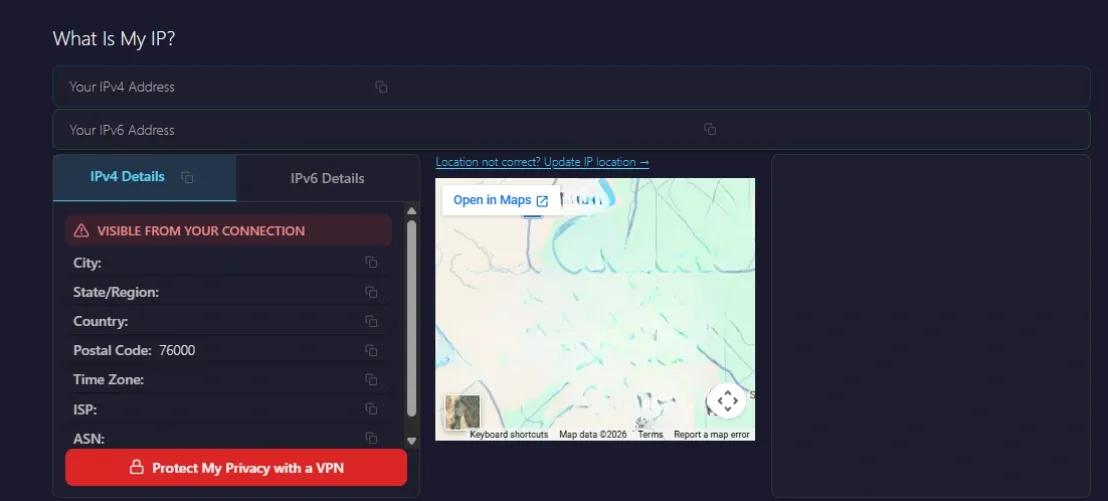
The problem could be with your browser most of the time. Many browsers, like Firefox, can use their own proxy settings instead of Windows. Also, extensions can really affect this test.
A VPN add-on, proxy switcher, or a Data Saver tool can override the operating system and send traffic somewhere else. So, disable these tools, reload the page, and test again.
The Terminal Test
Next, you should test outside the browser on PowerShell or Command Prompt. Then, run this command: curl.exe -L http://ifconfig.me. You can also test a proxy with cURL’s -x option if necessary.

Sometimes, the browser shows the proxy IP, but the terminal still shows your real IP. This usually means the proxy setup is split between two Windows networking layers. Firstly, your browser is using WinINet. At the same time, the terminal tool relies on WinHTTP or its own proxy flags.
So, you should import the Windows proxy settings into WinHTTP with the command line. This is the command: netsh winhttp import proxy source=ie. Then, run the cURL test again.
The Authentication & Error Code Audit
You should watch for a 407 Proxy Authentication Required error. This error code usually means the proxy is reachable. But access to that proxy is unavailable because of incorrect credentials.
If you get a 407 error code and Windows doesn’t require you to log in, your setup will fail. Windows doesn’t reliably handle every authenticated proxy flow on its own. The fix is very simple. You can switch to IP allowlisting at your proxy provider. Alternatively, you can use an independent client such as Proxifier for authentication.
If none of these fixes work, test the same proxy in a browser or app that supports proxies. It will help figure out if there’s any issue with the proxy itself.